 |
|
|
|

Tripod Shoulder Pads for a Safer Technique
For tripods with no center column
|
If
you have read through my "Better
Tripod Shoulder Pad" article, you know about my
solution for a more comfortable way to carry your tripod
and heavy super-telephoto lens across
your shoulder. However, carrying such a heavy
and expensive lens (and camera) slung across the shoulder
like a shovel is an extremely precarious proposition.
It was hardly any safer just because it was more comfortable.
Though it seemed the commonly accepted way of doing things,
I never liked the idea at all.
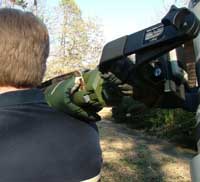
The
original "across the shoulder" pad
|
Then
one day I saw another photographer carrying his tripod (a tripod with no center column)
in a different way. At that time all my tripods had a center column, so I knew his technique would not
work with mine. And even though his camera and lens were
not mounted to the tripod while he carried it, it still
gave me an idea for a better way to carry my big heavy
lens on a tripod. In order to try out my idea I would
first need a tripod with no center column. I had already
been eyeing the heavy duty Gitzo carbon fiber tripods
for some time, hoping to find something sturdier to put
under my 500mm Canon, but they were simply not a luxury
I could afford.
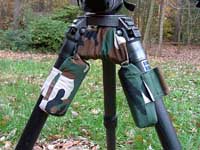
First
new prototype |
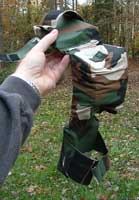 |
Almost
a year passed before I found an affordable second-hand
Gitzo 1548 carbon fiber tripod (no center column). Finally
I could try out my idea. It was an easy matter to make
pads for the tripod legs, shown in the photos at right.
This first prototype is simply a thick pad between two
smaller pads with velcro straps to attach around the legs.
The two leg pads have firmer foam padding,
while the center pad is thicker, but uses softer foam.
This
first prototype was extremely comfortable, except that
the leg pads would not grip the leg tightly enough and
had a propensity for slipping around to the side. In that
position the padding was doing no good at all and required
constant adjustment. Eventually I decided to make different
shaped pads to see how well they would work.
|
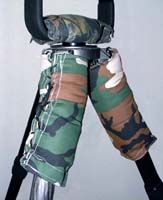
Second
new prototype
|
These
second prototype pads are shown in the left
photo. They look similar to the "leg warmer" type
pads, but these are much thicker. They are actually made
from flat foam, about 8 inches square, which was covered
and then wrapped around the upper leg sections. Because
the foam padding was rather firm, I didn't think velcro
would hold the ends that butt together, so I decided to
lace the ends together to insure a snug fit. They butted
up into the tripod spider so there was no need for the
pad under the spider, which meant they were simpler to
make.
Even
with this new version, I still had the issue of the pads
spinning around on the leg. The carbon figer legs were
simply so slippery nothing would grip them. The pads would
slip around so the laced-up side where there was no padding
would turn against my shoulder. I was back to constantly
adjusting them to turn the padding the right way.
 |
 |
| Leg
pads with web strap attachments
|
Fitted
spider pad conforms to shape
|
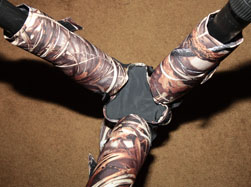
Eventually
I found the time to make a third style, combining the
spider pad with the round "leg warmer" style pads. I used
a bit softer foam in these leg pads so they would wrap
around more easily, though I could not make them grip
the leg any tighter than before. I made the spider pad
in a fitted shape so it would snug up neatly between the
leg hinges. To counteract the tendency of the leg wraps
to spin around, I attached them to the spider pad with
strips of nylon webbing as seen in the two photos at right.
This
time I made pads for all three legs, so it doesn't matter
which way the tripod is turned. With the web straps attached,
if any pad tries to spin around, it can go only so far
before the spider pad stops the rotation. This keeps them
from spinning around too far, keeping the padding against
my shoulder. I no longer have to make adjustments. Finally,
these pads do exactly what I want them to do. It took
three tries, but I now have a design that works as I originally
envisioned.
I
have provided no step-by-step instructions here on how
to make the pads, as they are quite simple enough that
no instructions should be needed. Anything similar will
work as well. The whole point of this project is not so
much about the pads though. The important point to keep
in mind is what the pads allow me to do....carry the tripod
vertically. This vertical method is safer by far than
the nerve-racking way I see so many photographers carrying
their lenses......with the tripod slung over the shoulder
like a shovel. That's not so much of an issue with smaller
lenses, but when you get into the much heavier f/4 and
f/2.8 primes, safety becomes a real issue.
Take
a look at the enlargement of the lower
left photo. The improved safety of carrying the
tripod vertically with lens and camera attached should
be quite obvious. No more fear that a loose clamp or weak
screw will give way and leave my lens and camera smashed
on the ground, or maybe worse, in water. I quickly realized
there were also several other important advantages. As
it turned out, the thick pad between the leg hinges barely
touches my shoulder. There is absolutely no weight on
my collar bone, completely eliminating that painful nuisance.
All the weight is divided between the chest and back pads,
effectively making the weight nearly disappear. The comfort
factor, just like the safety factor, jumped by a thousand
percent. The sensation of weight is also minimized by
the center of gravity being directly above my body, and
not way out behind me putting strain on my back muscles.
The
right
photo shows how easily I can control and manage
the whole thing with just one hand. Of course, I can use
two hands if I wish. Either way is quite comfortable and
natural as there is no strain on either arm. Gripping
the tripod legs falls into a natural position for my arms.
Those
advantages alone should be reason enough to switch to this method, but
it gets better. I soon realized that with the lens
pointed forward and riding just above eye level next to
my head, as seen at the right, I can easily see the lens
in the corner of my vision. This makes it easy to watch
the lens when I come to branches or other obstructions.
When carried the old way, I could never see which way
the lens had turned, and it was impossible to judge how
to handle it when maneuvering around limbs and high brush.
This technique of carrying it vertically greatly reduces
the risk of banging my expensive glass against something
hard.
| To
sum it all up, here are the pros and cons: |
| Advantages |
|
Safety - Significant reduction in the
chance lens & camera (or head) can loosen
& fall from tripod or mounting clamp
|
|
Safety - Lens position easily visible
- avoids bumps and damage
|
|
Greatly improved balance - less stress
on back & shoulder
|
|
Ease of control, one-handed or two-handed
|
|
Significantly improved comfort - less
sensation of weight
|
|
Improved mobility - quick setup with legs
already extended and spread, easy & quick
to pick up and move
|
 |
| Disadvantage |
|
Requires using a tripod with no center
column, or at minimum a very short
center column
|
|
Another
plus with this carrying technique is the ease of setting
up and getting into shooting position. In these photos
I happen to have only one leg section extended, but as
you can tell, even if I extended the legs fully, they
still would not hit the ground. Using this method with
the legs fully extended, I only have to bend a little
at the knees to set the tripod down. Because the legs
are already set and spread, getting into shooting position
is much faster, easier and safer than when the tripod
lays across my shoulder with the legs closed. Inversely,
when it's time to move on, I only need to bend at the
knees and put my shoulder between the pads, then straighten
up. Basically I just "step under it" and raise up, and
I'm on my way.
Looking
at the photo below of my camouflage suit with camouflaged lens
and tripod, you might expect all that camouflage would
get in my way when carrying the tripod on my shoulder.
Actually, it did used to be something of a hassle when
I carried the tripod horizontally, but not any more. The
tripod skirt is open on the third side so that I can sit
on my comfy "walkstool" with my legs and feet under the
tripod. That makes it easy to just lift the rig onto my
shoulder, spin the lens forward and I'm on my way. It
is so much simpler now. In fact, carrying the
tripod and lens vertically is just as easy with or without
all that camo covering, and far easier than the old way.
I no longer have to close and open the legs or fiddle
with the tripod skirt.
The
only disadvantage I can find with this method is the same
problem I had in the beginning..... it requires a tripod
with no center column. I suppose you could use
this technique on a tripod with a very short center column
(perhaps 12 inches or less). Even then it would require
the column be run all the way up, with no more than an
inch or two below the spider. However, that puts the lens
higher in the air, which becomes more of an issue to balance
and control, especially with a heavy super-telephoto lens.
You would also have to look up higher to watch the lens
around limbs, etc., thus taking your eyes off the ground
instead of watching where you're stepping. Lowering the
center column every time you stopped to shoot, and then
raise it when you're ready to head out again wouldn't
be very convenient. With lenses of 400mm or less, this
technique might work fairly well with a very short center
column because of the reduced weight. In any event, using
a long center column with this carrying method simply
would not work. |
| |
|
|
 |
|
 |
