 |
|
|
|

Super-telephoto
Lens Case for Backpacking
|
The hard case that came with my Canon
500mm lens is fine for storage or hauling around in the trunk
or back seat, but hardly the sort of thing you can drag around
in the boonies without some sort of cart to carry it in. Although
I modified a fishing cart for that very purpose (and it works
most excellently), there are still places and situations where
even the cart is impractical. Sometimes, backpacking equipment
is the only solution. At first I purchased a camouflage backpack,
into which I placed several pieces of thick foam for padding,
and slid the 500mm lens down inside. This was a good temporary
solution until I had the time to make proper padding for it.
Finally I've finished a sturdy protective canister to hold the
lens inside the backpack.
I started
with some 1/2 inch thick corrugated cardboard from a large cardboard
crate, the kind upright freezers and refrigerators are shipped
in. I got mine by asking at the hardware/appliance store. They
told me when they would have some new models uncrated, so I
came back and picked up one of the large boxes and hauled it
home in the pickup truck.
First A Protective Shell:
I started
by making a cardboard canister as a protective shell. The dimensions
will be different for different lens, but for my 500mm I measured
the diameter of the leather hood and added 3/4 inch all around
for padding space (hood cover diameter plus 1.5 inches). This
is the inside diameter for the canister. Next
I used a protractor to draw a circle of this diameter on a piece
of the cardboard, and then cut this disc out with a sharp knife.
This became the inside bottom of the canister. Then I cut a
second disc of cardboard, this one being one inch larger diameter
to allow for the 1/2 inch cardboard thickness of the cylinder.
It would become the outer bottom piece. Using two discs for
the base would give me more gluing surface and make the canister
much stronger. Both discs are shown in the "Cardboard
canister cutaway diagram" at right.
The canister's inside diameter
multiplied by Pi (3.14) gives the circumferance
of the canister - in my case approx. 26 inches. I cut
a rectangular section of cardboard 12 inches tall (the height
I wanted) and 28 inches long (a couple of inches longer than
the necessary circumferance, to give some trim for fitting and
overlapping the joint). This will make the "tube"
part. Next I cut notches in this piece to allow for bending
the thick cardboard into a tube. Otherwise, it is so thick and
stiff it simply cannot be bent. DO NOT cut all the way through
the cardboard, only about 1/2 way or 2/3 way through. The diagram
at left shows the measurements for the notches and an
example of how this will fold into a curve. The photo below
the diagram clearly shows the slight angles created as you fold
the notched cardboard into a cyllinder.
Pay close
attention to the "outer skin" noted in the diagram. On one
end of the notched piece, cut back the corrugation for about
one inch, but be careful not to cut through the outer skin of
cardboard that encases the corrugated part. Leave this outer
skin so that when you join the two ends you have this extra
surface area of overlap for gluing. This will make the joint
much stronger.
Now, one
notch at a time, bend the cardboard at each notch and curve
the piece into a tube. Then wrap it around the inner sized (smaller)
disc to test fit. It should come out a little too long to close
in all the way on the disc. Now, on the end that is NOT notched
out for the outer skin overlap, trim back the end of the "tube"
a little at a time to make it come closer to fitting snuggly
around the disc, while still giving a good solid butt to the
overlapped end. Once this is fitted, it is time to glue.
Be prepared.
You will need to clamp this thing when you glue it. Have some
wood clamps, tape, rope or whatever you can find ready to go
so you can tie or clamp this thing together when you glue it.
You get one chance at this. Be ready to clamp it tight until
the glue sets up. You might even enlist an extra pair of hands
to help you.
Use WOOD
GLUE for this job. Do NOT use white school glue,
as it will not hold. Any good wood glue will hold this cardboard
as well as it does wood, and make for strong joints. Run a bead
of glue inside the length of each notch. Also put glue along
the inside bottom edge where the disc will go. Put glue on the
two butt ends of the cylinder and the overlapping cardboard
flap. Also put glue on the outside edge of the disc. Now wrap
the cylinder around the disc, being sure the disc is flush with
the bottom of the cylinder. Butt the cylinder ends together
and clamp/tie/tape everything firmly in place. Let the glue
set up overnight. When dry, you will have an incredibly strong,
sturdy and lightweight canister as the basis for your lens case.
Once the
glue has dried, unclamp everything. Now you can glue on the
second (larger) disc to the bottom. This provides another strong
glue joint around the bottom of the cylinder sides to insure
it stays a cylinder. It also helps protect the bottom from puncture.
The image at right shows the finished
cylinder while the bottom outer disc is being glued.
I used a case of soft drinks as a weight to hold the cylinder
base tight against the bottom disc while the glue dried.
Now that the
cylinder is finished, the rest of the steps all involve sewing.
I will not even attempt to go into details for sewing. All my
plans were in my head, and everything was a cut and fit, work-it-as-you-go
process. I will only outline the general steps involved, using
photos to help explain the generalities of it.
 |
Covering
The Shell:
Inner
Liner:
I
will begin by stating up front that I've made no attempt
to make this thing a work of art, or to match thread colors,
or do fancy stitching. This is meant only as a functional
item (call it a prototype if you will). So long as it
gets the job done, I'm happy. Furthermore, the following
steps are presented in a logical and workable order, but
not necessarily in the exact order I did them, since I
was feeling my way through this project a little at a
time, and often had to work ahead on one part to figure
out how to accomplish the step I was presently working
on.
Now
down to work. I cut a circular piece of material for the
bottom of the inner liner. On it I put two strips of dense
gray foam about 1.5 inches thick as padding for the lens
to stand on. I covered the foam with pieces of cloth,
sewing them to the circular piece (orange looking cloth
across the bottom of the cylinder - photo
at right).
I
cut a rectangular piece of cloth for the sides of the
inner liner and laid it out flat. On top of it I placed
dense gray foam approx. 1/2 inch thickness to cover most
of the cloth. Over that I put a rectangular piece of nylon
material and sewed the nylon over the foam padding, in
essence making pockets for the padding on the cylinder
sleeve.
Next
I sewed the flat padded inner liner ends together to make
a cylinder, and sewed the round bottom piece with padding
onto the cylinder I just made. Now I have an inner liner
to slide down into the cardboard canister. The last step
for the inner liner is to attach it to the canister so
it will not pull out. To do this, I poked small holes
through the bottom of the liner and the bottom cardboard
of the canister with a finishing nail. Then I slipped
fine wires shaped in a "U" through these sets of holes
from the inside, and twisted the wire together outside
on the bottom, much like the annoying way toys are often
"wired" into their retail packaging with twisted wire
loops. I bent the twisted ends over and flattened them,
and covered them with pieces of tape (I used duct tape).
This will later be covered with a piece of foam.
Outer Liner:
I
essentially repeated the above process for the outer liner,
but without any padding. This is just a simple cloth cylinder
that fits snuggly over the outside of the canister (light
gray-green material in this
photo).
Outer padding and covering:
To
make the outer covering I first cut an oversized piece
of camouflage material that would wrap around the canister
with room to spare (it doesn't need to be camouflaged
- it's just what I had available). The piece extended
about four inches above the top of the canister. It also
hung a good 7-8 inches below the bottom edge so the excess
would lap over and fold across the canister base to fully
cover it and the piece of foam for the bottom that I just
mentioned above. It was also large enough in circumferance
to cover the foam pads that will be on the outside of
the canister.
With
the outer liner slipped on the canister, I next stood
three pieces of foam against the canister (each about
6x8x1.5 inches thick), evenly spaced around three sides.
The back side of the canister would not need added padding
since it would be against my back in the backpack, and
there was already some padding there. I wrapped the material
loosely around the canister so that it covered the foam
padding pieces. Then I pinned the outer material to the
outer liner between the foam pieces, and pinned the ends
of the covering material together and to the outer liner
to form a snug outer cloth cylinder.
Next
I pulled the three foam pieces out, then slipped the pinned
assembly off the canister and sewed the outer material
to the liner where it was pinned. This attached the cover
in place to the outer liner and formed three vertical
pockets for the padding.
The
cover and liner were slipped back onto the canister. I
hand stitched the top edge of the inner liner and outer
liner (NOT the camo material) together at the top edge
of the canister. This sealed the cardboard canister inside
the liners. Next I trimmed and shaped the top of the outer
camouflage material to form three tabs where straps would
later be attached. I folded over these edges and pinned
them, then neatly hemmed them. Finally, I stitched the
top edge of the outer camo material (only the sections
between the tabs) onto the canister's top edge where I
had just stitched the inner and outer liners together.
This tied the outer covering to the canister. Next I turned
the canister upside down and stuffed the three pieces
of foam into the pockets formed in the outer covering.
With the canister still upside down I placed the round
piece of 3/4 - 1 inch foam padding on the bottom. Then
I folded the bottom of the outer material over the foam,
forming pleats and folds, and trimming where necessary
to cover the bottom. I pinned this together and hand stitched
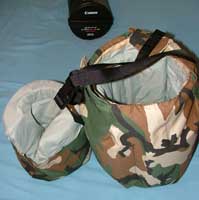
it. That finished off the canister. The completed canister
and the telephoto lens it will hold is shown in the photo
at left. On the right is the canister with the
500mm lens snuggly resting inside, shown from two angles.
Padded Canister Lid:
This
was probably the more tedious part - trying to figure
out how to go about making the padded lid. I started out
by setting the lens in place inside the finished canister.
Next I cut a thin cardboard template that would fit around
the lens barrel and tripod foot, and slide down a couple
of inches inside the canister. This gave the shape I needed
for the padding that would fill the void between the canister
and lens barrel. The template came out looking something
like a fat horseshoe. With this template I then cut four
pieces of 3/4 - 1 inch thick foam to stack around the
lens barrel to achieve enough height to come above the
tripod foot (see
photo one). Now that I was above the tripod foot,
I cut one donut shaped piece to fit over that (see
photo two), and finally one round piece of foam
above that for the cap, which required only a "scoop"
of foam cut out of the center on one side to finish up
over the lens back cap (see
photo three). The three photos below show this
progression of stacking foam padding to shape the lid.
I
took the stack of foam padding out, then draped a piece
of the nylon material over and around the lens. I let
it drape over and outside the canister edge to form a
"bowl" inside the canister around the lens.
I then stuffed the shaped pieces of foam down inside the
"bowl" and stacked them up again. A bit of pinning and
stitching finally formed the inner lining for the lid.
Again, the nylon material was used for this because it
slides easily over the lens. Next I cut a piece of camo
material for the outer cover and wrapped it around and
over the foam. I pinned it in place to the nylon liner
around the bottom next to the canister top edge, and then
trimmed off the excess. I took the lid off the canister
and hand stitched the outer material to the inner lid
liner. Then I folded and pleated the camo material over
top of the lid foam and stitched it up to finish off the
top of the lid. Now the lid was fully covered and the
foam layers were held in place.
 |
 |
Last
of all I sewed on straps made from black nylon webbing
and put a snap buckle on it. This goes over the lid and
insures the lens will not accidently slide out of the
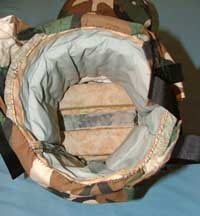
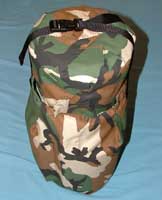
canister. These photos at right show the finished
canister with the lid off, and with
the lid strapped into place.
Inserting Into Backpack:
Now
all that was left to do was stuff the finished canister
into the backpack, which is an open top drawstring style.
This canister also works fine in my zipper-style backpack.
Here
are three more photos of the canister with the backpack:
(1) partially
inserted into the backpack, (2) with it fully
inserted and drawstring open, and (3) inserted
with drawstring closed.
All
that's left to do is fold over the backpack lid, snap
the lid straps, and I'm ready to safely pack this lens
off to those remote spots where the birds are.
WIth
this "canister" I can either use the whole backpack, or
just the canister without the backpack, and seatbelt it
into the front passenger seat of my truck. It provides
a safe and handy way to carry the lens where I can reach
it quickly. The hard case that came with the lens was
far too large and cumbersome to use this way, and I was
afraid it would bang up the interior of my nice new truck.
This cloth-covered, padded canister case is much more
friendly.
|
| |
|
|
 |
|
 |
