 |
|
|

Gura
Gear Bataflae 32L Backpack
A Review
|
My
first camera backpack was a Lowepro Vertex 300, which turned
out to be too heavy and not quite large enough. I did not want
to make that mistake twice. So, after much pulling of hair,
gnashing of teeth, and furrowing of brow (i.e. researching the
web, reviews and forums) - not to mention pondering of finances,
I finally pulled the trigger on another large camera backpack.
I looked at the F/stops, Think Tanks, Lowepros, Tamracs, Tenbas,
Katas and anything else anyone suggested on photography forums,
but in the end the Gura Gear Bataflae won out. It was not an
easy decision, considering the hefty pricetag it carried. (No
one does as much do-it-yourself as I do if they have piles of
excess cash lying around.)
Immediate First Impressions (good and bad):
• The box it arrived in
looked much smaller than I had envisioned. That really worried
me. Could a backpack that fits in that box possibly hold all
my gear?
• The zippers on the main
compartment seemed overly hard to zip. This was noted in some
reviews so it wasn't a complete surprise, though initially disappointing.
• Workmanship and materials
looked of good quality.
• The weight (including
all dividers, rain cover and storage bag) checked out at 5 lbs.,
as advertised (4.2 - 5.3 lbs.).
• The simple, clean design
really does look more like luggage than a camera bag. The gray
color I chose certainly adds to this illusion.
• The thin dividers inside
save space (and weight), unlike the overly thick dividers in
most bags, yet they are perfectly sufficient for padding and
keeping gear from rubbing.
Okay, so
much for first impressions. My main concern was "Will my
stuff fit?" After all, that's the whole purpose of the bag
- to hold my stuff! Despite the fact that the Gura Gear web
site shows the Bataflae 32L holding a Canon 500mm f/4 L IS II
mounted to a body, it turns out my version I 500mm would NOT
fit with a pro body. With the 1DMkIV attached, the 500mm simply
would not fit.... well, if you really forced it, it would go,
but it completely distorted the shape of the pack. With that
sort of stress on the zipper, or equipment, or both, something
would have to give. I'm not talking about "with" the 1.4x TC
attached AND the body. I already knew that wasn't going to happen,
based on the Gura Gear web site image. If only there was one
more inch width, one more inch length, one more inch depth to
the bag, all would have been cool. That was my first disappointment.
After several
tries (ripping out all the dividers and starting over) I finally
managed to get everything in that I needed to carry. However.....
there was no way I could have anything assembled and still get
it in - no bodies mounted, and two lenses separated from their
hoods. That was my second disappointment.
I had truly
hoped I could have all three bodies mounted to something, but
there was just no way that would happen. In any event I was
disheartened, and I lost all enthusiasm for this carefully considered
purchase. I will not be able to use it in the manner I had planned.
My quest for the "right" camera backpack is ended, as no such
backpack exists that meets my requirements or handles what I
want it to. It would be a waste of time to continue looking
and hoping. Maybe my expectations were too high. Is
there any wonder why I end up making most of my own equipment
accessories? With the honeymoon over, I settled into
considering the other features that led me to this particular
backpack, which took the sharp edge off my initial disappointment.
So, exactly
what did I manage to cram in there? The photo at right is labeled,
but it does not include the items I have in the outer pockets
on the lid. Here's the full listing:
| Main
compartment |
•
Three bodies- 1DmkIV, 7D, & 5DmkII |
•
Canon 24-105mm L IS without hood |
•
Canon 17-40mm L without hood |
| •
Canon 500mm f/4 L IS & 1.4 TC attached |
•
Canon 300mm f/4 L IS (integrated hood)
with tripod mounting ring & plate |
•
Canon 70-200mm f/4 L IS & hood |
| •
a second 1.4x TC |
•
3 stacked Kenko auto extensions |
•
cable release |
outer
lid
pockets |
•
three LP-E4 battery packs (mkIV) |
•
lens hood for 17-40mm |
•
lens cloths, memory cards, lens brush |
| •
four LP-E6 battery packs (7D, 5D) |
•
lens hood for 24-105mm |
•
GPS and download cable |
| •
Circular polarizer |
•
spare lens/body caps |
•
small flashlight |
 |
| The
32L stuffed to the gills |
In order
the get these lenses and bodies to fit, I had to deform and
bend some of the dividers in ways that would not be possible
with most backpack dividers I've seen and used before. Other
dividers are just too thick and stiff. The Gura Gear dividers
are slimmer, more flexible, and waste much less space, making
it possible to fit more gear. Had these dividers been like others
I've seen, this amount of gear would NOT fit this bag. It totals
36 lbs. (pack - 5 lb., gear - 31 lb.), and that does not include
a tripod strapped on. I admit that seems an excessive load,
but the 500mm lens alone is 1/4 of that weight. Without it,
the load would be quite manageable. The pack has no compression
straps to use as strain relief for the zippers. Of course, those
would add to the exterior clutter, which I prefer to keep to
a minimum.
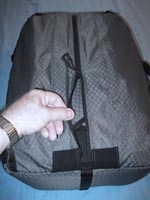
1 - Unzip cover |

2 - Pull out corner of waist belt |

3 - Pull out shoulder harness - cover
now tucks underneath |
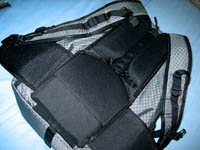
4
- Pull out belt and harness from other side |
| |
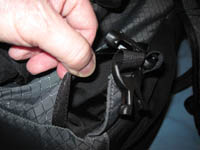
5 - Pull buckle clips from corner
openings on all four corners |
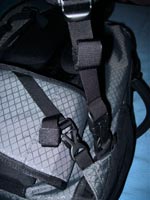
6 - Clip load lifter buckles
and shoulder harness
buckles |
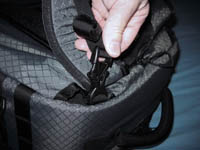
7 - Clip shoulder harness
adjustment buckles at top |
There are
reviews on the web, including video reviews, which explain a
lot about this backpack, so I won't repeat most of that. One
thing those reviews don't explain well is how the harness system
works. It can be stowed away inside a cover, so I thought you
might like to see how this works via the step by step images
above and right.
The unzipped
cover simply opens around the harness, which is attached up
the center, coinciding with the heavy center divider inside
the main compartment. This provides the shape and support for
the whole pack. The two sides of the cover tuck away neatly
behind the harness so it seems to disappear. All the buckle
clips are stowed behind the harness cover as well, slipping
into corner cutouts so they're out of the way when not used.
The shoulder harness buckle has a safety catch, which has to
be pushed along with the usual buckle side releases to unsnap
that particular buckle. It is a neat and ingenious system. The
hip pads are very wide but thin so they stow away with minimal
bulk. This all adds greatly to the illusion that this is really
a piece of luggage, and doesn't scream "Hey, expensive
camera gear inside." I also noted that the waist/hip belt
is removeable (heavy duty velcro).
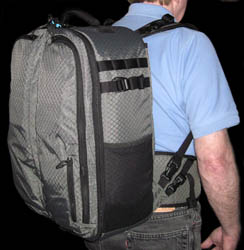
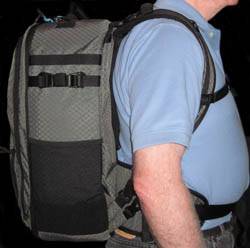
With the
harness now set up I put it on to see how the waist belt feels.
It felt pretty good with the static weight. It actually felt
manageable, all 36 lbs. of it. That is hardly any real test
of comfort on the trail though, which will have to come later.
I looked in the mirror at this thing on my back, and it looks
HUGE. Viewing it that way, it appears it could swallow all my
gear and ask for more.
Conclusions:
My first three concerns have been
addressed:
• 1 - Will it hold my 500mm
lens with body attached? Yes, but not with the pro (gripped)
body I wanted to attach. My 7D will go in attached to the 500mm,
but I'd just have to change it out for the MkIV anyway.
• 2 - Does all my gear fit?
Yes, but not with bodies attached to lenses. All three bodies
with "a" lens will fit, but that leaves little room for anything
else in that configuration. With everything disassembled, including
some lens hoods, all the gear fits. I suppose that is an accomplishment,
but it's still disappointing.
• 3 - What about the stiff
zippers? Once the pack had some gear in it, and thus some weight,
the zippers were easier to pull. They're still a little stiff,
but perhaps that will work out with use. One of the outer pocket
zippers wants to bind at a particular point in a curved corner
every time I use it, but I'm hoping that too will ease up with
use.
 |
| The
32L strapped on |
 |
| Side
view of the 32L |
So, will
I keep it? Yes. At this point I don't see there is anything
better out there at any price. The Bataflae has more of the
features I want than anything else I could find. Nothing else
offers the "butterfly" openings except the smaller Gura Gear
models. I am confident it will serve me as well as, or better
than anything else I might find.
Those great features are:
• a clean, uncluttered design,
• with stowaway harness
that eliminates that annoying clutter when used as a "bag",
• looks far more like luggage
than most packs,
• is lightweight (only 5
lbs.),
• has dividers that are
slim and flexible allowing more gear to fit,
• holds a great deal of
gear, certainly as much as, or more than I can handle (or wish
to),
• and has the "butterfly"
style openings that I believe will prove very useful,
• while allowing a full
open lid for those times when you want to get to everything
at once.
 |
Duffle
bag storage pouch
zipped fully open |
Accessorizing
My Backpack -
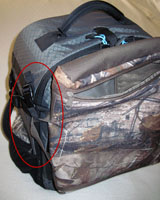 |
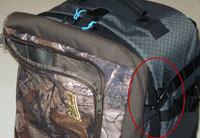
My
buckle-on "pocket" -
left view and right view |
 |
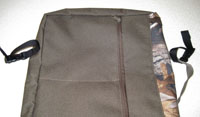 |
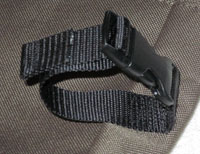
| Short
webbing straps with buckle sewn to pouch |
A utility pocket:
Okay, so
I couldn't ignore the urge to "improve" on my new backpack.
One of the things I would have liked is an "expandable"
outer pocket that could hold lightweight items such as a rain
jacket, boonie hat, gloves, spare socks and other such items
that the accessory pockets on the backpack were not designed
for.
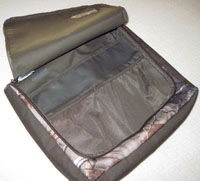
I had a
slim storage pouch such as comes included with many brands of
large canvas duffle bags, in which you can fold up the duffle
and carry it or store it. I didn't need it for the duffle, so
I put it to use as a clip-on "pocket" of sorts. These
pouches
have a zipper that wraps around three sides, giving a wide
opening, but if it's not lying on it's back then the contents
would just fall out. It wouldn't be useful at all attached to
a backpack like that. To solve the problem, I opted to attach
it "sideways", with the right side turned facing up. This way
I can just unzip
along one edge providing a top-only opening .... problem
solved. The actual attachment is provide by two short
straps of 3/4-inch nylon webbing with plastic snap buckles.
I obtained both the webbing and buckles from my local REI, or
you can order it online as well. Total cost - about $3.50.
 |
| A waterproof camo cover project |
The right
photos show the short buckling strap I sewed to the top and
bottom of the pouch. That sounds odd, but remember, it's turned
sideways so one side is up, and the top and bottom are now the
sides. These straps simply buckle
to the webbing on the backpack designed for accessory attachment.
Almost all backpacks have these sort of attachment points or
loops of one style or another. With it attached near the top
of the backpack, all I need to do is flip the pouch up over
the carry handle, and it's out of the way for access to my gear.
It's easily removed and usable by itself.
I also made
a waterproof camo cover for this backpack shown at left, described
in this article.
|
|
 |
|
 |
