 |
|
|

Strap
On Your Hoodman Loupe
Easy-to-make straps with clips
|
 |
| Hoodman
Loupe with pouch |
One
of my Christmas gifts this year was a Hoodman Loupe. The first
thing I noticed when I opened it was the lack of any sort of
attachment straps. Holding it against the LCD screen with one
hand is almost practical enough for reviewing shots, but I knew
that would not work so well while trying to shoot video and
manually focusing with the Hoodman. Both hands would need to
be on the camera in that situation. So my first project after
the holidays was to come up with a practical means to strap
the Hoodman onto the camera when needed.
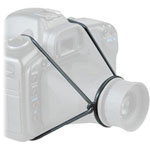 |
| Cinema
strap |
There are
already various products available to accomplish this task.
The closest I found to what I wanted was the Hoodman Cinema
Strap. However, I could immediately see an issue.... at least
for how I wanted to use it. The Cinema Strap was not designed
to go on while you have a camera neckstrap attached to the body.
You would have to remove your camera strap first, and that would
be an issue of time and hassle, even if your neckstrap had clips
or buckles to make the task easier. That was going to be a problem
I would need to find a way around if I made my own straps for
the Hoodman.
Luckily
the solution came to me quite easily. The Hoodman has a strap
with a plastic clip buckle which looked very familiar to me.
It just so happened that I had a couple of neck straps from
some old USB thumb drives that had black plastic clips exactly
the same as the clip on the Hoodman (see
photo). The clips were designed for a 1/4-inch strap, and
I had some 1/4-inch black elastic I had already considered for
the task. These clips would solve the issue of using elastic
straps to mount the Hoodman onto a camera that also had a camera
strap attached.
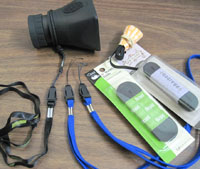 |
| Almost
everything you need |
It makes
absolutely no difference whether your clips are a match for
the Hoodman clip. The fact that I recognized my old clips as
being the same as the Hoodman's clip was simply what sparked
the idea in my head. You can use any sort of small clip similar
to these to accomplish the same thing. The important point is
that using the clips allows you to snap on the elastic straps
without having to remove your camera neckstrap.
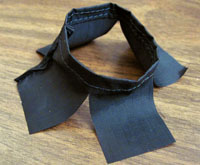 |
| Unfinished
eyepiece ring |
First I
gathered my materials. I already had several packs of black
1/4-inch braided elastic, three of which are shown in the photo
at left as examples. Brand doesn't matter, but use black as
it will be less visible. To make a "ring" to go around the eyepiece
and connect the straps I used a scrap of black ripstop nylon,
cut about 2-1/2 inches by 6-1/2 inches. I rolled up one edge
of the long length into a triple thickness hem and stitched
it. Next I folded it in half the long way and stitched the ends
together to form a cylinder slightly larger than the eyepiece.
Then I cut four slits in the un-hemmed end almost down to the
rolled hem, spacing them equally apart around the cylinder as
shown in the photo
at right. This would become the harness around the eyepiece.
I used ripstop
nylon because it does very little fraying on the cut edges when
cut like this. It's also very strong and dries quickly if it
gets wet. Like the black elastic, I use black ripstop nylon
for many other projects, so I had some scraps on hand, and again,
black fits the color scheme. You can use some other method if
you wish to make a harness for the eyepiece to attach the straps.
I'm just using whatever I have on hand that I think will do
the job.
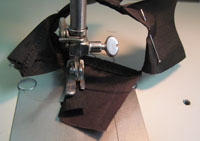 |
 |
| Fold
tab edges & stitch into a "V" as in right image |
Next I folded
over each edge of each squarish "tab" and stitched them to form
a "V", shown in the images at left. This then slips over the
eyepiece and is what the straps will be attached to. Now it
was time to prepare the clips and elastic straps.
 |
| Test
attachment of female clips |
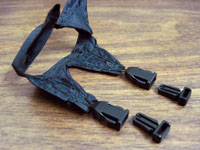
I started
by removing the blue nylon straps from the male ends of the
clips. The string on the female end of one clip was broken,
so I replaced the string with some heavy duty nylon suture that
I knew would be very strong. A note here: using two clips
alike allows you to criss-cross the straps if you find that
it works better for your camera instead of being forced to clip
the right to right and left to left. Next I sewed the female
clip ends with the string to the two upper tabs. My reasoning
was that clipping the straps would be easier on top instead
of underneath the Hoodman. Then I sewed a length of 1/4-inch
elastic to the other two tabs. I looped the elastic ends into
the male clips and pinned the connection temporarily to test
the length.
 |
 |
| Elastic
attachment |
Test
fit to 7D body |
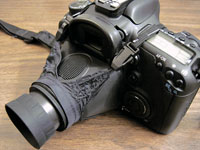
When I slipped
the Hoodman onto my Canon 7D (which shoots most of my video)
it was immediately obvious I would need to move the clips farther
away from the body and closer to the eyepiece. The right clip
was directly in the way of the video button next to the viewfinder.
Except for this issue, the fit looked good. The Hoodman was
very snug and held in position very well. I could even use the
Hoodman as a handle and it would hold up the camera in any position
without slipping. At least I was on the right track.
 |
| Modified
harness parts |
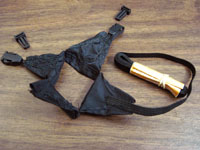
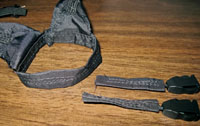
I removed
the harness and took out the stitches holding the two clips
by their strings. Then I snipped the two upper "V" tabs down
to short stubs, folded the stubs under the main ring and stitched
them to avoid fraying of the cut edges. I next covered the clip
strings by wrapping a small piece of ripstop nylon around each
and stitched them to make short "straps" over the strings as
in the right
photo. I then sewed the two female clips by their straps
onto the main ring as close as I could get them. At this point
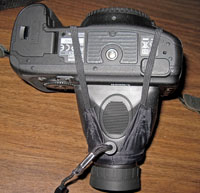
I did another test fit, shown in the photos below. Now the clip
was no longer in the way of the video button, and the elastic
easily flipped edgewise into the gap between the mode knob and
the viewfinder housing. The elastic fit well in the front too.
This was going to work out okay.
 |
 |
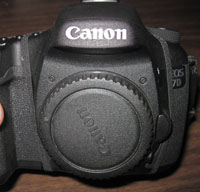 |
| Modified
harness test fit, top, bottom and front views |
All that
was left to do was stitch the elastic straps where they looped
through the male clip ends. I loosened the tension a tiny bit
on the elastic before stitching, then removed the pins that
held them temporarily. I installed the harness once again to
test the final fit and that was it. In the end I decided to
use the clips on the bottom side, though the harness works just
as well either way. All I need do to change it is simply spin
the harness ring around the eyepiece to rotate the clips to
the top or bottom as desired.
The location
of buttons and controls on your camera body will affect how,
or even whether you can attach a Hoodman using straps like this.
In my case, this worked out quite well on my Canon 7D. It also
works as well or better on my 5DmkII. However, the shape and
height of my 1DmkIV precludes any chance of lashing it to that
body, or likely any gripped pro body for that matter. I can
still handhold the Hoodman to preview shots on the MarkIV though,
which is fine with me. I don't know that this harness is better
than commercial items, but it certainly solves the problem of
strapping a Hoodman onto a camera without first removing the
camera neckstrap. That certainly makes it worthwhile for me.
|
|
 |
|
 |
