 |
|
|
|

Dry Bag/Camera
Bag for Kayaking
|
This
is not my first try at making a suitable camera bag for
use in my kayak. My first project is described on my kayaking
site in this article titled "Kayaks,
Water, and DSLR Cameras - How I Manage Mine". The
post discusses a large 54 liter bag that holds two DSLRs
with lenses attached (up to 300mm with teleconverter).
My rationale for using dry bags to hold my camera equipment
while kayaking, even though it seems everyone recommends
against it, is explained in the article, so I won't
rehash it here. Just be sure you understand the risks
before trying this for yourself.
 |
|
| Warning:
I make no claim of suitability
or waterproofing for camera equipment while using
a dry bag. I use this solution
with the knowledge that even the dry bag manufacturer
warms this is not suited for any sort of
electronic equipment. |
|
While the
large bag works great and does exactly what I wanted it
to, I found that it was just a tiny bit cumbersome in
my kayak. It is better suited for my duck boat where the
cockpit is a few inches wider. So I set about creating
another dry bag camera pack for one camera with lens that
would be a little easier to handle in the limited space
of my kayak.
For this
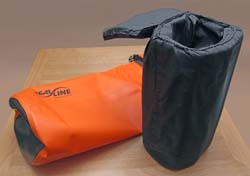
project I chose a 20 liter Seal Line Kodiak Sac tapered bag
with pressure valve, shown in the upper left photo. It took
some measuring and head-scratching to finally come up with this
particular bag. The problem was that normal cylindrical 20 liter
dry bags were the right diameter but were not deep enough to
accomodate my 300mm lens with teleconverter attached. The 30
liter bags were deep enough but much too large in diameter.
Finally I checked out the tapered bags. I discovered that because
of the tapered shape, a tapered 20 liter was as deep as a cylindrical
30 liter bag, but still had the upper diameter close to the
20 liter cylindrical bags. It worked out to be a perfect fit.
I also discovered that the pressure valve in these bags makes
sealing it much easier.
To make
the foam padding form for this project I used a technique
different from the foam blocks in the kayaking site article.
This was made completely with sheet foam pieces, mostly
of 3/4 to 1 inch thickness. I first rolled a 3/4-inch
thick rectangle into a cylinder with an inside diameter
just a little larger than the lens and lens hood. I hot
glued the butted edges together so it would hold its cylindrical
shape.
On the bottom
of the cylinder I glued end caps and a thick dome-shaped "bumper".
The form diameter necessary for the lens wouldn't let the cylinder
slip any lower in the tapered bag, so this bumper was needed
to extend the bottom of the form. (I felt it would be better
than having excessive air space in the bottom of the bag.) On
the top of the form I glued layers of foam with the center cut
out to conform with the inside diameter of the foam cylinder
and with the shape of the camera body as shown in the two above
right photos. The diameters of all these layers of foam were
trimmed to best match the diameter of the tapered dry bag.
Next I sewed
a tapered sleeve of rip-stop nylon to cover the foam padding
form. This is shown above lying on the dry bag, then with it
slipped over the foam form.
Then I sewed
a cylindrical "sock" of nylon to serve as a liner inside the
foam cylinder, shown at right. This liner will allow the lens
to easily slide in and out. The far right photo shows the inner liner and outer sleeve on the foam form before pinning and sewing. Next I pinned the inner liner and
outer cover together at the top and stitched them together.

|
Padded
insert for standard
cylindrical 20-liter dry bag.
|
I
made a foam lid and covered it with the same rip-stop
nylon as the outer covering, seen
in the far right photo. With one edge of the lid sewn
to act as a hinge, and a velcro strap to hold it shut,
the project
was ready to insert into the tapered dry bag.
In
order to have a second camera body handy with a shorter
zoom lens, I made another camera bag like this one (left photo). It did not require a tapered bag for it though, since the depth
of a standard cylindrical 20 liter dry bag was quite
sufficient for a short lens. Hopefully these two smaller bags
will be easier to deal with in my kayak than
the one large two-camera bag I first constructed.
|
| |
|
|
 |
|
 |
