 |
|
|

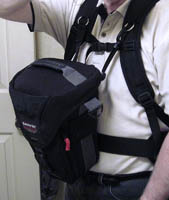
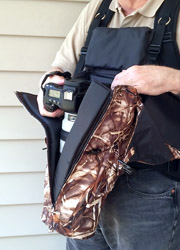
Large
Camo Camera Holster
with unique front zipper feature
|
 |
Large
Custom Holster
|
After
several equipment upgrades it became evident I had outgrown
the Tamrac Zoom 19 holster I had used for several years (this
article). So I went looking to see what was available on
the market. But as is often the case, I found that I was not
completely happy with the current choices for a holster that
might handle a Canon 1D mark IV gripped pro body and an EF 100-400mm
f/4.5-5.6 L IS II zoom lens..... with the lens hood mounted
for shooting - not reversed. And therein lies the issue.
For my style of shooting, a holster is not as useful as it should
be if I have to fiddle with the lens cap and hood before shooting.
That's especially true when the lens hood is a twist-on type,
instead of the wonderful built-in pull-out style on the Canon
300mm f/4 and 400mm f/5.6 primes.
 |
 |
The
Tamrac Zoom 19
holster hung from my
backpack harness
|
The
new large
holster hung from my
backpack harness
|
My research
pointed to the Kinesis C750 Holster Case (X-Large) and Think
Tank Photo Digital Holster 50 V2.0 as the only two that would
handle the 14-inch length of my combo. The Think Tank claims
to house 14.25 inches with the "extension" deployed on the pouch.
The Kinesis claims to handle 15-inches. Either should do the
trick. But I had another concern. Having used a holster for
some time, I knew I did not want a waist level mount. Wearing
a separate harness or waist belt for a holster was not workable
when also wearing a camera backpack like my Bataflae 32L. I
had already begun using my original Tamrac Zoom 19 hung
from my backpack shoulder harness. This
held it higher (up to chest high), avoiding the annoying thigh
slapping on the holster, and also making the unit feel almost
weightless compared to a cumbersome belt mount.
If you look
at the thumbnail on the far right, the problem with carrying
a holster up high will become more evident. Lifting a camera
and short lens (wide angle for example) out of a high mounted
holster isn't an issue. But think about lifting a long telephoto
from the same holster. Trying to vertically lift 14 inches of
camera and lens, with hood deployed, out of a holster mounted
high puts the camera and lens in your face. Then there is the
issue of weight. My 1D4 pro body with the 100-400mm lens together
weighs 7 lbs. - almost as heavy as a whole gallon of milk. It's
hardly a lightweight combo.
The awkwardness
of lifting it so high to get it out did not appeal to me. I
decided there had to be a better way. So, I came up with the
idea of a camera
holster that would zip down the front. This way, the combo
only had to be lifted about 3 to 4 inches to tilt the lens out
the front. Of course, the lid zips open as well, just like conventional
holsters. I knew none of the commercially available holsters
would have this unique front zipper feature, so I made up my
mind to construct my own custom holster. Since it was DIY, I could use my favorite camouflage
pattern of Cordura so it would match with my other gear.
 |
 |
 |
 |
 |
 |
A
padded flap protects the LCD screen
from the camera strap. |
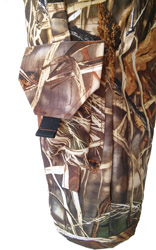
The
12-inch zipper opens all the way down the
front, allowing the lens to come out the front.
|
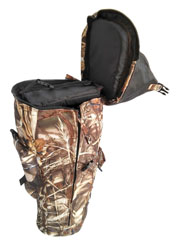
Shown
here are the two
side pockets and the large
zippered lid pocket. |
 |
 |
 |
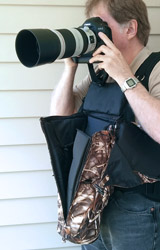 |
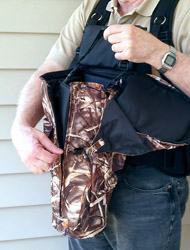
Imagine
accessing this pro camera body and large lens without
the front zippered opening.
The zippered front really makes this simple and practical.
|
I knew going
into it this project would not be so easy to pull off. It was,
in fact, so challenging that I am making no attempt to try to
describe or explain how I went about it. It's pretty much beyond
any text and photo explanation I could provide in this article.
This is
really mostly about sharing a new concept (a front zippered holster)
and how it came about. The production of this item took a lot
of head scratching, measuring and planning, until I eventually
visualized how a pattern might look and work. It took days of
fiddling with the thing to get it to do what I wanted, but finally
it began to take shape. While at it, I incorporated two velcroed
pockets - one on each side - and a zippered pocket on top, the
entire size of the lid. This gives me plenty of handy storage
for batteries, memory cards, gloves, lens cap, and other items.
I added
a padded
flap under the lid which covers the LCD screen. This lets
me fold up the camera strap and tuck it inside between the pad
and the lid, avoiding any chance the strap clips might scratch
the LCD or anything else. There is another padded flap between
the lens and front zipper to insure the zipper never contacts
the lens or camera. The lid zips shut, and also clips shut with a
standard snap buckle. It hinges open to one side so it can hang
open and stay there without getting in my way. My other holster lid opened against me
and always wanted to flop down.
The weight of the body and lens is not supported by the end of the lens (and hood). There is web strapping near the top that catches under the grip side of the camaera body. This strapping essentially hangs the body in the air so the entire weight does not press on the lens.
An inch
and a half of padding in the bottom of the holster protects
the end of the lens hood when deployed. I made two covered foam
discs that I can insert for an additional 3 inches of padding
if I have the hood reversed. The pads take up the space where
the hood would be, and adds considerable protection. It avoids
zooming the lens out and locking it to fill the height of the
holster. That might put unnecessary pressure on the zoom mechanism
if the lens is resting on the lens cap in that position.
This holster
is not meant so much for quick draw shooting as it is for handy
access. With two zippers and a snap buckle, instead of one zipper
and snap buckle, it takes a little longer to extract the camera.
However, it certainly beats taking off the backpack to get the
camera out. With this larger, heavier camera/lens combination,
I've been having to carry it in the backpack instead of my old holster.
And you know there is always the unexpected opportunity while
hiking to your destination. Having quick access to the camera
is important, and this solves my problem nicely.
|
|
|
 |
|
 |


