 |
|
|

Strap Up Your Camera and Holster
|
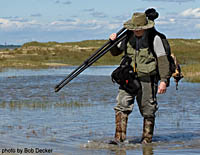 |
| Holster
on backpack belt |
Here
is a small project to save a bundle on a "chest harness" for
your camera holster, and a simple tip to get that camera weight
off your aching neck.
Easy Holster Strap for Backpack Harness:
Before I
got my huge Bataflae 32L camera backpack, I used a normal hiking
backpack to port my gear in the wild. I often added a Tamrac
Zoom 19 camera holster to keep one body and lens handy instead
of having it hanging around my neck. However, using the backpack
waist strap as my belt to hold the holster was the worst
solution I'd ever dreamed up. The waist strap was never designed
to hang things on, and the holster covered the buckle in the
center, making it a royal pain to put on and take off. The holster
flopped about incessantly when I walked, and it tipped forward
at an inconvenient angle - all around a bad solution. Trying
to use a belt made for hanging holsters and camera cases would
not have worked while having a backpack belt around my waist
too. So I made the best of what I had. The pack harness had
no "D" rings on it, so using a strap there did not seem to be
a solution either.
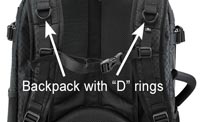
|
| D-rings
on a backpack |
 |
 |
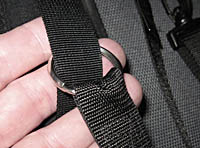
Standard
1-1/4 inch key ring
|
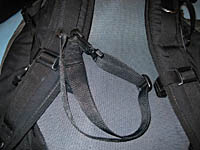
Clip
to ring when not in use
|
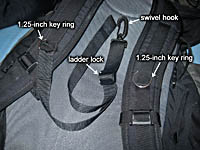
Eventually
the old lightbulb came on in my head and I realized I could
use large
key rings as a clipping point by slipping them onto the
web strapping on my backpack harnesses. That led me to try making
a simple 1-inch wide web strap to clip between the two rings
I had installed to see if it would work to hang my holster.
To my surprise, it not only worked like a charm, it also made
the weight of the camera/lens, now hanging from the backpack
shoulder harness, seem to disappear. I couldn't feel whether
or not there was a camera and lens in the holster. Finally the
tugging, dangling, flopping weight on my waist belt was gone.
 |
 |
| Homemade
strap and key rings |
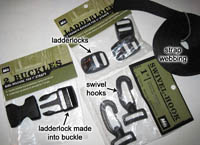
Materials for the project |
The two
photos at right show the
strap I fashioned, and the
materials needed to make the strap. I've been getting my
web strapping and hardware (buckles, clips, snap hooks, etc.)
for my various projects from my local REI store. You should
also be able to order such items on the web. You'll need some
1-inch wide webbing, and either (a) one or two hooks plus one
ladderlock, or (b) one or two snap buckles (which already have
a "ladderlock" built in). The ladderlock is the part
that lets you slip the webbing to adjust the length, then locks
it tight at the length you set. If your snap buckles don't have
the ladderlock, just add one to your list. I chose to use a
loop sewn on one end of the strap, and a hook on the other end.
I slipped the key ring into the loop end, then onto the right
shoulder harness webbing (go the other way if you're left-handed).
If you are using key rings as your attachment points, you could
alternately use (a) a hook on both ends, or (b) buckles on both
ends, or (c) sew a loop on one end and use a single buckle on
the other end. With a hook or buckle on both ends you could
remove the strap completely. Optionally, you could just slip
off both key rings just like you put them on, but that's much
more hassle than simply unhooking them.
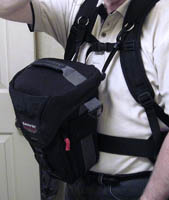 |
Holster attached to
strap
|
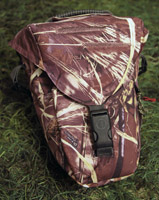
Check
out this article
on a
camo cover for
your holster
|
|
The options
are different if your harness already has "D"
rings and you choose to use them instead of adding key rings.
You will need to use hooks on both ends since it's not possible
to simply slip the "D" rings off the webbing as is possible
with the key rings. Otherwise, the project is the same in both
situations.
My strap
is something like 24 inches long, but includes a lot of extra
so I can adjust the holster height up or down. Remember, for
every one inch you want to lower the height you'll need two
inches of strap (an inch for each side of the holster), so don't
cut yourself short. You can always trim off excess if you find
there is just too much excess dangling when you put it to use.
Allow enough length to lower the holster to your waist level.
That will allow you to hang a second camera around your neck
by a regular strap so you can have two at the ready if you ever
wanted to. When you're not using the strap, just clip
it to one side as in the above right photo. Also, when taking
off the backpack, just do the same - clip both ends of the strap
on the same side. Your holster stays attached - it can't slide
off.
You might
note in the upper left photo that my holster has "D"
rings on it (both sides). That's because it came with a neck
strap that I started to use instead of the strap I made. It
would have served as well, except it would not adjust short
enough to use as a harness strap. I didn't want to alter the
original equipment strap, so I just made my own to the correct
size. If your holster comes with a
neck strap, it could possibly serve for this purpose instead
of having to make one as I did.
Quick and dirty "Camera Harness":
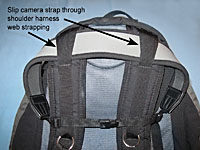 |
Camera
strap slid into
shoulder harness |
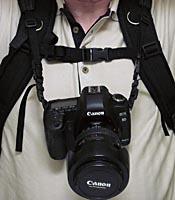 |
| Camera clipped to strap |
This is
practically a "no-brainer", assuming you have a backpack with
web strapping running down the shoulder harness, and a camera
strap with snap buckles or the metal clip hooks. The photo
at left shows how I slip my camera strap through the rear-most
web strap section on my backpack shoulder harness. This position
on my backpack puts it behind my head far enough that it does
not touch my neck. You can then clip the buckle ends together
behind you if you want to just leave it there. If your backpack
allows this, you're in business. When you put the backpack on,
unclip the strap ends and clip
them onto your camera. Voila, the harness takes all the
strain instead of your neck. It costs nothing and works great.
This is especially useful if you have a "non-stretchy" camera
strap, which can get pretty uncomfortable otherwise. I prefer
the stretchy, neoprene style straps, which are certainly more
comfortable. But using this method, there is simply no neck
strain at all, no matter now long you wear it.
|
|
 |
|
 |
