 |
|
|

LensMaster
RH-1 & M-1 Gimbals
A Review
|
Having
used my LensMaster
RH-2 full gimbal for over two years, I decided it was time
to end my relationship with my two ballheads, and replace them
with gimbals. As I've said before, I was not a fan of the Arca-Swiss
style clamps. That negative bias was based on the experience
I had with a Wimberley plate and Acratech clamp on my first
ballhead. But when I received my RH-2 gimbal, which came with
an Arca-Swiss style clamp and plates, I realized they were made
much better. I still will not use an Arca-Swiss style clamp
on a lens as heavy as the 500mm f/4. However, my new gimbals
would be for the considerably smaller and lighter Canon 100-400mm
f/4.5-5.6 L IS versions I and II.
One of the
new gimbals would go on my Gitzo 1348 CF tripod, and the other
would be on a Feisol CM-1471 carbon monopod. For this I chose
the LensMaster RH-1 and M-1 side mount gimbals. The RH-1 is
almost the size of the RH-2, but without the swing arm, since
it's a side mount model. For the monopod, the M-1 was ideal.
The M-1 has no base swivel, but screws directly to the monopod
stud. The monopod provides the horizonal rotation (panning)
so it needs no base swivel. This saves on weight and cost. Both
of these smaller gimbals have a rated capacity more than sufficient
for a 500mm or 600mm f/4 lens, so I knew they could easily handle
the 100-400mm zooms I would be using on them.
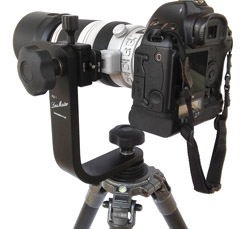 |
The
RH-1 on the 1348 Gitzo with the
Canon100-400mm f/4.5-5.6 L IS II
and a 1D4. |
Both gimbals
arrived at the same time, in just 8 days from North East Lincolnshire,
England. I ordered them from the LensMaster web site US sales
page at https://www.lensmaster.co.uk/usa-sales.htm,
which provides a currency conversion calculator from GBP £
to Canadian, Australian, and most importantly, US dollars, that
made ordering easy.
The LensMaster RH-1 Gimbal:
As I mentioned,
the RH-1
is a side mount gimbal. It's made from "flat" stock
the same thickness as the RH-2 full gimbal. This thing is sturdy
and solid. The rubberized knobs are more than sufficiently large
to get a really good grip for tightening, even with gloves on.
They're well rounded and easy to use - no more sore hands from
trying to tighten knobs that are too small for the job. Like
the rest of Lens Master's gimbals, the workmanship is immaculate.
It came
with two Arca-Swiss style plates - a 50mm plate and a 140mm
long plate to provide sufficient slide adjustment for balancing
large telephotos. It also included a 3/8-16 to 1/4-20 stud adapter
and hex wrenches. All I had to do was screw it onto the tripod
stud and it was ready to go. For less than $175*
plus shipping, you just won't beat this sturdy, well crafted
gimbal.
The LensMaster M-1 Gimbal:
 |
The
M-1 gimbal on a Feisol CM-1471
monopod with a Canon 100-400mm
f/4.5-5.6 L IS II and 1D4 body. |
The M-1
gimbal is designed specifically for monopods, and has no
panning bearing. It is a little shorter in height than the RH-1,
yet still made from the same sturdy stock in the same thickness
and width as the RH-2 and RH-1, and quite capable of handling
the weight of a 500mm or 600mm f/4 lens. The large, easy to
grip knob, and pride of craftsmanship on the M-1 is just the
same as my other LensMaster gimbals. Since I already had enough
Arca-Swiss style plates, I ordered my M-1 without the plates
for just $108*
plus shipping. Even with the 50mm and 140mm plates included
it's a steal at $136*
plus shipping.
(*US
dollars vary with exchange rate)
I don't know why I waited so long to replace my ball heads with
gimbals. All of my shooting is with long lenses. I suppose I
was avoiding the Arca-Swiss style clamps and plates. But the
quality of the clamps and plates included with all the LensMaster
gimbals won me over. Good riddance to those unpredictable, always
top heavy ball heads. I simply cannot foresee ever using ball
heads again.
 |
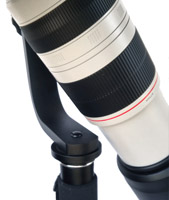 |
The
RH-1 has a rubberized
knob to act as a bumper. |
The
M-1 could use a
protective bumper. |
A protective bumper pad for the M-1:
The M-1
has no panning bearing, and thus no panning lock knob. Both
the RH-1 and M-1 are shown at right with the lens tilted down
sharply. As you can see, if you tilt the lens down too far without
the rubberized knob to act as a safety bumper, as on the RH-1,
there is the possibility of hitting your lens on the bottom
bar of the gimbal, or on the monopod's head platform. This could
possibly cause a chip on your lens. If you have a lens cover,
it may negate this possibility. But I haven't yet made a cover
for my new 100-400mm lens, and wanted to avoid any chance of
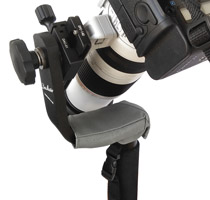
this happening. As a stopgap measure, I made a little pad to
cover the gimbal where it screws onto the monopod. It's just
a piece of dense gray foam cut and carved to fit snuggly over
the bar, and held on with a simple fabric cover with velcro
to hold it in place.
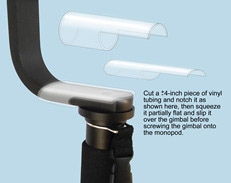
A simpler
pad could be made from a short piece of vinyl tubing of sufficient
diameter. I've included a diagram
of how this would work. Notch out one end of the tubing as indicated
in the diagram, then slip it over the gimbal before screwing
the gimbal onto the monopod head. That alone will keep the tubing
from coming off, not to mention the friction of the tubing squeezing
the gimbal. This shouldn't cost more than a few cents to make.
 |
 |
 |
 |
 |
My
pad started with a piece of foam cut and carved to fit
the gimbal bar, then I made a cordura cover with velcro
closure,
which fits neatly over the gimbal to protect the lens
from bumps and nicks. |
Instructions
for a very simple bump
guard made from a piece of vinyl tubing. |
Conclusions:
Obviously
I like the LensMaster gimbals. After buying the RH-2 and using
it for two years, I came back and bought two more LensMaster
gimbals. And the total cost of all three was less than some
other gimbals cost for one!! The quality of the clamps and plates
on the first one convinced me I could trust the Arca-Swiss style
clamps, even though I had been a total skeptic previously.
Both the
RH-1 and M-1 are very sturdy, steady, and well made. The action
is silky smooth. Like their big brother, the RH-2, they are
field serviceable. They simply unscrew for cleaning off any
sand or grit you might get on them. A touch of light grease
before reassembling will make them good as new. There is simply
nothing to go wrong with these gimbals - no special order parts
or hard to get replacements. You can pay a lot more for a gimbal,
but I don't believe you will get more in the way of quality,
reliability and craftsmanship.
Update: It's been 3 years since writing
this review, and I've just added two more LensMaster gimbals to the collection - another M-1 and a T-1 Traveler. The T-1 Traveler is mounted
on a VariZoom "Chicken Foot" monopod. I am reviewing the monopod at
this link - Varizoom
Chicken Foot Monopod Review.
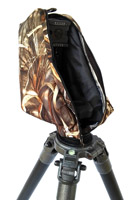
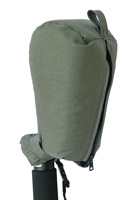
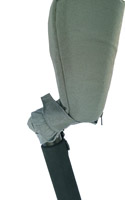
Did I make
padded covers for my new RH-1 and M-1 gimbals as I did for the
original RH-2 gimbal? You bet I did. My equipment is an investment,
and I do my best to protect it all. Below are some photos of
the two different styles I made. The M-1 gimbal has no panning
knob, so it was designed differently, requiring a different
means to hold it in place.
 |
 |
 |
 |
 |
| RH-1
cover open |
RH-1
cover closed |
M-1
cover closed |
M-1
cover open |
M-1
velcro strap |
The RH-1
cover is essentially the same as the original cover I made for
the RH-2. The only real difference is that I used a longer zipper
on this cover so it zips all the way up to the top.
For the
M-1 gimbal, I used a velcro strap to wrap around the bottom
of the gimbal arm to secure it. With no panning knob for leverage,
I used a sort of "heel strap" to keep it from sliding
up. The padded bumper on the arm meant it didn't need as much
padding coverage as the others. Both are made from cordura -
one in camo, and one in pale green.
|
|
 |
|
 |
