 |
|
|

Padded Camo Gimbal Head Cover
|
 |
When
I purchased my LensMaster RH-2 gimbal, I needed a padded cover
to protect it. Having made covers for my previous 393 Gimbal,
I had a good idea how to go about making an even better one
for this new gimbal.
This was
a relatively simple project, requiring only some suitable material,
a zipper, and some foam padding salvaged from shipping boxes.
Many times electronics will come packaged with gray foam padding,
which I scavenge and save just for these projects of mine. I
also had some 600 denier waterproof polyester fabric in my favorite
camo pattern, Realtree Advantage Max-4 HD. With the addition
of a 7-inch zipper I had on hand also ( a 9-inch zipper would
work just as well), I had everything I needed.
The pattern
diagram below is an approximation of the shape needed to make
a cover for this gimbal, or most other similar "J"
style gimbals. It's something like a fat boot with the toe pointed up into the air. I realize it appears much oversized compared
to the gimbal itself, but there is a good reason for this. These pattern pieces fold over
to meet in the middle where the two halves are sewn together.
Plus there is foam padding inside, which takes up room. The
pattern must be somewhat oversized to account for this. You
will be surprised how snug this becomes once you stuff it with
padding and sew it together.
 |
| Basic
pattern |
I cut two
outside halves of camo material, and two inside halves of rip-stop
nylon as a lining, all the same shape and size as the tan area
of the pattern diagram. I sewed one rip-stop nylon lining piece
to the back side of each camo material piece. This made two
"sandwich" pieces to stuff the foam into. Contrary to the diagram,
I sewed these almost all the way around (red lined area AND
green lined area). However, I did NOT sew the area marked by
the violet arrowed line in the diagram (about 6 inches) on each
piece. This was left open to stuff the foam padding inside each
half. Two identical pieces of 1/2-inch thick gray foam padding
were cut out about one inch smaller all the way around than
the tan pattern. This allows for the material used up by the
hem, and for the thickness of the foam inside.
With the foam now inside
each half, I then seamed up the opening in each half, sealing in
the foam. Next I placed these two foam-filled halves face to face (camo side against camo side with the lining out) and pinned them together. Then I stitched around ONLY ON THE RED ARROWED LINE AREA this time. The green lined area and violet lined area are NOT stitched this time.
Next I turned
the assembled cover right side out and test fitted it over
the gimbal. At this point it's practically finished. All I had
to do now was sew in the zipper. Note the curve in the middle
of the green lined zipper area. This may require a pleat in
the middle of the curve on both halves before sewing on the
zipper in order to make the cover bend around the end and lay
flat for the Zipper. A careful look at the photos will help
make this clear. With my pleats stitched in, I then sewed the zipper into place. That was
it..... cover finished. It not only serves as camouflage, but protects the gimbal from damage and works as a rain cover too.
 |
 |
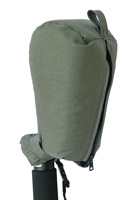
| RH-1
cover |
M-1
cover |
UPDATE:
After adding
two more LensMaster gimbals to my gear, an RH-1 and M-1, I made
additional gimbal covers for them as well. The RH-1 cover is
essentially the same as the original cover I made for the RH-2.
The only real difference is that I used a longer zipper on this
cover so it zips all the way up to the top.
For the
M-1 gimbal, I used a velcro strap to wrap around the bottom
of the gimbal arm to secure it. With no panning knob for leverage,
I used a sort of "heel strap" to keep it from sliding
up. The padded bumper on the arm meant it didn't need as much
padding coverage as the others. Both are made from cordura -
one in camo, and one in pale green. More images of these are
included in the RH-1 and M-1
gimbal review on this stie.
|
|
 |
|
 |
