|
|
|
|

Butterfly
Bean Bag version II
and
Flying Saucer Ball Head
|
I
often photograph birds from the window of my vehicle in
situations like a wildlife refuge, where you can drive
around and see plenty of opportunities to get good shots.
I've made three double bean bags for this type of photography,
created from the basic pattern from an article
by Scott Fairbairn. These worked well for almost
everything. I found, however, I needed more height than
these provided when I was shooting from the window of
my truck..
Problem #1-
Even
in my full-sized truck, the camera and lens sat too low
in the window to shoot comfortably. The bean bag needed
more height. I tried stacking two bean bags, but they
would slip apart. I had to slump down into the seat to
see through the viewfinder. I didn't dare use the window
to raise the bean bag, camera and lens. That much weight
on the power window mechanism seemed a very bad idea.
It was designed to raise a piece of glass, not 25+ pounds
of deadweight.
Problem #2-
When
panning left and right, the tripod foot would bind in
the bean bag, and the lens wanted to flop over on one
side all the time. When I panned right, the side mirror
was at the same level as the lens and in the way. It made
following the action a bit of a hassle. Spinning the tripod
foot up out of the way helped, but I lost what little
height advantage it offered, making the lens sit even
lower.
 |
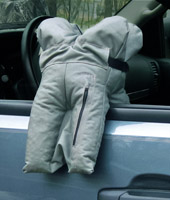
| The
Butterfly Bean Bag and Flying Saucer Ball Head in
use with a super-telephoto. |
 |
| How
to make your own |
I
had looked at every bean bag I could find on the web,
including the "Molar
Bean Bag" by Vertex Photographic. I liked the
way it hugged the vehicle door, but it simply did not
provide enough height above the window for comfortable
shooting. Also, the photos on the Vertex website showed
the beanbag with a camera mounted on a plate, with what
I presumed to be a panning head attached. I found such
a device at another website, but it wasn't cheap. It did
however give me the impetus to come up with my own solution.
After pondering these problems for awhile I designed a
one-two combination to solve both problems. . . . .
The "Butterfly Bean Bag" and the
"Flying Saucer Ball Head"
I
will start with the Butterfly Bean Bag, so named
because the cutting and sewing pattern for it looks something
like a butterfly, although the bean bag itself actually
looks more like a "molar tooth" than the Vertex product.
I used the basic back-to-back "double bean bag" construction
technique from the bean bag on the Scott Fairbairn website,
and combined it with the general "molar" shape of the
Vertex design. The advantages of my design are:
• Weighs less
for its size than other designs
• Stands far taller
than other designs of same (or even greater ) weight
 |

The tubular bottom
design improves rigidity
and cuts the weight by
4 pounds. |
|
The
molar-like shape
of the
Butterfly Bean
Bag is
evident in this
shot. |
To
accomplish these improvements I made the top half taller
(above the "V") than the Vertex design, and added stitching
to shape the sides and make them stand up stiffer. Otherwise
the extra height would have been lost due to the sides
bulging out and drooping. I also closed off a large portion
of the bottom half so it didn't fill with unnecessary
beans. This created four
tubular colums, providing a firm base hanging
over the vehicle door so the bag stands up taller and
firmer. Without this design feature, the extra height
would have required an additional 4 pounds of beans to
fill it. In essence, it provides greater height, while
retaining the bulk necessary to handle the super-telephoto
lens. I don't pretend the material I used is as rugged,
or that the stitching is on a par with the Vertex product.
That part of the construction is up to the discretion
and skill of the do-it-yourselfer who is making one. Mine
is quite rugged enough for my use.
If you would like to make
one for yourself, follow this link to a separate page
with full details and instructions on how
to make your own Butterfly Bean Bag.
 |
| The
Flying Saucer Ball Head mounted on a 500mm lens |
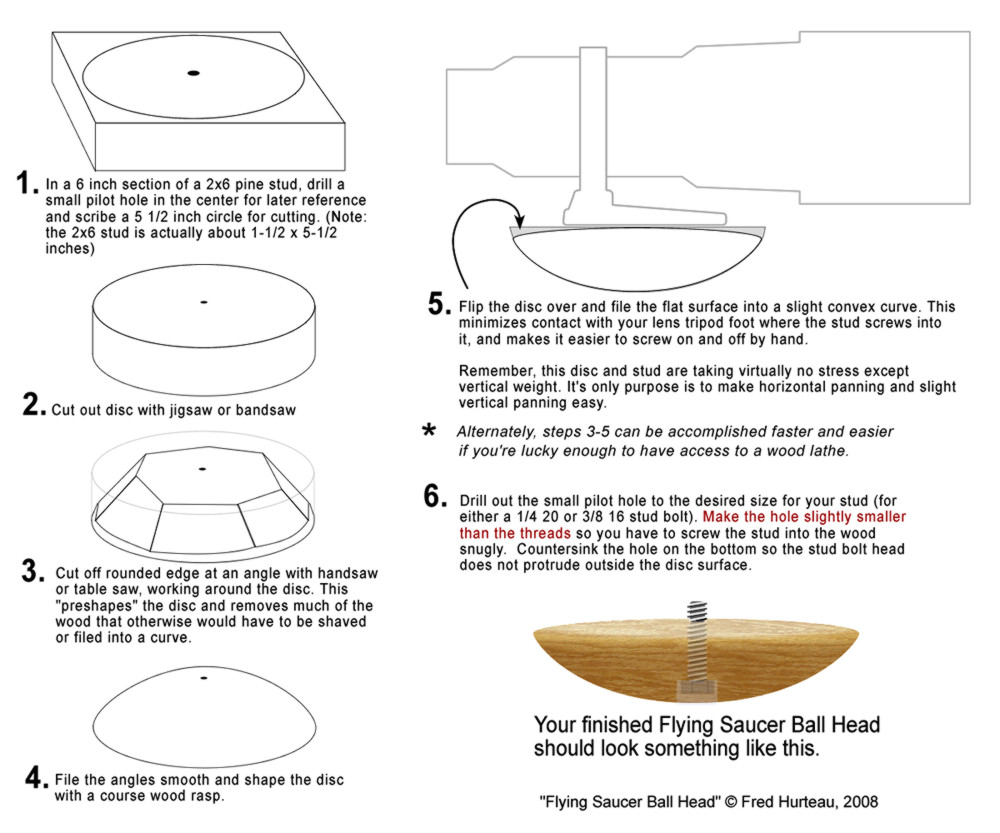
The Flying Saucer Ball Head?
Yup,
that's what I call it. I think you'll agree it's an apt
description. I never would have thought a piece of wood
with a bolt in it could be so useful, simple and effective,
but I believe this idea is the epitome of simple design
form and function. It's really only half a "ball", but
that's all it takes to make my big, heavy telephoto lens
pan and tilt smoothly while resting on a bean bag. It
screws on and off the lens tripod foot with the flick
of a wrist. Even if you have to go out and buy a stainless
steel 1/4 20 bolt to make one of these, it'll only cost
a couple of dollars.
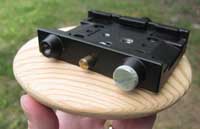
To
the left are photos of the top (showing the 1/4 20 stainless
bolt I used), and the bottom (showing the countersink
hole). The bottom left thumbnail links to a large diagram
explaining how
to make the Flying Saucer Ball Head. It's relatively
simple to make with simple tools, although a wood lathe
is by far the easiest and fastest way to make one. Even
making one the hard way with hand tools took me less than
two hours of work. The only thing I haven't done is to
seal or stain the wood, or paint it. Unless you think
it will get wet, you won't really have to do that.
If
you should decide to put any kind of finish on yours,
I recommend leaving at least a one to one-and-a-half inch
radius area on top (around the stud) clear of any paint
or finish. This is the area that will rub on the bottom
of your lens tripod foot when you screw on the Flying
Saucer Ball Head. The paint or finish here will probably
get rubbed off anyway, and you don't want that coming
off and staining or marking your lens finish. Just leave
the wood natural and unfinished in that area.
 |
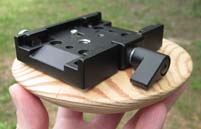 |
Two
views of the ball head with the Manfrotto
quick release clamp attached. |
Update: After using the Flying
Saucer Ball Head for some time, I decided to find a way
to better balance my large lens on it. The lens was quite
front heavy, despite the camera body's counterbalance.
Eventually I decided to borrow my Manfrotto 357 Pro QR
(quick release) adapter from the monopod I was using it
on and try it on the ball head (shown below). This really
did the trick. Now I have 3-1/2 inches of slide range
to adjust the balance point, which allows perfect balance
with the 500mm lens. This is the same quick release that
comes on the Manfrotto 393 gimbal I use for this same
lens, so switching back and forth is a snap. If you're
using the Flying Saucer Ball Head for a very large lens
that is front heavy when the foot is screwed directly
to the ball head, try a quick release clamp that works
with your equipment. It should solve the issue easily.
|
| |
|
|
 |
|
 |