 |
|
|
|

Boat
or Kayak Camouflage Cover -
Design & Modification
|
My first boat for wildlife photography was a Carsten "Puddler", and this was my first attempt at designing a camouflage cover for a boat or kayak. The concept and techniques used to
make this camouflage cover are applicable to most any small boat
used for the purpose of getting close to birds and animals in the wild. With some intelligent adaptations it
could work for a john boat, a canoe, even a kayak. And I guarantee
that it's a LOT cheaper than commercial boat blinds.
The photos below show the "frame" I made to drape my camouflage cover over. I used pvc
water pipe and fittings (the thinner-walled 300psi pipe works fine for this). Everything
is press-fit into the various connector fittings ("T's", 90° and 45° elbows, "cross" joints
and end caps). Tubular foam type copper pipe insulation was slipped over the pipe
in strategic spots to avoid the noise of pipe bumping fiberglass.
Once everything was cut and test fitted,
the joints which would not need to be taken apart later were locked together with
a small screw. This minimizes the chances something will slip apart in use. It also
simplifies and speeds up the assembly/disassembly process. Joints that needed to
come apart in order to assemble and disassemble it for transport and storage were
left alone. No pvc cement was used on any of it. The pieces will press-fit
together quite sturdily for this application.
All joints that were not screw-locked
were then masked with a piece of masking tape, and the frame received a light coat
of black acrylic spray paint to make it less visible under the camouflage cover.
The
taped joints were thus left white, which quickly identifies the joints that "come
apart", so I'm not tugging like an idiot to separate two pieces that are locked together.
By the way, by using screws instead of pvc cement, I can easily remove a screw and
disassemble any joint if I want to modify the frame later.
The whole thing is "attached" to the
boat with only four mini-bungee cords (short 8-10 inch cords). With the way I designed
the frame for this boat, this proved to be all that was needed to keep the frame
from shifting around. The frame is "bungee-ed" to the carry handles at the nose and
tail, and at the edge of the "cockpit" on each side just about the middle of the
boat. (I've left out many of the finer details of construction in this writing for
sake of some brevity, but I would be happy to go into more detail if there is interest
and inquiry by readers.)
 |
 |
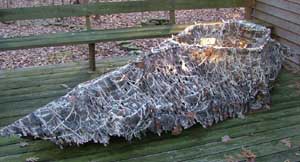
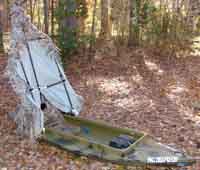
The
left photo here shows a test fitting of the camo cover before adding the
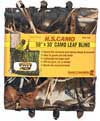
additional details. The camo material used is a commercial product made
by Hunter's Specialties called H.S. Camo - 56"x12' Camo Leaf Blind (product
model # 04092) in the "Advantage Max-4 HD" pattern, that simulates a grass-type
environment. It also comes in a 56"x30' pack (#04093). This works great
for fall and winter camouflage along the shores of marshes, lakes and ponds.
It's a polyester fabric which weights virtually nothing, doesn't soak
up water, dries quickly, and is pretty tough. It's easy to sew with a
sewing machine, and the 4.5x12 foot pack (about 1.5x3 meters) was only
$13.00,
though I've seen it priced as much as $25.00 (the 4.5x30 foot pack is about
$30-$35).
| One
Caveat: I
must note here that the "Camo Leaf Blind" product is susceptible to deterioration
from exposure to ultraviolet, salt water and weather in general. After occasional
use over a three year period I found that the material used for the boat
cover degraded into the consistency of heavy paper, and tore apart easily.
I was not aware
of
this
when I started using it. However, because of all it's other great characteristics,
not the least of which is it's unequaled camouflage qualities in the Advantage
Max 4D pattern, I do and will continue to use it for my projects. I do this
with the knowledge that I will likely have to replace items with a newly
made version after two or maybe three years of use. DO NOT expect this material
to hold up if left outside in the elements on a continual long-term basis. |
 |
 |
| The
camouflage material used. |
A
package of rafia. |
 |
|
|
A dozen
small loops were sewn to the inside of the cover in strategic spots. These
loops slip over the pipe frame during assembly and keep the cover from shifting
or flapping in a breeze. As you can see, the cover is not pulled taught, though
it is secure. I was afraid a taught cover would diminish the natural look.
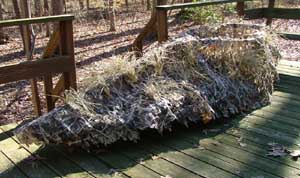
Then finally the finishing detail was added to the cover. The upper right image
shows the cover after some homemade "tufts" of Rafia were added for additional
3D effect.
As
for the other materials, I used a single package of Rafia (about $3.00 or $4.00
if memory serves me right) from the craft section of Wal-Mart. All the pvc
tubing and fittings, and a pack of screws, came from a hardware supply and
totaled around $10.00. I already had a couple of half-used cans of flat black
Krylon spray acrylic on the shelf which sufficed for the frame painting.
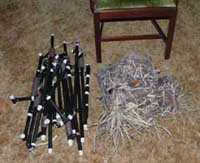
The partially disassembled frame
and folded cover (shown at left) make a small package,
altogether weighing perhaps 3 pounds. The frame sections
will in fact breakdown into even smaller, shorter sections,
and can be rolled up inside the cover material if desired,
making a lightweight, easily portable package (the dining
room chair in the photo is for size comparison).
|
The
photos here show how well this simple, inexpensive camouflage
cover works. I was not wearing any camouflage gloves or
face mask for these photos, though I was using a homemade
camouflage cover on the camera. My head was covered with
the hood of a camouflage rain jacket, which I wear along
with a camo life-vest, and camo rain pants, the latter
being mostly for keeping my legs from getting wet from
the paddles dripping water.
The sides
of the frame around the "cockpit" will detach and lay
in the boat, which allows the camo cover to collapse under
my arms. This facilitates paddling, as shown in the below
left photo. This is one of those details of construction
that I have not gone into deeply. If there is interest,
I can provide more explanations and photos with details
of the design and construction of this camo cover and
frame.
After
this initial trial of the cover I was quite satisfied
with the whole concept, except for one small detail. I realized
getting into and out of the cockpit opening was much trickier
on water than on land. I devised a hinge for the frame
which allowed me to easily lift the entire front 3/4 of
the frame. This not only made getting in and out a breeze,
but also greatly simplified the loading of gear.
 |
 |
Two
views with the
cover hinged up. |
Unlike
the rest of the frame, I glued two of the elbow joints
in the hinge assembly, as noted in the upper left photo.
This eliminates any twisting that could throw the hinge
out of alignment. Four elbow joints were used to make
the hinge. One of the elbows is a "three-way"
elbow, as you can see in the lower left image. The joint
that points down has a piece of 3/4 inch oak dowel screwed
into it to provide vertical support at that point for
when the frame is tilted up like in the photo. Another
of the elbows has a hole drilled and trimmed large enough
for a piece of 3/4 inch oak dowel to slide through. This
dowel is the hinge-pin for the hinge. A threaded pipe
cap was screwed onto the end of the dowel to hold the
joint together, but by unscrewing the cap, the joint could
be disassembled. This allows separation of the front and
rear segments of the whole frame without taking anything
else apart.
To install
the hinge on the frame, I simply shortened the side segments
next to the vertical supports at the cockpit (as noted
in the left photo) and inserted the hinged piece there.
It turned out to be a very simple and easy modification.
A Work In Progress:
Everything
seemed peachy, until I took the boat and cover to Merchant's
Mill Pond in Gates County. A thick area of duck weed by
the boat ramp meant I had to put the boat into the weed,
and take it out at the same place. The duck weed clung
to the fringes of the camo cover - not a fun problem to
deal with. The real problem was that I didn't dare lift
the hinged cover, since the weed would have dripped and
made a mess inside the boat. Since
the camo cover material does not soak up water, and dries
quickly, a little water dripping into the bow was never
really a problem. Duck weed on the other hand was a completely
different matter. This new problem meant I was again confronted
with the initial situation of climbing into the boat without
using the hinge. I was back to the awkward and potentially
disastrous method of squeezing into the small cockpit
opening. I realized there HAD to be a better way.
|
| |
|
|
 |
|
 |
