 |
|
|
My
Native Ultimate 12 Tegris kayak is an "open" design, more like
a canoe than a conventional "cockpit" style kayak. It has no
deck of any kind, which is one of the reasons for the extreme
light weight of this kayak... a mere 29 pounds (without seat)...
truly a featherweight among kayaks. I knew I would need a center
skirt to shade my legs and feet from cooking in the summer sun.
The skirt would also minimize paddle drip on my camera equipment
sitting between my knees, right where most paddle drip would
end up. Though the manufacturer made bow and stern spray skirts
for this model, which I purchased, they never offered a center
skirt for it. It would be up to me to make my own center spray
skirt to provide shade and water protection.
 |
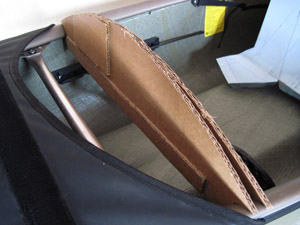 |
Two
views of the temporary cardboard batten.
|
After first
making a kayak cover for my Tegris from 500 Denier coated Cordura
nylon waterproof material, I turned my attention to making the
center spray skirt from more of the same material. I had already
drawn the skirt design on the computer, so I had a good idea
how the patterns should work (see
the cover article for drawings). However, without access
to a large format printer, the computer drawings of the skirt
design could not be used to print paper patterns for cutting
the material.
MAKING SPRAY SKIRT PATTERNS -
 |
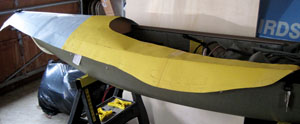 |
| Two
views of the paper patterns being fitted and marked. |
In order
to make paper patterns I had to resort to taping large sheets
of art paper together to make larger pieces to drape over the
kayak and create paper patterns by hand. For proper fit I needed
a temporary batten arch over which to form-fit the paper, so
I made one from corragated cardboard. With this temporary batten
wedged into place, I draped these larger pieces of paper over
the kayak, wrapping the paper around the gunwale (or gunnel)
and bow as if it was the material itself, and marked it with
a pencil.
Since the
bow piece was a symmetrical shape, I could fold the paper pattern
in half along the centerline and insure it was drawn and cut
perfectly symmetrical. The two side pieces should be mirror
images of each other, so I only needed to make one of them.
For the opposite side I simply used the same pattern but flipped
it over on its back side to use for marking and cutting of the
material. With the paper patterns now trimmed and marked with
my hems and folding lines I was ready to cut the material.
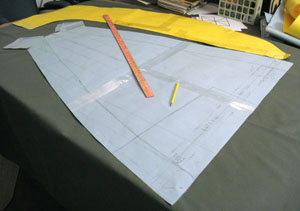
Having already
made a
"virtual" pattern layout on the computer, I knew how best
to arrange these life-sized paper patterns on the remaining
piece of Cordura material. I adjusted the arrangement for the
absolute least waste and pinned the paper cutouts to the material.
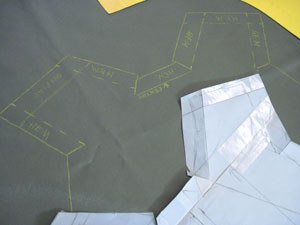
Next I traced them, adding my marks for hems, alignment lines
and arrows, and other notes right on the material. Then I cut
out the material pieces. (This only included the three main
pieces. The zippered flap would have to wait until I had the
main spray skirt assembled because the flap had to be fitted
to the spray skirt, not to the kayak itself.)
 |
 |
| Laying
out paper patterns on the material. |
Example
of tracing pattern onto material,
and adding hem marks and notations. |
I will note
here that you could alternately just lay the material over the
kayak, mark it and cut it out, much as I did with the kayak
cover. That worked fine for the cover because the shape was
quite simple (a large "football" shape), and it required the
full width of the material for the cover. There was simply no
need to "fit" a pattern to the material. Instead I had to fit
the material to the kayak. However, if I had done that with
the small complex and oddly shaped pieces of the center spray
skirt design, I could have ended up wasting a good deal of material.
I realized during the initial design drawing stage that it would
be best (and much more efficient) to make the center spray skirt
out of three main pieces (bow section and two long side pieces),
plus the zippered flap as the fourth piece. Making the paper
patterns allowed me to lay them on the material and arrange
them to best utilize the material without excess waste. This
proved particularly important with such oddly shaped pieces
as those for the center spray skirt. It also saved money on
material.
With the
skirt pieces cut and ready, I turned my attention to making
the battens before doing any sewing. If my batten idea didn't
work out, I didn't want to have to take out a lot of stitching
and make alterations to accomodate battens made a different
way. It would be easier to ensure the battens would work before
doing all that sewing.
MAKING BATTENS -
 |
 |
"Splitting"
1/2-inch CPVC pipe with
a hand saw. |
1/2-inch
CPVC pipe before and
after cutting in half. |
I had used both PVC and CPVC in previous projects for frames
and stiffening in camo blinds. I learned that CPVC was lighter
and more easily flexed and bent to shape. I had also learned
that heating CPVC with just a hair dryer (1500 watt or so) would
allow it to be bent easier, and hold the shape when cooled.
CPVC is waterproof, very lightweight, won't rust, will flex
and spring back, and is practically unbreakable - all good attributes
for batten material. An option would have been to use an aluminum
yard stick cut to size and bent into an arch, but I already
had sections of 1/2-inch CPVC on hand from those previous projects
and decided to try that first. Besides, if the aluminum was
accidentally bent, it would not spring back into the desired
shape by itself.
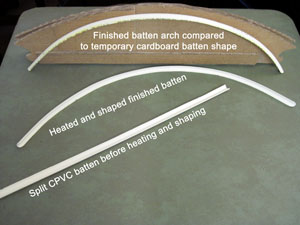 |
CPVC
battens comparead to the
temporary cardboard batten. |
In short
pieces, even the round 1/2-inch CPVC was too stiff to bend well
for what I would need here. Flatter material would fit inside
the channels in the material much better. So I put the CPVC
in a clamp and cut the 1/2-inch CPVC in half lengthwise with
a hand saw to get two half-round "slats". If you have a table
saw, splitting the CPVC would be even faster and easier. These
"slats" are relatively flat. It should be no surprise that these
flatter pieces flex more easily in short sections than round
pipe. Heating these "slats" with a hair dryer and shaping them
was much easier than doing so with round CPVC pipe. I found
that applying and holding the desired bend while heating them
works faster and better than heating a section and then doing
the bending. Heating it with the bend in place seems to "set"
the bend more quickly. Once shaped and cooled, they hold their
shape. Then when you try to straighten them, they spring back
into the bend you just put into them.
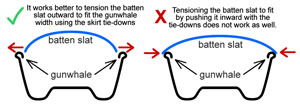 |
Best
way to shape CPVC battens.
|
One important
thing I learned was that it worked better to pre-shape the battens
into a higher, rounder arch and less width between the ends
than you need. Then use the spray skirt tie-down points to pull
the ends outward toward the gunwale, slightly flattening the
batten's arch. This way the battens naturally want to return
to the higher arch by themselves, creating a firmer arch. The
alternative is to leave the battens straight, or only slightly
arched and wider than the gunwale, and then forcing them into
a tighter arch with tension against the gunwale using the spray
skirt tie-down points. Although that sort of worked, if the
tension slacked off, they would flatten out, which is exactly
the opposite effect from what you want to happen. It definetly
did not work as well as having too much bend and too little
width.
ASSEMBLING THE SPRAY SKIRT-
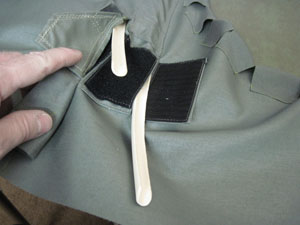 |
Inserting
CPVC battens into the channels.
Velcro flaps secure them inside the channel.
|
I knew sewing
together the three main pieces of the spray skirt would be a
slower process than sewing the relatively simple one-piece kayak
cover had been. There would be a bit of design-as-you-go involved,
since I didn't have all the answers just yet. I did have a lot
of ideas and possibilities I had considered at length during
the design drawing phase. However, I've learned from previous
projects that what I thought would work, and what would actually
work does not always coincide when doing projects like this
one. There is always a bit of learn-as-you-go involved. First
I sewed the three main pieces together, and made a test fit
on the kayak. So far, so good. I made minor trimming adjustments
to the two flaps that wrapped around the bow point, pinned the
flaps together and did the finished sewing and hems on that
small area. The skirt design depends on hanging the front over
the bow point and pulling the rest of the skirt back from that
anchor point to tension the whole skirt into shape. Next I sewed
the channel hem around the cockpit cutout area so I could insert
the nylon cord/bungee cord around it. This cord would hook the
rear points of the two sides into the rear thwart, and pull
everything into shape - at least that was the plan.
My original
plan called for 1/4-inch bungee cord all the way around the
inner "cockpit" opening. I found out that this allowed too much
springy "give" to hold the skirt as tight as I wanted. I tried
using 3/16 nylon cord around the "cockpit" with a foot or so
of bungee cord on each end to hook to the thwart bar. That worked
better, but even that much bungee was too springy. Then I tried
useing a 1-foot length of bungee cord in the middle (around
the curved front edge) of the cockpit and a length of 3/16 nylon
cord on each side. That was better still, though the large knots
necessary to connect the cord and bungee tended to get hung
in the notches of the curved center along the hem when tightening
the cord. Finally I moved the bungee section to one side away
from any notches in the hem, and that did the trick. This seemed
to give me the best tension (and stiffest sides) for the cockpit
opening.
I inserted
the batten in the channel where the bow section and side pieces
were sewn together, as in my original design, and did another
test fit on the kayak. To my relief, it worked pretty much as
planned. However, the tension pulled down the cover a bit too
much just behind the batten. It seemed the batten was some four
inches too far forward to do exactly as I had intended. I decided
to add a second batten just behind the first one. Such practical
impirical modifications are often the case in my projects. It
only required an additional channel for the second batten to
slide into. Because I had designed the pattern with enough material
overlap to allow room for a second batten channel, all I needed
to do was a row of stitching to create the channel. With a second
batten inserted, it did the trick. Now it worked as planned.
 |
The
Adapt-A-Trak kit clips.
|
With that
important hurdle behind me, I checked to see if the attachment
points I'd chosen for the Adapt-a-Trak clips would be optimal
for tensioning the battens and holding the skirt edge in place.
It became obvious this too was going to require some impirical
modifications as I fit things together and found out just where
the tension points were really needed.
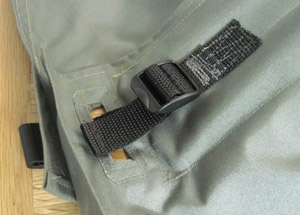 |
Reinforced
slot for skirt tie-down
clips in Adapt-A-Trak railing. |
The Adapt-A-Trak
Lashpoint kit from Native Watercraft was the only source I could
find to get clips to fit their proprietary rail connection system
on the sides of the Tegris. I cannot fathom why they don't sell
the clip strip material, since they make very few items that
use that connection system. Native kayak owners who want to
make items not provided by the manufacturer have little option
for do-it-yourself solutions without a means to attach to the
kayak. The Tegris in particular is a problem, as it does not
have the option of the "Groove" adapter system that comes on
the poly Ultimate models to attach accessories. In the instance
of spray skirts, the Adapt-A-Trak strip is the only logical
attachment point short of drilling holes in the Tegris hull.
The kit
comes with four "lashpoints", but as shown in the accompanying
photo, each of these lash points actually has two pieces - one
clip sewn to a 1-inch web strap, and one clip sewn to a 1-inch
D-ring and 1-inch ladderlock (also called a strap adjuster).
Thus I actually had eight "clips" available to hook into the
Adapt-A-Trak strip on the Tegris. I had planned only six attachment
points (three on each side) for the spray skirt, but at this
point it looked like I may need to use all eight clips.
Note that
my center spray skirt design works alone, with or without the
OEM bow or stern spray skirts from Native, although I am also
using both in conjunction with the center skirt. The OEM skirts
do not interfere with my design, so I can leave them on when
using the center skirt.
With all
the clip points still not firmed up, I finished hemming the
rest of the center skirt. Then I cut slots into the cover for
the first pair of clips that hook onto the Adapt-A-Trak rail
just below the double batten. I reinforced the openings where
the web straps feed through, and sewed on the straps and ladderlocks
for these two clips.
My next
step was to sew the two 26-inch nylon zippers to the base spray
skirt. Then I set up my temporary cardboard batten again so
I could cut and fit a paper pattern for the zippered flap. This
was the final piece to the puzzle to make everything work as
designed.
ZIPPERED FLAP with LAP SKIRT -
 |
Paper
pattern for the zippered flap after
trial and error fitting and adjustments.
|
The zippered
flap would have a CPVC batten at the rear edge to support it,
replacing the temporary cardboard batten. The two 26-inch nylon
zippers will allow me to roll the flap up out of the way. This
will open up the center skirt much like a cockpit style kayak
to reach equipment and for ease of entry and exit. It will also
have what I am calling a "lap skirt" that will function as a
sort of "touring skirt". This will offer additional rain protection,
as well as extra coverage from excess paddle drip whenever I
engage in some serious paddling. The lap skirt will tuck away
into a pocket on the zippered flap when not needed.
Once again
I had to tape two large pieces of art paper together to get
a piece large enough for the flap pattern. I soon found my attempts
to position the paper on the kayak and mark it very frustrating,
even with the temporary batten in place. Eventually I resorted
to taking measurements from my scaled design diagram and transferring
them to the paper to create a pattern. I cut this pattern out
and did a test fit with the kayak. After several rounds of re-marking,
taping more paper around the edges and refitting, I finally
achieved a useable pattern, although it now looked more like
a patchwork quilt. Next I pinned the pattern to my material,
marked it and cut out the material for the flap. Then I hemmed
all around the flap and once again made a test fit. So far,
so good. After some more pinning, fitting and scratching my
head, I decided I would need a second batten near the front
of the flap. It didn't take long to make the additional batten.
Then I made and sewed on two channels for the battens, slid
both CPVC battens into these channels and did another test fit
after moving the cardboard batten out of the way.
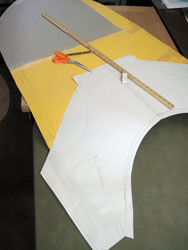 |
The
paper pattern for
the "lap" skirt.
|
This time
the news was not good. The flap sagged far too much. The tension
I expected would keep it in position only pulled it down flatter,
even with the batten inserted. After so much work it was rather
disappointing. This was obviously going to require some rethinking.
There had to be more support at the rear batten, which it seemed
was only achievable by making a longer batten that reached wider
and closer to the gunwale for support on the ends. So, I moved
the existing rear batten and channel forward near the center
of the flap, then moved the front batten and channel farther
toward the front as well. I made a new longer rear batten and
channel. This new one would extend over the zippers instead
of ending next to them. I wasn't sure how easily I could work
the zippers in this configuration, but I had little choice.
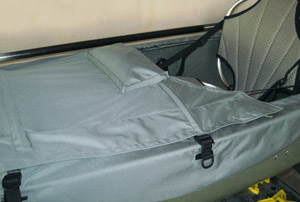 |
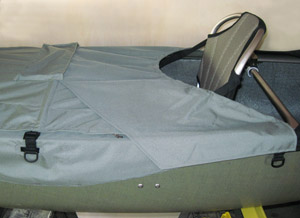 |
| Lap
skirt pocket with skirt tucked inside. |
Lap
skirt deployed. |
When I tried
this new modification I was very pleased. I now had a workable
solution. With the skirt and flap installed on the Tegris, I
climbed in to be sure I had sufficient knee room. I found there
was more than enough room, and the batten height was just what
I was shooting for. To finalize this modification, I removed
the skirt and did the final sewing of the zippers to the flap.
After a little final stitching to permanently attach the front
edge of the flap, I was home free. There was still the "lap
skirt" piece to be made and attached, but that would be simple
enough. All the difficult work was finished.
For the
"lap" skirt I made another paper pattern by a combination of
measuring and test fitting. I traced the pattern onto the Cordura
I had left, cut it out and stitched the hems around the edges.
On the back edge where the skirt wraps around the body I made
the hem wide enough to form a channel. I will feed 1/8 or 3/16
bungee cord through this channel and clip it to the thwart bar.
That will hold it snug while still having enough stretch so
I can comfortably move and paddle. About twelve inches of the
front edge is sewn to the zippered flap. The rest hangs down
to shed water. On top of where it's sewn to the zippered flap
I stitched on a "pocket" where I can roll up the lap skirt and
store it out of the way when not in use. It will also make a
handy spot to temporarily stuff small items.
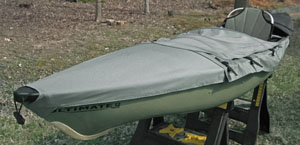 |
 |
 |
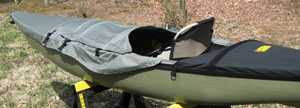
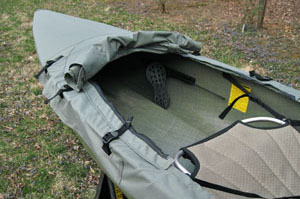
| Two
views of the nearly completed skirt. The "lap" skirt has
not yet been attached. |
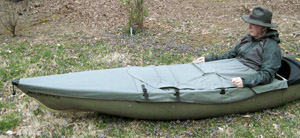
A
full side view of the center skirt
before the "lap" skirt was added. |
 |
 |
 |
Here
the zippered flap is unzipped
and rolled up out of the way. |
Alternately
the zippered flap can be
rolled under behind the footrests. |
The
fully completed center spray skirt
with "lap" skirt deployed. |
So, there
is the finished center spray skirt for my Tegris. I have taken
into consideration the idea of using a camouflage cover over
this skirt. It should be as simple as using some die-cut polypropylene
camo blind material, or even some netting in which I can stuff
natural vegetation. Either one can be draped over the skirt
and tied to the bow handle and the D-rings along the sides of
the skirts. The center skirt will hold it up out of my way.
Combined with some camo clothing it should work out nicely.
|
|
 |
|
 |
