 |
|
|

Kayak Cover
and Center Spray Skirt
for the Native Watercraft Ultimate 12 Tegris
|
I
use my kayaks for wildlife photography, and having a spray skirt
is practically a necessity. I cook like a lobster in the sun.
I had thought that would not be a problem in my cockpit style
kayaks, but I learned the hard way that even when wearing long
pants, my feet could still get sunburned in sandals while paddling.
I knew that the open design of my newly acquired Native Ultimate
Tegris would mean putting spray skirts on it. The extra protection from
paddle drip and sudden rain showers that they could provide for
my camera gear and myself was high on my list of considerations
too. Though I added OEM bow and stern skirts to my Tegris, the
company did not make a center skirt for it, so that task fell
to my own creativity.
The kayak
cover was almost an afterthought. While planning my spray skirt
design, I figured if I had to order material for it, there was
no reason not to order enough extra to make a custom cover.
The idea of a coating of oily road spray all over the inside
of my Tegris (and the seat) from hauling it on a trailer in
the rain did not appeal to me at all. Unlike a simple cockpit
cover for my other kayaks, sealing out the weather would be
a little more involved with the Tegris and other Ultimates.
Sure, it would have been easier to just purchase a generic-fit
"bag" to put it in, but I was already going to be measuring
and sewing the spray skirt. Making a fitted cover would be even
easier than figuring out the design for a center skirt, and
it would be 1/3 to 1/4 the cost of a pre-made, generic fit boat
cover of any description.
DESIGN and MATERIAL -
 |
 |
 |
The
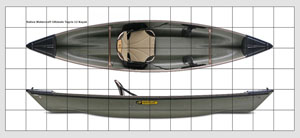
original scaled grid layout
with
only the Tegris images. |
Here
the OEM bow and stern skirts
have
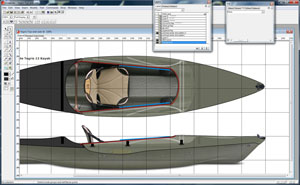
been drawn on an additional layer. |
In
this initial draft design the center
spray skirt pieces are drawn on a top
layer and set partially transparent to
show what is underneath. |
 |
 |
In
this enlarged detail the red line is a bungee or
nylon cord, the blue lines are zipper locations
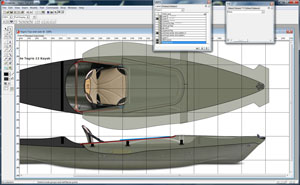
and the white lines are possible batten locations. |
This
enlarged detail shows the skirt separated
into sections to better fit the Cordura material
for
cut-out. Side flaps and hem
allowances
have been added to make a pattern. |
My first
task was to create a design plan for the center spray skirt,
figuring out how it would work, or even how it would attach.
It would have to be versatile and practical without getting
in the way of paddling, or limiting access to my photography
equipment and other gear, while still providing sun protection
for me and water protection for my gear. Beyond that, a preconceived
design would give me a good idea of how much material I would
need. I started by putting images of the Tegris into my favorite
graphics software. Then I set up a 12-inch by 12-inch scaled
grid overlay. I scaled the images to the grid, then began drawing
various design ideas layered over the scaled images. By adjusting
the layer transparency settings I could see through the various
pieces I drew and line them up with the kayak image underneath.
This made it much easier to visualize how and where to attach
the skirt, as well as how and where to incorporate battens to
make it retain its shape and properly drain away water. A design
incorporating simple and easy attachment and removal was important
too. After many hours of adjusting and tweaking my idea drawings,
I had the major design details figured out. Then I spent some
time figuring out a rough design for the custom boat cover so
I would know how much material everything might require.
 |
This
scale diagram of 7 yards x 5-foot wide
material (6-inch grid) shows
cover and skirt
pieces arranged for
cut-out with minimal waste. |
With the
cover and skirt designs ready, I could see it would take about
seven yards of 60-inch wide material. I ordered mine from Rockywoods
Outdoor Fabrics at Rockywoods.com, an online source I had used
before to get hard-to-find material for some of my other projects.
I chose 500 Denier coated Cordura nylon fabric in a dull gray-green
shade called "Foliage Green", which is a fair match to the green
color of my Tegris, though a bit grayer. Their "OD Green" might
have been a slightly closer match, but I thought it was a bit
too dark for my needs. I had considered ordering some sort of
camo pattern material instead, but decided a solid color match
for the Tegris color would be more practical. I thought it would
make a better looking boat cover, for which there was no need
for camo. As for the spray skirt, I would not need "camo" all
the time, and this center spray skirt would likely stay on 90%
of the time anyway. I reasoned the dull green skirt could serve
well as a base for whatever camouflage add-on I decided to use
whenever camo was needed for my photography.
KAYAK COVER -
 |
 |
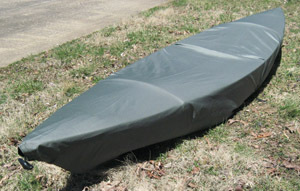
The completed kayak cover
|
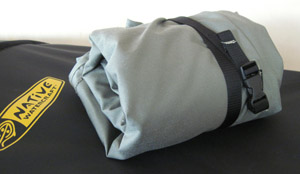
The cover rolled up for storage
|
It's important
to note that I designed this cover for use while transporting
my Tegris. It is neither meant to be used as a year-round outdoor
storage cover, nor will it be used that way. If I wanted that,
it would have been designed as a fully sealable "bag" to ensure
no critters could utilize my Tegris as a seasonal home. What
I needed was a cover to keep the Tegris dry inside while being
carted around on my photography expeditions, so the design reflects
that purpose.
The seven
yards of 5-foot wide Cordura I ordered for these projects is
a huge
piece of material to deal with. So I decided to make it
easier to handle by making the kayak cover first. I draped the
whole thing over the kayak, pulled the material together under
the bow and stern and pinned it in place. Then I marked it with
white chalk so I had a close general shape to cut out from this
huge piece of material without wasting anything. I removed the
material from the Tegris and cut out the rough shape I had marked.
That left a bit less than half the material, which I set aside
to use later for the center spray skirt. This cut out piece
of Cordura for the cover was now easier to handle.
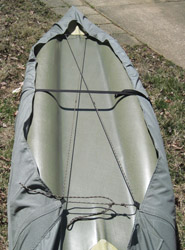 |
| Another view of the cord tie between the hull channels.
|
 |
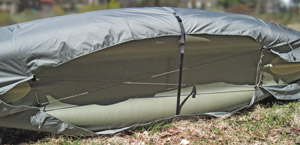 |
The seamed bow section anchors the cover
|
Nylon
cord and web strapping secure
the middle of the cover
|
Next I draped
this rough cut-out over the Tegris again, then flipped the kayak
bottom up. This made it easier to pull and snug up the material
to the keel so I could fit, mark and trim it more accurately,
allowing for overlaps and hems. During the design drawing phase
I had decided to take advantage of the double channel hull shape
when tying on the cover. This approach allowed me to pre-fit
and sew the bow end for a snug fit. With the bow end sewn, I
slipped this fitted bow end onto the bow like a sock. Then I
draped the rest of the cut material over the kayak. The fitted
bow secured it in place so I could pull the material tight and
make an even closer fitting and marking of the rest of the cover.
All that was needed now was a final trimming, then sewing all
the hems. I stitched on the webbing loops to thread the nylon
cord through for tying on the cover, and added a nylon web strap
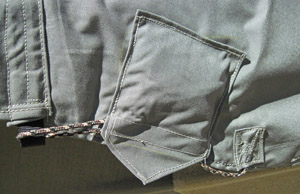
with a plastic snap buckle across the beam. I also added a small
pocket just behind the left hull channel to store the lashing
cords. That was it. The cover was finished.
 |
 |
 |
This
pocket with velcro closure holds
the nylon cords ties for storage. |
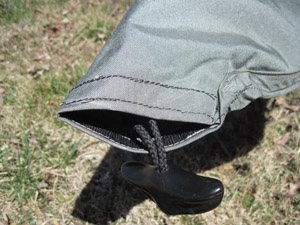
The
bow handle exits through a
velcro closure opening. |
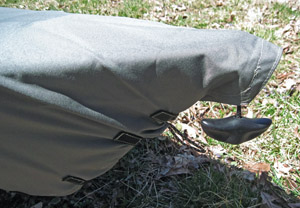
The stern handle exits through the stern opening. |
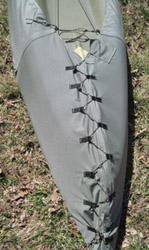 |
The
stern lashes snugly
with nylon cord. The cord
pocket is also visible in
upper right of photo. |
Putting
on the cover is as simple as slipping on the fitted bow end
like a sock, then draping the rest of the cover over the kayak
and cinching it up. A single 3/16 diameter nylon cord pulls
the cover snug inside the floor recess between the two channels,
while another 3/16 nylon cord laces up the stern along the keel
to form fit it to the stern. The adjustable nylon web strap
across the middle of the kayak ensures the cover does not flap
along the sides when transported at highway speeds. The two
nylon cords used to secure the cover remain attached to the
cover so they cannot be lost, and they store in a handy pocket
with velcro closer sewn to the bottom of the cover. The nylon
strap and buckle also serve to neatly cinch up the cover when
it's folded for storage. The bow point has an opening where
the T-handle comes out for carrying or tie-down. This opening
will velcro shut to keep out excess water and air pressure during
transport. The point of the stern also has a small opening for
the T-handle, but since the stern is trailing when transported,
water will not blow in, and it won't catch air and balloon up
the cover. No velcro was needed here. This gives me a very snug,
well-fitted cover with virtually no bagginess to whip in the
wind while transporting. Hopefully these photos will make it
apparent how the cover design works.
|
|
 |
|
 |
