|
|
|
|

Homemade
Frames for
Camouflage Net Photography Blinds
|
Camo
netting is a flexible, portable means to make a blind,
but sometimes you find yourself in a spot with nothing
substantial to drape the netting over. So how do you hold
it up? How about a frame that is light and portable just
like the netting, costs very little and is very simple
to make?
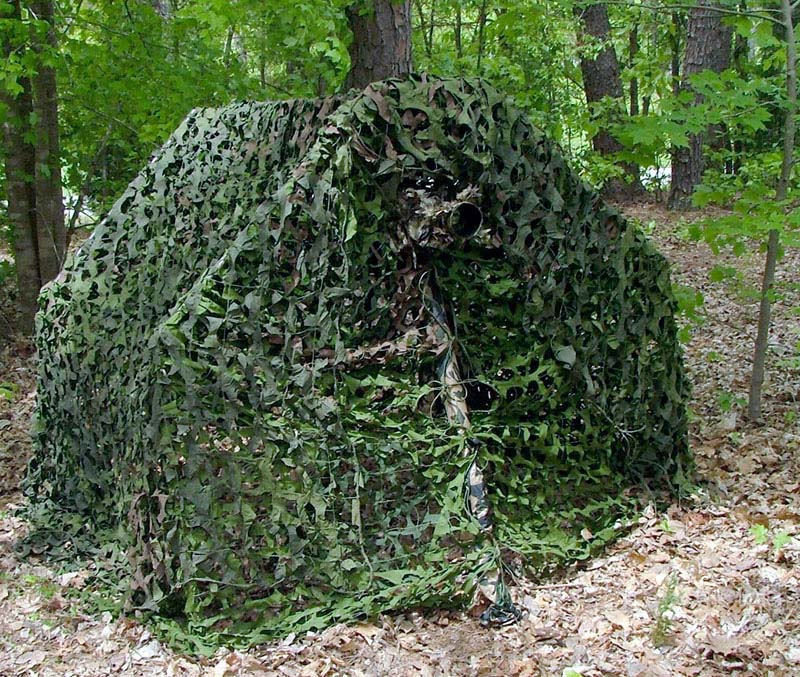
The
two lower right photos show a large and small version
of the portable frames I made from inexpensive PVC water
pipe. One is large enough that I can sit inside in
my camo folding chair with three bags of gear. The other shows a smaller version for when I use my folding
boat seat on the ground to get low. It still has room
for a couple of bags of gear as well.
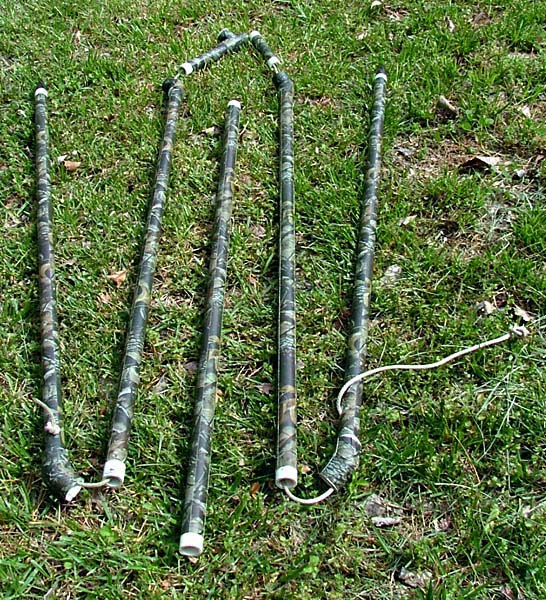
What
you are going to make are the two
identical bundles shown on the far left. Each
bundle is half of the frame. The
left photo shows one of these bundles opened to
show the 6 sections of pipe strung on a nylon rope, and
one of the two cross beam sections that connects the two
halves of the frame. How all this works will become more
evident farther along.
The
materials you need are very simple-
(1) Two or three 10-foot lengths of 1/2-inch
PVC pipe (depending on desired frame size) [
I recommend the 600PSI pipe - it has a thicker wall
and is stiffer ],
(2) Eight 45° PVC elbow couplings (1/2-inch
diameter to match the pipe),
(3) Two PVC T-couplings (1/2-inch diameter),
(4) One straight PVC coupling (1/2-inch diameter),
(5) about 20 feet of 1/8 or 3/16-inch braided
nylon rope
(6) One or two rolls of camo tape (similar
to duct tape), or you could paint the pipe black,
or a dark shade of green, so the bright white of the
PVC does not show under the netting.
 |
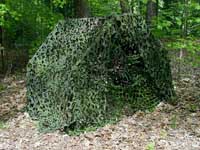
The
frame is shown here covered
with Hunter's Specialty Camo
Leaf Blind material in
Advantage Max 4D pattern. |
By the way, the camo tape also comes in handy to cover
shiny parts of tripod heads and various other things.
These
following materials are optional. If you want to have
a point on the ends of the vertical sections so you can
push them easily into the ground (often this is enough
to make the frame stable) you will need a 3-foot oak
dowel 7/8-inch diameter, four 1/2-inch #6 or #8
wood screws, and a means to shape the dowels. I was
lucky to have access to a small wood lathe to turn down
the ends. You might want enough 1/8 or 3/16-inch braided
camouflage nylon rope for tie-downs (like a tent)
and a few tent stakes. Of course, you will need
camo netting (or some other kind of camo blind material).
Deciding
on the size of your frame is the next step. The dimensions
and joint coupling placement for the various sections
of the large frame I made are noted in this
diagram. You are not limited to these dimensions,
although the joint coupling placement will be the same.
Figure out for yourself what space you need inside your
blind and adjust the section lengths accordingly.
For
my
two frames, I made a larger one that allows enough
headroom for sitting in a comfortable folding camp chair
for those long all-day sessions. I also made a smaller
frame for when I need to be low to the ground, or for
when I have to carry the gear a long distance and don't
want to carry the extra weight and bulk of the foldling
camp chair.
Now
for the easy part - making the frame pieces. Cut the PVC
pipe to the desired lengths using a hack saw with a fine
to medium blade. I've found a hack saw blade cuts the
1/2-inch PVC pipe like butter. Don't use a wood saw, as
the teeth are too large and course for PVC. It won't do
your handsaw's sharpness any favors either. The metal
cutting blade of a hack saw will not be dulled by the
PVC.
If
you are using the spike ends, you can install them now.
The diagram
at left shows how I made my spikes, and the photo
at right shows a spike
painted black and installed. Once inserted into
the pipe, I secured each with a half-inch wood screw so
it could never work its way out of the pipe.
If
you are using the camo tape to cover the pipe, do that
now, as it will be much easier taping one section at a
time than waiting until after it's assembled onto the
rope. If you are painting the pipe instead, you might
wait until the frame is assembled. It will probably be
easier to paint it all at once instead of having to paint
all the individual pieces one at a time.
Next,
drill the holes for the nylon rope, which will later be
threaded through the pipe as shown in the diagram
(but don't thread the rope just yet). You can also
refer to
photo one and photo
two at left to see how the holes look. On each
frame half one vertical piece gets a slotted hole, with
a slot just large enough for the rope and a larger hole
on the end to let a small knot pass through (while catching
a larger knot). The other vertical piece gets a round
hole just large enough for the nylon rope to fit through
(photo
two). Install the 45° elbows (one to each
long section), then the T-coupling to one of the short
top sections, pressing these on as firmly as you can.
No need to use PVC cement on these.
Now,
knot one end of the rope so it will not slip through the
small hole. Thread the other end of the rope into the
small hole and slip it on through the other sections and
couplings, stringing them onto the rope like beads, arranged
in order as you see in the diagram
and this
photo, and finally out the long slotted hole on
the last section.
Next,
assemble all the sections together with a snug press fit.
Now pull the rope at the slotted hole fairly snug
so it is stretched a little, and bend it up into the slot
and mark the rope with a permanent marker right where
it exits the slot. Next, tie a half knot near the mark,
and work it closer to the mark until it's right at the
mark (you may need to disconnect the vertical piece
from the assembly, slide the rope out to tie the knot
at the mark, and then slide it back into the slotted hole
again). This knot should be small enough that it will
slide back into the pipe through the large end of the
slotted hole, but will not slide through the small
end of the slot. About 12-18 inches beyond this small
knot tie a larger knot, perhaps two knots over top of
each other to make it fat, so that it's large enough it
will not slip through the large end of the slot.
Now
this rope, when pulled snug with the small knot locked
in the slot (as
shown in this photo), will ensure the sections
will not slip loose during use. When the tightened rope
is unhooked from the slot and the small knot is allowed
to slip up inside the pipe, the rope will slacken, and
the pipe sections can be pulled apart. But they will remain
strung together on the rope, thus keeping them together
in order, as
shown it this photo. You'll never have to fumble
with figuring out which section goes in what order again,
nor will you loose a piece and find out you cannot assemble
the frame at all. Once you've tested this out, you can
cut off the excess rope beyond the large knot.
The
photo at right shows one
section assembled, easily standing alone with
the spike ends in the ground.
Do
the same assembly operations to the other half of the
frame. Now press the straight coupling firmly onto one
of the horizontal sections that connects the two halves.
Then assemble both the top horizontal sections end to
end and connect it with the two frame halves. Now the
frame will stand alone, and you have the basic
assembly completed, as shown in the left photo
here. This right photo shows a more detailed
view of the upper section and horizontal support.
Don't forget that you can vary the depth (front to back)
by using only one of the horizontal sections if you wish.
 |
 |
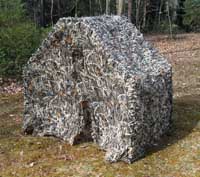
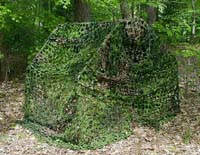
The
two photos at right show the large frame with
a
single
net covering it (right), and then with
two nets covering it (far right). My large frame cannot
be fully covered with a single standard net piece.
It will cover the top and front, but hangs down only
a foot in the back. I use a second net to cover the
back, which double-covers across the top. This makes
the netting a little less "see through" on the sides
and top. Optionally, I could make a set of camo material "flaps" or
"curtains" to hang from the back frame half, as I did
with
the
smaller
frame I made, shown below.
|
The
upper two photos at left show the inside and back of my
smaller frame with the netting installed. As you can see
in the far left photo, the net does not hang down all
the way in the rear. This is because this net is the one
I cut a section from to make my camo
drape. I had some extra camo material, so I made
two
small "curtains" or "flaps" which I leave slipped
over the rear frame, using the frame something like a
curtain rod. This blocks viewing "through" the netting
from the front, something you always want to avoid. If
you don't take this into account, then your movement inside
the blind might be seen as a silhouette against the daylight
coming in the rear of the blind. Birds will visually pick
up on movement very quickly, a good rule to remember anytime
you're trying to photograph wildlife.
Since
I showed the boat seat in the blind photo above, I
thought I'd mention it here. I absolutely LOVE this
seat. I have two of them. I bought this one while on
a photo trip, to keep from having to sit on the wet
ground. It's FAR better than any foldling "stadium
seat" or "camping seat" I've found. It weighs no more
than the typical folding stadium seat, and provides
far greater lower back support. It's contoured for
your back, and the bottom of the seat comes forward much
farther under your thighs. This provides plenty of
leverage to hold up your back when you lean back, unlike
the stadium seats I tried, which rely on the folding
hooks to latch onto the stadium bench for support.
If you sit on a stadium seat on the flat ground and
lean back, you fall right over. But you can sit flat
on the ground with this boat seat and your own weight
provides the leverage for the back support naturally.
I later
bought a second one of these seats with the Advantage
Max
4D camo pattern for my
one-man
duckboat. I made a duckboat
camouflage
cover for this boat, which is featured
on another page.
|
|
|
 |
|
 |