 |
|
|
|

Homemade Camouflage Body
Drape
from military surplus or commercial
camo netting
|
My
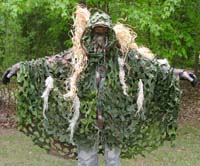
wife calls me "Swamp Thing" whenever she sees me in this
camo net body drape, and I suppose I can see the resemblance.
But that's a good thing, I guess, since the whole idea
is to blend into the natural surroundings while trying
to get close to birds (and other creatures) in the wild.
- I like to use the
phrase "blur your shape into your surroundings", which
is quite appropriate for "photographers", as it really
describes the effect you should be going for.
-
This
camo drape is still getting some refinements, mostly adding
tufts of rafia and stringy gobs of burlap thread to blend
its overall green tone into something more suitable for
the coast, where I do most of my photography. Those rafia
tufts in the photos are much too "blonde", and
will be toned down with a light (very light) misting of
flat black spray paint, a technique I used very effectively
on the rafia for the duckboat
camo cover I made.
 |
 |
| Swamp
Thing? |
This
was my first attempt at making any sort of body camo,
utilizing the materials at hand. I've since greatly improved
my techniques, but I still utilize this body drape on
occasion.
So,
how do you go about making one of these contraptions?
Basically it's a piece of military surplus camo netting
with the aforementioned refinements (tufts of rafia, pieces
of tangled burlap, dried fronds from water plants and
other doodads) attached to it to make it blend in with
the foliage around water - or whatever landscape where
you do your photography. In this case I cut off a piece
of camo net about 6-feet x 9-feet from a larger net I
purchased from a military surplus outlet. The diagram
at left shows which dimension is for the front, back and
sides.
 |
| The
"harness" inside |
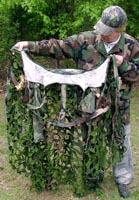
One
edge of this piece of net had the thick "cord"
you find along the outer edge of the large net. I covered
this corded edge with a hem wrap of camo material (easily
seen in this
photo) to neaten it up, make it softer and give
the edge some "body". This is the edge I use for the front
(around the "hood" and down the chest).
 |
| The
sleeve insert |
From
this point on I went to a lot of extra trouble that you
may not want to or need to deal with, depending on how
you plan to use the camo drape. Since I wanted the option
to use this in warmer weather if I needed to, I opted
to make a complicated "body
harness" (for lack of a better term) shown
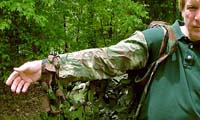
in the left photo, and added sleeves,
shown in the right photo. The other option would be to
permanently attach the camo netting to an old (or new)
camouflage shirt or jacket. Then you simply slip on the
shirt/jacket and voila, you're wearing the camo drape.
I knew
though, that any camo shirt or jacket, plus the camo netting, might be too
warm (hot) for some weather. I wanted the option to wear a thin short-sleeved
green shirt underneath the camo drape (refer
to this diagram). But the camo netting itself was not very comfortable
on bare arms, thus the sleeve inserts, which are nothing more than the sleeves cut
from an old faded cotton camouflage shirt. The "body harness" is the "yoke" (or
shoulders and collar) cut from that same old faded shirt. To this "yoke" I
added a framework of straps made from camo material, which provides the framework
of a shirt without completely covering your body with material. It allows for
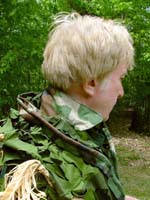
much greater air flow. The collar
is worn turned up to keep the netting off the back of the neck, also
for more comfort. (Note that if I'm wearing a long-sleeved camo shirt under
the drape, I bypass the inserted sleeves altogether and just put my wrists
through the wrist openings. )
 |
 |
 |
You
might wonder why go to all this trouble to put a shirt
or harness under the net. Why not just drape it over your
head and go?
Well,
I actually tried that, but I quickly realized that the
drape would not stay in place that way of I moved around.
Though it worked fairly well as a "blanket"
sort of drape when seated, if I moved it would slide off
my arms, over my hands or down my back. It would hang
all the weight on my head and neck, and not even touch
my shoulders. In short, it didn't work. If it weren't
for the fact of trying to allow for warmer weather, I
wouldn't have messed with the "harness" at all, and just
attached the netting to the old shirt. This IS by far
the easiest way to put on the camo drape, since your fingers
don't get caught in the netting while trying to find the
arm/wrist holes. With the open harness design, I still
have to fumble for a minute to find the wrist holes and
position the shoulder-yoke & collar. But once that yoke
and collar are pulled up into position, the drape falls
right into place and stays comfortably.
Now
for a few other points of detail. The wrist openings (see
diagram and photo-1
and photo-2)
allow the excess length of the netting to drape below
your hand instead of being bunched up on top of your arm
and forever trying to fall down over your hands. I simply
cut out one of the "cross joints" in the netting where
I wanted my arm to come out, and lined the edges around
the opening with a hem of camo material, much as I did
the front "corded" edge of the drape. This makes it soft
and comfortable, and is far easier to find the opening
to get your wrist through it. The hem around this wrist
opening is attached at the top to the harness strap that
runs down from the shoulder yoke. This controls the length,
gives you something to attach the sleeve section to, and
also to attach the netting. You may find you need to "gather"
some of the netting up near the shoulder to keep it fuller
in the front over the chest, instead of a wad hanging
in your elbow crook. You only need one layer over the
arms, since they are normally in front of you anyway holding
up the camera.
You
may also need to gather up some of the netting in the
back, attaching it across the shoulders, behind the neck,
and part-way down the back so it won't hang down too far
in the back, depending upon how tall you are. I made little
squares of material, about 2x2 inches, placed them over
the cross joints of the net webbing where it intersected
with a harness strap or the yoke, and sewed along the
webbing. This secures the net to the harness, and spreads
any stress from pulls for a sturdier attachment point.
See the diagram
below right and the photo
below right which both illustrate this attachment
method, which was used everywhere the netting attached
to the harness.
 |
 |
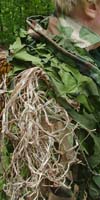 |
As mentioned earlier, the camo drape
is shown here adorned with tufts of rafia and wads of
burlap thread. Rafia is fine strips of oak, which looks
something like dried weeds. It's available at craft stores
or the craft section of large department stores. Just
take a couple dozen strands from the package, double them
over if they're too long, and make little pom-pom tufts,
something like the left
photo. Sew or tie together the bunched end into
a little "handle", then sew or tie this onto the net webbing
as shown in the photo. I have found that spraying a light
misting of flat black spray paint onto the tufts before
installing them dulls the bright blond color into a more
natural dull tone. Just keep the spray can at least two
feet away from the tufts you've made, and let just a misting
of the paint fall onto the rafia. It's really easy to
get too much, so try a couple of quick spurts first to
see how it works before you overdo it. The rafia in these
photos has not yet received this treatment but they will
before my next photo outing.
The
burlap tufts can be made by cutting the edge of burlap
cloth and carefully pulling out one thread at a time.
This is a tedious process, but you get better at it as
you go along. Laying out these "strings" in
bunches, you can make dangling clumps with it like hair
or Spanish Moss. Just use whatever materials you can think
of to decorate the camo netting to blend into the foliage
where you do your photography. You can also stuff bits
of foliage from your surroundings into the netting for
the final touch when you're out in the field.
The
left photo shows how the front of the drape is tied together
to keep it closed. I used a simple method of sewing short
pieces of lightweight camo nylon cord into the hemmed
edge on each side of the front. Tying these together with
bows like a shoe lace works very well, and is easy to
tie and untie, even with gloves on. Notice that I'm wearing
a camo face mask and camo gloves in these photos, and
camo clothing under the net. It's important to cover everything
so you blend in as much as possible.
This
camo drape will fold up (or ball up) into a small package
that's easy to pack in a bag and carry. It gives you the
freedom of movement that a fixed "blind" simply does not.
There
is always the option to pull out the checkbook or plastic
and order some sort of camouflage suit...... or you could
make one. I have made two
Ghillie suits, as well as a leafy
camo suit, each of which fills a niche in my arsenal
of camouflage. They are each useful for different seasons
and different environments. You might also read my articles
on "Good
Camouflage and Its Use in Bird Photography" and
"Tips
On Getting Closer To Your Subjects (Field Craft)".
I hope this information will inspire you to
make something "camo" of your own and use it effectively
for your nature photography. |
| |
|
|
 |
|
 |
