 |
|
|
|

Homemade
Leafy Camo Suit
|
 |
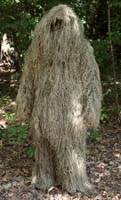 |
| Ghillie suits for different terrain and seasons |
The
traditional "Ghillie" suit was originally a Scottish invention
used for gamekeeping and hunting, and was eventually adopted
and adapted for use in military applications. There are
various styles of Ghillies, designed for stalking partially
upright, or for sniper crawling, or general hunting, and
even paintball sport. Ghillie suits can look something
like the two suits I made specifically for wildlife photography,
shown at left. The construction techniques have changed
with the times, and today they are usually made from heavy
twine or strips of cloth painstakingly tied to a net backing,
creating a shaggy covering that disguises the human shape
and blends easily into foliage. Because of the construction
technique and the materials involved, they tend to be
hot and stuffy to wear. Lighter weight versions built
on a clothing base of fine synthetic netting are now available
which tend to be some cooler. Commercially made suits
will cost from around $125 and up, depending upon the
quality, materials and what the suit is designed to be
used for. More info on traditional Ghillie suits can be
found in my construction article "Ghillie
Suit Camouflage - An Introduction to the Ghillie Suit
for Wildlife Photography".
|
 |
 |
Homemade
Leafy Camo suit
|
These
days, any sort of camouflaged suit that incorporates a
textured three dimensional simulation of foliage might
be referred to as a Ghillie suit. Instead of long shaggy
threads, they may be made of die-cut "leafy" synthetic
materials which are much lighter in weight, and attached
to either a fine netting or a shirt as a base. These are
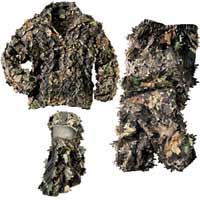
more properly called leafy camo suits. The image
at right shows a shirt, pants and a hood of this type
of suit. Just like the "shaggy" version, a well-made commercially
manufactured set like this suit will cost $150 and up.
Now
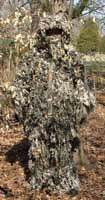
take a look at the homemade suit in the photo
at left. This leafy camo suit cost me less than $50.
It's homemade, using a shirt and pair of lightweight pants
I purchased on an end-of-season sale. The pants and shirt
were both made of the light polyester material that sports
jerseys are made of, with many
tiny holes for ventilation. You can see the tan material
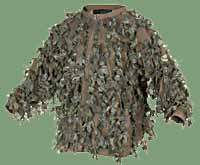
of the shirt I bought in this
photo, which shows the widely spaced green camo die-cut
leaf strips that came on the shirt originally.
This
shirt (Mad Dog Gear Eclipse 3-D Leafy Pullover) was a
poor imitation of quality leafy camo, and a pull-over
design at that, which made it cumbersome to put on and
all the more undesirable. The minimal leafy camo sewn
to the shirt covered perhaps 30% of the area, with wide
tan strips of shirt showing between. It looked for all
the world like a green and tan stripped shirt, utterly
useless for camouflage. However, there was a large rack
of these shirts in the store marked down on sale, perhaps
because nobody would buy the things. While the shirt as
it was would be useless for camo, I saw the potential
for it to become something more, so I bought one cheap.
I got an X-large that would fit my "medium" frame over
a heavy winter coat. That way I could use it in warm or
cold weather.
 |
| |
This
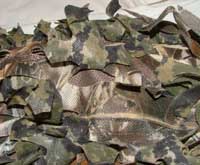
photo shows the "Mad Dog
Gear Leafy Pullover" shirt I used
as a base for my modified version.
The widely spaced green leafy
die-cut camo "leaves" hardly
qualify as any sort of camouflage. |
 |
The
tan shirt material shows through the die-cut holes
of the Camo Leaf Blind material where
I pulled through the green leafy die-cuts.
|
|
On
another rack I found a pair of warm-weather camo pants
made from the same lightweight polyester jersey material.
These were on an end-of-season sale, also cheap. Though
the pants were the right weight for what I needed, they
were the wrong camo pattern, but I had already decided
how to solve that problem, just as I would solve it for
the shirt.
To
make the shirt into useful camo, I took out the shirt's
short 12-inch zipper that made it a pull-over and cut
the shirt all the way down the front. Then I sewed in
a full-length zipper so it would open fully in front.
Next I cut out and attached sections of the same Advantage
Max-4 HD Camo Leaf Blind material I used for several other
projects, including my duck boat camo cover, my tripod
camo skirt and the camo cover for my super-telephoto lens.
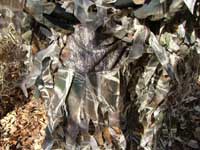
To take advantage of the existing green leafy die-cut
camo on the shirt, I patiently pulled each and every leafy
cutout through the closest die-cut hole in the Camo Leaf
Blind material as shown in the photo
at left. That gave the shirt an even greater three-dimensional
effect while covering the "bare" areas of the shirt with
the Advantage Max camo pattern.
 |
Detail
of pleating on pants leg
|
|
Then
I turned to modifying the pants. These were also a size
or two over-sized for me so I could wear them over other
pants. I cut out sections of the Camo Leaf Blind material
to cover the front of the pant legs from the leg inseam
to the outsided seam. These sections were cut straight
on the top and sides, but cut ragged on the bottom edge.
I overlapped them down the legs like shingles, sewing
the top edge of each section with pleats to make them
pucker outward for greater three-dimensionality (see
photo at left).
I
saw no reason to cover the back of the legs, since the
pants material was already a camo pattern. I would hopefully
be facing the birds while using it, and likely sitting
as well, so covering the back of the pants legs seemed
of little value. The photo
at right shows the back of the legs without the additional
camo covering. The far
right photo shows how the leg covering comes up only
to mid-pocket in front, since the shirt hangs down close
to the knees anyway. It also shows the full zippered front
unzipped. The hood is shown in both photos, with the one
on the right showing it with the face mask open.
The
hood on this suit is more Camo Leaf Blind material backed
by the same camo netting I used on some other projects,
including the super-telephoto cover and the tripod skirt
mentioned earlier. The hood was then tied to the band
of one of my camo boonie hats with camo cord. The hat's
chin strap serves to hold it on my head in a wind and
makes for a comfortable fit for the hood. I thought this
was a novel and original idea until I went looking for
a Ghillie suit image to use at the top of the page. In
my search I came across a product called a "boonie hood"
(shown
at left), which is pretty much exactly what I had
made on my own, except mine hangs down a little farther,
and mine has a face mask made into it. This avoids using
a separate face mask, which would be a bit stuffier in
warm weather than the one made onto the hood. The mask
velcro's on one side so I can pull it back when not needed,
or to eat and drink without having to remove the hood.
| |
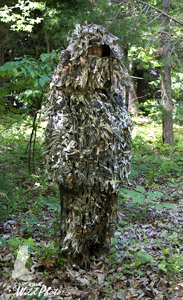
Update:
I constructed a second Leafy Camo Suit for the wife,
made on the same style of polyester lightweight
camo hunting pants and shirt as the first suit.
This time I was more liberal with the pleating of
the camo, which gave it even greater texture and
3D depth. The pants and shirt for this second suit
are two sizes oversized so they can be worn over
heavy winter clothing. Being oversized also makes
this suit more open and airy for use in warmer weather.
Though
not used for these photos, wearing facemasks under
the hoods would be desirable in many situations.
When using this type of suit with the matching lens
covers and tripod skirts, the addition of facemasks
would usually be optional. In that situation, working
behind the lens cover provides excellent masking
already. |
Last
but not least, the left
photo shows me wearing the suit behind the super-telephoto
lens camo cover and the tripod camo skirt I made to use
in conjunction with the suit. This provides extremely
effective camouflage when it isn't practical or possible
to use a photo blind. The lower
left photo shows me crouching next to the camera and
tripod set-up.
HOW EFFECTIVE IS THIS LEAFY CAMO SUIT?
On more than one occasion
I have walked to the edge of the water within 30 feet
or less of rafts of 150-200 wild ducks (Redheads, Ruddys,
Teal, Wigeons, Scaup, Buffleheads, Mergansers, Coots and
Grebes) while wearing this camo suit and carrying my tripod
with camera and telephoto mounted. Moving slowly and carefully,
I stalked upright across completely open ground where
no other cover was available, in broad daylight. Then
I set down the tripod, sat down on my walkstool and took
photos for a couple of hours. No matter how you slice
it, that's pretty darn amazing. It's slow and tedious,
I'll admit, and takes patience, fieldcraft, and excellent
camouflage, but it can be done. To be honest, I even amazed
myself. Now I know how good this stuff is.
For
more on how I made these items, check out the Super-telephoto
Lens Camo Cover article. You can also read my
4-page article on making my own Ghillie
Suit Camouflage. |
| |
|
|
 |
|
 |
