 |
|
|
|

Camouflage
Lens Cover for Super Telephotos
and a Camo Tripod Skirt
|
My
first camo
lens cover project worked out pretty well, I think,
but that cover was designed for a zoom lens with a front
element that rotated as it focused and extended as it
zoomed. When I started using Canon's fixed focal length
"L" prime lenses, the dynamics were completely different.
I also wanted a lens cover that was easier and simplier
to make, but would still be just as effective at camouflage.
It also needed to cover up the gimbal mount as well as
the lens and camera, because I don't shoot from an actual
"blind" very often.
 |
My
first lens cover project
| |
It seems most of the places
I go these days for birds don't let you set up a blind and leave it. Since I have
to work with more flexibility and mobility, I use a homemade camouflage suit and sit
huddled behind the tripod. I'm effectively hiding pretty much out in the open, and
the camera
and tripod MUST blend in with me and the surroundings for effective camouflage.
When camouflaged out in the open like that, I have to set up and stay put for awhile.
I can't wiggle around much either, unlike being inside a blind where you have a little
leeway. On the flip side of the situation, I do enjoy being able to blend right into
nature and have the birds pretty much ignore me. I also have a better view of things
going on around me than I do inside a blind. It does provide some advantage.
I've
found that for this type of photography I mostly use my EF 500mm
f/4 IS lens. As with most of Canon's prime lenses, it is "white" and
really needs some sort of cover for camouflage work. The "Lens Coat" brand
neoprene covers you can purchase are good for knocking down the
white glare, and for protection from scratches and paint chips
if you are careless in handling your lenses. If the neoprene covers
weren't so outrageously expensive, I'd probably use them myself.
However, with or without them, achieving the kind of truly effective
camouflage that I need requires something more than a camo neoprene
cover.
 |
Super
telephoto lens cover
|
|
The type of lens
cover in this project is quite easy to make and use. It works for fixed focal length lens where the lens hood
does NOT rotate when focusing. It also works for zoom lens where the zoom is completely
internal (the barrel does not extend), and of course, does not rotate when focusing. If you have a zoom with a barrel that extends when zooming, you will need to allow for enough material on the cover so it will "accordion" when you zoom in and out.
Since
I discovered the die-cut Camo
Leaf Blind material in the Advantage Max-4 HD
pattern (made by Hunter's Specialties) I will not be without
it. I keep one or more packs of the 56 inch x 30 foot
size on hand at all times now. I've used it for many projects.
It started with my duck boat
camouflage cover, and from there it's become my
default camo material for just about everything that doesn't
require actual "cloth" material. It weighs almost nothing,
does not soak up water (and therefore air dries quickly
if it becomes wet), is easily sewn, and it's very tough
and durable, given that it's so thin and light. And to
top it all off, it does a great job of blending into the
landscape in the very environments I work in for bird
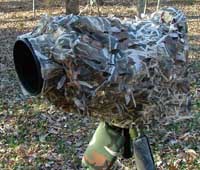
photography. In fact, you can see from this
photo that it even works pretty darn well in the
middle of my front yard.

|
Another
item I use frequently is the Camo
Netting by the same company. It's extremely tough and lightweight,
and also sews well. Mostly I've used it for a backing or lining
on the die-cut camo material. Since the camo is "die cut", it has
lots of holes. Backing it with the netting keeps the holes from
catching on things, makes the material surface more slippery against
equipment, and adds body to the camo material. I also use it for
reinforcement in stress spots on other fabrics when making things
for my photography work.
My point to all this is that
I used both these materials in making the camo lens cover for my super telephoto,
as well as for making the tripod camouflage skirt project you
will find farther down on this page.
Here are the other items you will need for the
lens cover project:
- some 1/2 inch or 3/4 inch velcro (the sew-on
type)
- a couple of strips of cloth material (for straps)
- some elastic (in 1/2 or 3/4 inch width, and
in a 1/4 inch width - preferably in black)
- and optionally, a bit of camo nylon cord.
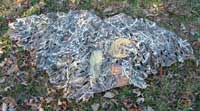
The
photo on the right shows the finished lens
cover lying upside down and open so you can see
the placement of straps inside. The large white cup demonstrates
how the front elastic goes over the lens hood. Note the
two velcro tabs near the front. They hold the bottom edges
together in front of the gimbal head. The rest of the
cover flairs out to wrap around and cover the gimbal mount.
The main barrel strap holds the cover in place so a gust
of wind doesn't flip it up. The rear barrel strap is optional.
The eyepiece elastic slips over the eyecup and flash head,
and keeps the rear of the cover in place. The tie cord
is also optional, but I found that it helps keep the rear
of the cover from flapping about too much in a stiff breeze.
Remember, some movement is natural, so it's perfectly
okay for the cover to rustle in the wind. It's just not
supposed to completely flip up in the air and uncover
everything.
Take a look
at this diagram which explains some of the measurements
used for the cover material and elastic. The material
measurement of 29 inches is based on the need for 25 inches
to reach from the front of the lens hood to the back of
the camera body (including a teleconverter) plus
four more inches for any edge hemming, and for some looseness
so the cover is not pulled too tight and straight. A wrinkled
appearance will add to the camouflage effect. The 35-inch
dimension was what I needed to drape low enough on the
sides to cover the gimbal head bracket down to the top
of the tripod. That also allowed for pleating the cover
around the lens hood for that wrinkled, natural appearance
for better camouflage.
Next I lined the back side (underside)
of the camo material with a piece of the camo netting. I covered the whole piece
of material except for the front 6 or 8 inches that
goes over the lens hood (the hood is smooth and not likely to catch on any die-cut
holes in the material anyway). I simply stitched around the edges to attach the netting,
then tacked the two layers together in 5 or 6 random spots with a few stitches. It
would end up getting some more incidental stitching later when I added the barrel
straps, which altogether would be sufficient to tack the netting to the cover. Then
I came back about 6-8 inches from the front edge and sewed on the velcro tabs that
would hold the cover together in front of the gimbal head.
 |
|
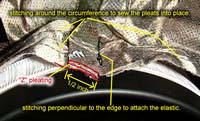
The
next step is to attach the 1/2-inch wide elastic to the front
edge that will form the loop that goes over the lens hood. Refer
to this
diagram for an illustration of the "Z" pleating, which
is also shown in the lower
left photo. The circumference of my lens hood is 20.5
inches. Keep in mind that this is being made for my Canon 500mm
lens. If yours is for a different lens, you will likely need
to adjust all these dimensions to suit your situation. By emperical
testing (stretching the elastic against a ruler) I figured out
that a 12-inch piece of the particular half-inch wide elastic
I was using would stretch up to about 22 inches. I decided this
would work just about right when stretched to only 20.5 inches
around the hood. That would leave me with a couple of inches
leeway which I would need in order to slip it on over the lens
hood easily, yet still remain tight enough to hold snuggly.
Next I divided the 35-inch
material edge into 6 equal segments. Subtracting 2 inches to allow for sewing
overlap, I made
a mark one inch from the corner, then marked with a dark pen every 5.5 inches
along the material edge ( 6 x 5.5 inches + 1 inch on each end = 35 inches).
These
marks are
the
stitching
attachment
points
for
the elastic,
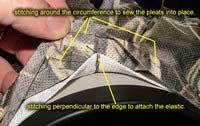
and indicate the center of each "Z" pleat. Next I made the 1/2-inch wide "Z" pleating
folds on either side of each mark (except for the two very end marks) as
shown in this photo and I pinned each pleat in place. Then I stitched
along the full edge of the material to hold all the pleats in place, and removed
the pins.
Then I marked the center of the 12-inch piece of elastic (6 inches from the end)
and lined up this center elastic mark with the center mark of the middle pleat.
I sewed the elastic to the central pleat, stitching perpendicular to the material
edge
(across the elastic band) as shown in this
photo.
At this point you have the
center of the elastic band sewn to the center of the material front edge. Next
sew one end
of the elastic band to the last mark at the corner of the material, stitching
across the elastic band as before (never stitch along the length of elastic as
obviously this would keep it from stretching).
The elastic is much shorter than the span of material, but that's necessary.
Now
sew the
other elastic
end to the other end mark at the corner of the material. Then pull the two ends
of the material, stretching the elastic until the material is taught. The elastic
band
should stretch far enough for you to do this. If this is okay, all you need do
is to stretch the elastic again so the material is again taught, and stitch
across
the
elastic band in the center of each "Z" pleat while the elastic is stretched.
When this is completed, test the stretch again. The material should accordion
and pucker
up as you stretch and relax the elastic.
Now form the material and elastic band
into a circle, bringing the ends of the elastic together so they butt. Then sew along the 1-inch
border you left on the edge of
the material as shown here. Assuming that your lens and camera are mounted on the gimbal
head and
tripod, you can now test fit the cover. Slip the elastic end of the cover over the
lens hood and drape the rest of the material back along the lens and over the
camera body.
The rear edge of the cover will likely extend a couple of inches beyond the camera
body. This is okay, as you want a little excess for looseness. The eyecup elastic
will keep this from hanging off the back once you're done.

|
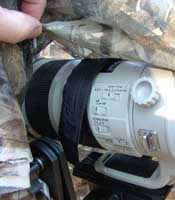 |
At
this point all the hard part is done. The next step is
to make the main
barrel strap. Hem up a simple band of material
about an inch wide for a cloth strap that is about 4 inches
longer than the circumference of the lens barrel at the
point you will use the strap. If your lens barrel has
a 10-inch circumference, make the strap 14 inches long.
This allows you two inches on each end of the strap for
the hook and loop velcro strips. The placement of this
strap along the lens barrel depends on your lens. You
want it in a spot that doesn't cover or interfere with
buttons and controls. For my Canon lens, the ideal spot
was just in front of the IS and focusing control switches
as shown in the photos at left and right. As you can see,
the strap happened to align right with the lens foot,
and between the gimbal bracket and lens barrel. To avoid
fumbling around trying to squeeze my fingers between the
lens, the tripod foot and the bracket, I simply attached
the strap with it spun around so that the velco overlaps
near the top side of the lens, and not on the bottom.
This makes it easier to reach. The only attachment point
you need is to sew it right along the top center line
of the lens barrel and cover. Do not sew this strap all
the way around. You don't want it to wrap the cover tightly
around the barrel, you just want the strap to hold the
cover down onto the lens. It also keeps the cover from
sliding forward or backward.
Next is the rear
barrel strap, which is really an optional item, depending upon your lens.
I positioned mine just behind the tripod foot ring, which works well with or without
the teleconverter, which is shown in the photo at left. Since there was plenty of
room below the lens here, I oriented the strap ends at the bottom so the velcro tabs
hang down. You can plainly see in the photo the stitching which attaches the rear
strap to the top center line of the cover. This is all that's necessary to attach
both the main and rear straps.
The eyepiece elastic is next.
A 1/4-inch wide elastic works well for this, and I recommend using black. This technique
for attaching to the camera should work for most any DSLR camera body, as I should
think they all have a gap around (and particularly below) the rubber eyepiece cup.
The elastic fits quite nicely into this gap, and on both my Canon 10D and 50D it
does not interfere with any of the controls, nor does it interfere with your vision
in the viewfinder. In fact, you will very soon forget it's even there. If this technique
doesn't happen to fit your particular camera body, you may still be able to find
some other position where the elastic will slip on.
The first photo at the right shows how the 1/4-inch wide elastic loop is attached. I first sewed the teardrop-shaped
loop to a small patch of material, then sewed the patch onto the lens cover. You
could sew directly to the cover, but I found handling the large cover material and
the small loop a bit awkward. The patch of cloth allowed me to pin the loop onto the cover, test fit and adjust position before sewing it in place.
Be sure you turn the elastic so it lays flat against the camera body and does not
end up with a twist in it. It will be less obtrusive as long as it lays flat.
The second photo at the right shows one position for hooking the elastic over the eyepiece, while the photo
at left shows a second option for hooking the elastic over both the eyepiece and the flash head. The only real difference is that you will need to attach the elastic loop at a slightly different position for each choice so the rear edge of the cover comes back as far as you want. Both seem to work fine for me.
The last detail is to add a
nylon cord or a strap of some sort to the bottom edge of the cover about 6 inches
from the rear edge (shown
at right). This is optional, but after my first use on
breezy
days
I
realized that being able to connect the two sides together would minimize the rear
corners flipping about in the wind. Be careful not to position the cord or strap
so far back toward you that it's in your way. You want to be able to easily get your
arm up under the cover to lay
your wrist across the top of the lens barrel for proper control and dampening when
panning. I found that 6 inches in from the rear gives plenty of room to get my
arm in and out while still providing the desired control against the corners flapping
in the breeze. You also want to be able to disconnect this for ease of installing
and removing the cover. My solution was to sew one end of a piece of 1/8-inch nylon
cord to one edge of the cover. I then tied a loop in the other end of the cord and
sewed a clip hook to the other edge of the cover which then clips into the cord loop.
Thus I can disconnect it easily. A strap with velcro would work just as well. The
length of the cord or strap should be about ten inches.
 |
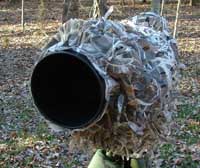 |
| Two views of the completed lens camo cover |
Other than perhaps folding over some of the camo material edges and hemming them up for a neat edge, the camo cover is now finished. Here are two views of the finished camo lens cover. I've been extremely pleased with how well this cover works, and how easy it is to put on and take off. It takes about 30 seconds to install it on the lens, and just half that time to remove it. It folds up into a small bundle that I stuff into a pocket of the backpack I use to carry the 500mm lens. Combined with my camouflage tripod skirt and my homemade leafy camo suit, it provides me with excellent camouflage, even for wary ducks.
 |
|
Camo Tripod Skirt
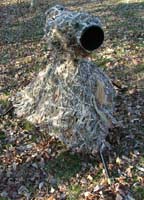
This
project came about when I needed something to truly hide the
tripod legs while I was "hiding in the open", as I talked about
above. It's a logical extension of the lens cover camouflage,
and compliments it very well as you can see in the photo at
left. It only needs to cover two sides of the tripod, by the
way. It would be in the way if it wrapped around all three sides.
This skirt
consists of nothing more than two triangles of camo leaf blind
material with the upper tip of each traingle snipped off a little.
The two are then sewn together along one edge and backed with
the same camo netting material just like I used with the lens
cover above. The two outer edges and the bottom corner on the
middle leg have pieces of nylon cord sewn to them so I can tie
the cord around the tripod legs at those points to hold it in
place. In other words, the two outside legs have a top, middle
and bottom cord, and the middle leg only has a bottom cord.
This skirt fits on right over the tripod
shoulder pad I made, so I don't need to take the skirt
off when moving the tripod. I just gather up the legs and throw
the tripod and lens over my shoulder the same way I would without
the skirt. It doesn't seem to interfere with the pad or handling
at all.
 |
| |
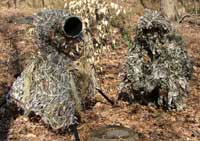
The
leafy camo suit next to the tripod skirt and lens
cover
|
 |
 |
| Tripod
skirt, lens cover and photographer merge together |
|
The really
cool thing about using this lens cover, tripod skirt and the
leafy camo suit is that once I've assembled the lens and tripod,
put the covers on and slipped into my leafy
camo suit, I'm ready to go. I just lift the tripod onto
my shoulder, grab my little Walkstool and head out. When I find
a good spot I simply set the tripod down, then open the stool
and have a seat. Voila, I'm instantly camouflaged and ready to
take photos. No setting up a blind, or packing one away either.
It's quick, versatile and ultimately portable camouflage.
The main
thing to consider when making the tripod skirt is to size the
trangular pieces so they fit the legs while they're set at the
lowest and widest stance you generally use. Obviously the legs
spread farther apart the lower you spread them. Mine is made
for the medium height/spread setting, which works for me when
sitting on my Walkstool. If I spread the legs to the next lower
click, the skirt rides up on the center leg. However, this ends
up being okay, because the skirt doesn't have to hang down as
far with that lower setting anyway. I do have to re-tie the
middle leg's cord though so it will slide farther up on the
leg in that instance.
The photo at right shows the skirt after I added a little imbellishment
with tufts of rafia and bundles of burlap threads. You could
also use commercially made camo kits or even natural vegetation
to add some realistic touches to it. This adds to its three-dimensionality
and improves the camouflage effect. I didn't worry about covering
the very bottom of the legs, since there is usually a ground
cover of grass or weeds on location to hide that.
 |
 |
Completed
lens camo covers and tripod
skirts
for two seasonal colorations. |
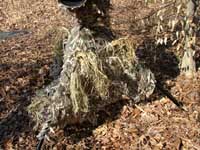
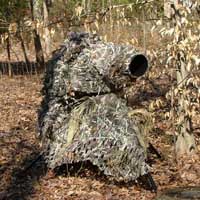
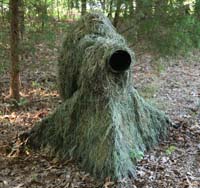
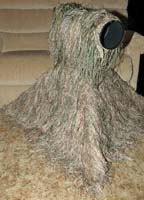
If
you want to go with a Ghillie style cover, check out this
last page from my DIY article on "Ghillie
Suit Camouflage - An Introduction to the Ghillie Suit
for Wildlife Photography". The two tripod skirts and
lens covers from this project are shown on the left. They
each have a matching Ghillie suit so that the lens, tripod
and myself blend together (far left photo) just like the leafy camo suit
and covers above.
I
will warn you that the Ghillie style covers and suits
are much more time consuming to make than the leafy camo
version, and will cost as much or more, but they are very
effective. The leafy camo material is cooler and a little
lighter, and has less tendency to snag on bushes than
the threads of the Ghillie type suits and covers. On the down side, the leafy camo material will deteriorate sooner than the Ghillie versions made with synthetic threads.
|
| |
|
|
 |
|
 |
