|
|
|
After
experimenting for several years with various forms of camouflage,
my curiosity about the Ghillie style of camouflage got the better
of me. With much study of the subject under my belt, I finally
decided to try my hand at making some Ghillie camouflage. While
users praise its excellent potential for camouflage, they also
grumble about its weight and excess warmth. New lightweight
synthetic fiber Ghillies have helped alleviate the weight issue.
To minimize the heat issue, some commercial suits are made on
a "shirt and pants" base made from fine netting, something like
mosquito netting, which allows for greater air flow. Although
these solutions help, the fact is that any extra layer of clothing
will add heat, no matter what it's made of. I decided to take
a stab at making my own using some "ventilation" ideas to see
how much that might help. I also wanted to create something
that would best suit my wildlife photography needs instead of
purchasing something designed for military sniping, bow or rifle
hunting, or paintball sport.
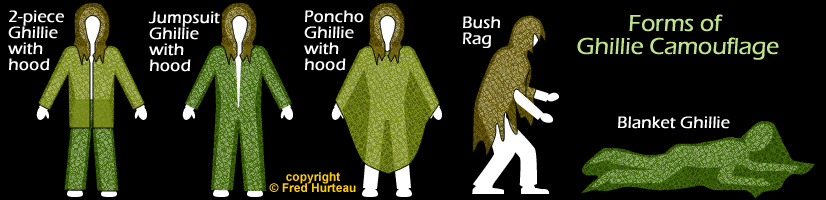
Choosing a Style and Form of Ghillie:
First on
my list was deciding what form and style of Ghillie to make.
For bird and wildlife photography, any of the forms or styles
of Ghillie suits may serve for photographic purposes, depending
upon the style of photography being employed. There are many
variations on the Ghillie. The following table explains the
differences, advantages and disadvantages of the basic styles
and forms from which all the variations are created.
For the
photographer who lives for those low angle shots, two options
look best. (1) The Sniper styles of suit may serve well for
those who do a lot of crawling with a "ground pod" for example.
The jumpsuit version, since it's a closed one-piece affair,
has less tendency to collect debri at the waist than the two
piece version. (2) For those who tend to lie in wait in a prone
position, the blanket form will do well. On the other hand,
photographers using tripods and moving from location to location
would benefit more from the two Hunter styles, the Poncho, or
the Bush Rag forms of Ghillies. For my own needs I decided on
a couple of "Hunter" style two-piece suits, and perhaps a blanket
as well if I had enough materials left over.
Form
- Two Piece (plus hood)
|
Form
- One Piece (plus hood)
|
Form
- One Piece Throw (no hood)
|
Shirt
or Jacket with Pants
Good mobility and freedom of
movement. In situations
where
existing cover
camouflages
the lower body the top can be
used
alone with the hunter style. |
Coveralls
or Jump Suit
Good mobility, but less freedom
of movement, since jump suits
tend to be restrictive for arm
and leg movement. May also
be hotter than other forms. |
Poncho
More open and cooler, with
ease of upright movement,
but the draping looseness
may interfere with crouched
mobility. |
Bush
Rag
A small "blanket" form, generally
more open and cooler than other forms. Has greater ease
of upright or crouched mobility, with less draping, and
consequently with less coverage. |
Blanket
A rectangular shape used as an overall
cover. Not suitable for movement and mobility. More coverage
but warmer than smaller Bush Rag. |
| Style
1 - Sniper (for crawling) - Back of shirt and pants
are covered with shaggy camouflage threads. The shirt
chest and front of pants are covered with heavy duty padded
patches to provide protection and durability for crawling.
Front patch areas may be camo colored and made of waterproof
material, but have no shaggy camo threads to avoid drag
and snagging. |
Style1
- Sniper (for crawling) - Back of jump suit is
covered with shaggy camouflage threads. The chest and
leg fronts are covered with heavy duty padded patches
to provide protection and durability for crawling. Front
patch areas may be camo colored and made of waterproof
material, but have no shaggy camo threads to avoid drag
and snagging. |
Conventional
poncho style of "blanket" draping over the arms and body
with a hole for the head. Sides my or may not be gathered
and closed under the arms to form "sleeves". Most effective
when used with a hood or other head cover. |
Essentially
a small blanket draped like a shawl over the back, shoulders
and head to serve also as a hood. Can also be used
like a small blanket as an equipment cover. |
Best
suited for stationary camouflage, thrown over one's self
and/or tripod and camera. Inconvenient for mobility, requiring
folding and carrying, or grasping and holding in place,
when moving between locations. A blanket style of the
right dimensions, with the addition of a hole cut for
the head, can serve double duty as a poncho style. |
| Style
2 - Hunter (for walking) - Sometimes called a "Yeti",
both the front and back of shirt and pants are covered
in shaggy camouflage threads. Bow hunting versions have
no threads in some arm and chest areas to avoid snagging
on the bow string. |
Style
2 - Hunter (for walking) - Sometimes called a "Yeti",
the jumpsuit is fully covered, both front and back, by
shaggy camouflage threads. Bow hunting versions have no
threads in some arm and chest areas to avoid snagging
on the bow string. |
|
|
|
 |
 |
Bare arm & chest of
a
bow
hunting Ghillie
(image courtesy
GhillieSuits.com)
|
Padded pant leg fronts
of a Sniper Ghillie |
Choosing Materials:
Making a
Ghillie involves attaching sections of netting to a base material
(shirt and pants in my case), then tying bunches of heavy thread
or strips of cut material to the netting to form a shaggy appearance.
The Base: The chosen style and form of suit
dictates the base to which your camouflage will be attached.
For me the shirt/pants "hunter" style seemed suitable.
Most commercial Ghillies built on a pants and shirt base are
made on rugged military BDUs (Battle Dress Uniforms). After
some looking, I came across two pairs of cotton pants and two
cotton shirts in dark green and black from a local Goodwill
store at $3.75 each, for a total of $15.00. This was much cheaper
than buying camouflage BDUs, even used ones from the military
surplus, which would have cost at least four or five times more. If you're lucky you might even find BDUs at Goodwill in your size, but I had no such luck. In any event, the dark solid colors hopefully would serve just as well as would
camouflaged material for the hunter style I'm making. The shirts
were size XXL (I wear medium to large) and the pants are well
oversized too. I would be wearing these over other clothing -
most often in fall and winter over heavier coats. At other times
I would likely be wearing a jacket or vest under the Ghillie,
with pockets bulging with lenses, gloves, batteries and other
items. The oversized clothes should provide extra air space inside, and hopefully increase
air flow and help keep me cooler, which is a top concern. I
learned from previous camouflage projects that such oversized clothing
works well in these instances.
 |
1-inch
square netting to hold burlap,
jute or
synthetic
Ghillie threads
|
The Netting: I had absolutely no luck at
all finding netting locally. I ended up buying mine online,
ordering hopefully enough for two suits and a large blanket,
probably with left-overs to make small wraps for equipment.
The best netting to use is nylon netting, with squares ranging
from 1-inch to 2-inches. Black or an earthy color netting blends
better into the camouflage. I ordered 5'x9' nets in brown nylon
with 1-inch squares.
The Thread and Fabric: The most commonly
used materials are:
• jute yarn
• burlap yarn
• cut burlap cloth strips
• synthetic yarn
• synthetic cloth strips
Companies
who make and sell Ghillies with synthetic thread claim it is
lighter in weight and more water repellant, however synthetics
may have a distinct sheen to them. Burlap and jute is said to
weigh more and wicks water like a sponge, with the weight problem
being amplified when it gets wet. All of it is flammable, with
synthetic perhaps being less so. In any event, most commercial
Ghillie suits and kits of jute or burlap to make your own suits are already treated
with fire retardant, or at least come with some you can apply yourself. Natural jute and burlap
must be dyed to gain a selection of colors, using something
like "Rit" dye. Burlap cloth can be bought at fabric
shops or craft supplies in various pre-dyed colors as well as
its "natural" color. This can also be dyed like jute.
Bundles of burlap thread, jute thread and synthetic thread can
all be purchased online in pre-dyed colors saving the labor
of dying and cutting to length. There are even kits containing
the netting and select colors of thread to make a suit or blanket.
Farm stores, hardware and garden supplies will carry jute thread.
Burlap material from fabric stores can be cut, strung and dyed
as needed. All of these materials, including synthetic thread,
are available online. If you have access to used burlap feed
or seed sacks, they can be cut and strung to obtain threads.
I had some
"natural" and light green burlap cloth on hand from previous
projects, and had previously figured out how to easily "string"
the material into bundles of thread. I didn't have enough though,
and needed more material and more colors. I planned to make
one suit in mostly greens and another in tan and light greens to simulate winter grass and weeds. I found rolls of jute twine, but thought it seemed a bit thick compared to the
burlap I'd worked with before. I wondered if it would make the
suit weigh more than burlap threads. In the end, I ordered synthetic thread online.
Other needed items: I would also need some
"skrim" netting and some mosquito netting to use for covering
cutouts on the shirts to increase
air ventilation. I already had some camouflage mosquito netting
on hand, left over from previous projects. For the skrim netting
I found some nylon "cargo netting" at a fabric shop - the kind
with round holes I'd seen used for duck decoy bags, laundry
bags, and even fishing nets. This is called "sniper mesh"
in Ghillie suit jargon, used for ventilation and face veils.
I bought 2 yards (by 4' wide), which was more than I really
needed for this project.
 |
 |
"Scrim"
netting detail (pencil
is for scale reference)
|
Camo
mosquito netting detail |
The only
other things I knew I'd need were a boonie hat, some zippers
and velcro. Although zippers
and velcro are somewhat optional on this project, they're much
easier to operate while wearing gloves than fiddling with tiny
shirt buttons. I had velcro on hand already, but I bought zippers for the two suits I had planned to make:
- two 24-inch zippers for the shirt fronts (to replace
the buttons)
- four 9-inch zippers for the large vented pockets
- four 7-inch zippers for the smaller pockets
- four 18-inch zippers for the pant legs (to allow dressing
with boots on)
With all the items assembled, the real work begins.
Next - Page Two -Constructing
A Ghillie Suit for Wildlife Photography - Building the Base
|
|
 |
|
 |