 |
|
|
(continued
from Page One - Ghillie Suit Camouflage
- An Introduction to the Ghillie Suit for Wildlife Photography)
I should note here
that my sewing is not the best by any stretch of the imagination. That's not too important though, since we're not making a wedding gown. It doesn't have to
be beautiful. The Ghillie suit only has to be sturdy and functional.
 |
 Inside
view of the back vent showing center strip of fabric for
support Inside
view of the back vent showing center strip of fabric for
support
|
Outside
view of large back vent
|
My first
task was to replace all the tiny shirt buttons with a zipper
and velco so I'd be able to get in and out of it while wearing
gloves. (The buttons were so small on this shirt, I could hardly
work them with just bare fingers.) I cut off all the little
shirt buttons, both down the front and on the sleeve cuffs,
and replaced the front buttons with a 24-inch zipper. Then I
sewed velcro to the cuffs to replace the cuff buttons.
Air Ventilation Modifications to the Shirt:
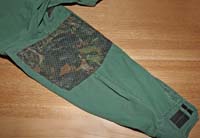 |
Sleeve
vent netting panel
pinned into place |
 |
| This
shows the sleeve turned inside out, viewing the vent panel
sewn in place with half of the area cut out. |
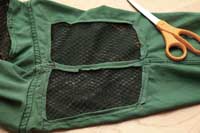 |
This
shows the sleeve vent area
fully cut out and edges hemmed. |
Now for
the vents.... I cut matching pieces of mosquito netting and
scrim netting in a shape to fit each area where the vents would
go. I made seven of these vents - one very large vent covering
most of the back of the shirt, a vent on the front of each shoulder,
and a sleeve vent under each upper arm. The other two vents
are chest vents that are a combination of vents and large zippered
pockets (you can never have too many pockets!). These vents
will hopefully increase air flow and minimize heat build-up
while keeping out the mosquitoes.
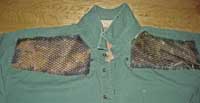 |
Completed
shoulder vents
|
I placed
each cut piece of mosquito netting on top of the matching cut
piece of scrim netting. Then I joined the two pieces by stitching
right down the middle to keep them from shifting while I worked
with them. Then I folded under about 1/4 inch of both pieces
together around the edges and hemmed them together all the way
around for a neat edge. Next I pinned the hemmed netting to
the desired location on the shirt WITH THE MOSQUITO NET ON THE
OUTSIDE. Then I sewed the netting to the shirt by
sewing all the way around along the hemmed edges I'd just made.
On the large back vent panel, and on the arm panels that spanned across
an existing seam, I again sewed across the middle of the netting
or along the seam, connecting it with the shirt material (This
will leave a strip of shirt material along the middle for extra
strength when you cut out the openings). Finally, I cut away
the shirt material from behind the attached netting to open
up the vent, leaving about 1/2-inch of material around the cut-out
edge. I then folded over this 1/2-inch of edge and hemmed it on the
inside to minimize any future fraying along the edges.
IMPORTANT TIP: Do
NOT cut out the vent openings before sewing on the netting.
I made that mistake once and quickly realized the shirt simply
wouldn't hold its shape while I tried to pin and sew on the
netting. It's MUCH easier to FIRST pin and sew on the netting
and THEN cut away the shirt material for the opening. Just be
careful you don't accidently cut the netting while cutting away
the shirt material.
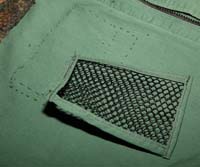 |
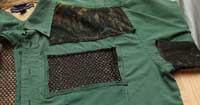
Chest
vent scrim netting panel
prepared with edge trim sewn on
and ready to install. Dotted
lines denote where the vent will go. |
 |
|
| Completed
chest vent |
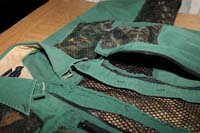 |
| View
of chest vent after the large vented zippered pocket is
installed over it |
The vented
pockets on the chest were made a little differently (If the
shirt has breast pockets, you may need to remove them as I did
before making the chest vents).
• Step 1- make the chest vents in the shirt
- I cut out a piece of scrim netting only (no mosquito
net piece for this one) to cover the desired chest vent area
behind where the pocket would go. Using thin strips of scrap
material, I folded and sewed them over the edge of the netting
for a neat hemming to finish off the edge (otherwise the netting
tends to fray). This also makes the netting edge stronger once
sewn to the shirt. Next I pinned and sewed it in position on
the upper chest. Then I cut out the vent opening behind the
scrim netting, folded over the cut edges and hemmed it neatly.
• Step 2 - make the vented pocket panels
with zipper - I made a panel from some of the
material previously cut from the large back vents. To the top
1/3 of the panel I added another section of scrim netting under
mosquito netting just as I used for the other vents (this would
line up over the vent I just made in the shirt). With the netting
sewn to the cloth panel, I cut out the vent hole from the pocket
panel and hemmed the edges as before. Next I sewed a 9-inch
zipper to the edge of the pocket panel that would be aligned
next to the shirt zipper.
• Step 3 - attach the pocket panels
- I positioned the pocket panel over the chest vent
area and pinned it into place. Finally I sewed the pocket panel
onto the shirt around the hemmed edge, but NOT across the zipper.
That would have sewn it shut! Now, since both halves of the
zipper are already together and aligned, I simply sewed the
other zipper edge that attaches to the shirt and it lines up
perfectly when zipped and unzipped. Now I have a large pocket
with a cloth bottom half so that tiny items won't fall through,
yet the netting in the top half allows ventilation via the chest
vent behind it. I made another of these pockets and sewed it
on the other side as well.
 |
 |
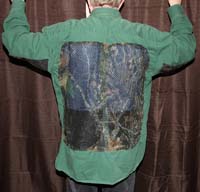
|
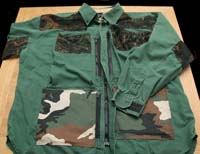
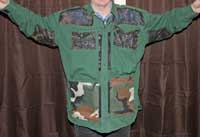
The
leftmost image above shows the front zipper and the added
lower pockets. The other photos show the shirt's ventilation
panels,
front and back. The shirt is now ready to attach the outer
netting. |
I also made
two slightly smaller pockets in the same manner (but with no
vent) with 7-inch zippers that go below the large vented pockets.
I had no more large scraps from the shirt cutouts to use for
these pockets, so I used some camo material I had on hand. These
smaller pockets need no vents, and are much easier to make and
attach.
Each of
the large vented pockets are actually so big they will hold
two 300mm f/4 prime lenses. The smaller pockets are almost as
big as the vented pockets, so the shirt really has LOTS of storage
capaciity that zips in the front where it's handy and easy
to access.
It's clear
from these photos this is certainly not what you'd call fashion
apparel, but that's perfectly okay. To begin with, this is a
prototype. Besides, all of it will be completely covered by
the Ghillie netting and thread. The only important thing is that
the functionality of zippered pocket storage and cooling air
vents beneath the outer layer will make this Ghillie suit cooler
and more useable.
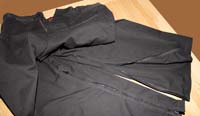 |
| Pant
leg zippers installed |
Preparing the Pants:
The pants
needed a little customizing as well. Pulling on or taking off
pants, even oversized pants, while wearing shoes or boots can
be a problem, or even impossible. To facilitate this I installed
an 18-inch zipper on each pant leg. You may even want to use
up to a 24-inch zipper. I prefer mine on the inside seam, as
it's easier to reach, but they can also go on the outside seam
just as well. Don't forget that if the pants have cargo pockets,
you'll want to remove them, since you won't be able to get to
your cargo pockets anyway.
Attaching
Netting to the Base:
All the
previous steps were custom features above and beyond the basic
Ghillie. If you don't want or need those modifications, you
can just skip them and start here.
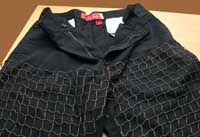
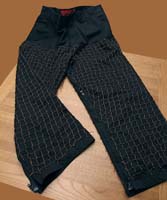
The nylon
netting (1-inch square netting in my case) is cut into panels
conforming to the shape of the front, back and arms of the shirt,
and the front and back of the pant legs. Then it is sewn on
at key points. This is what actually holds all the threads or cloth
strips that give the Ghillie its distinctive "wooly" appearance.
 |
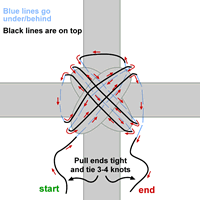 |
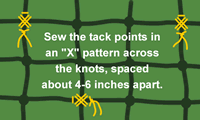
This
is the stitch pattern I used to
tack the netting knots
(click to
enlarge). It looks complicated, but
it's just
an over and under pattern
that changes direction and ends
up with two ends you knot together. Once learned it's
easily repeated
and
will secure the knots very well.
|
Fair warning
here: This part of the process is tediuos work. With that said,
it's not hard, just time consuming if done properly. The easiest
area to access is probably the back of the shirt, so start with
that. This will give you some practice before you tackle the
harder to handle areas, like the shirt sleeves. Develop a technique
for sewing the tack points across the netting knots and
it will become habit before you're done, making the work go
faster and easier. Most sources recommend using un-waxed dental
floss as the thread to tack the netting on. If you are one of
those people that is hard on your equipment and clothing, you
might stick with the dental floss. I happened to already have
some black nylon thread on hand, and reasoned it should be tough
enough, and easy to work with, so I decided to give it a try
instead. In any event, note that ordinary cotton thread may
not be tough enough for this.
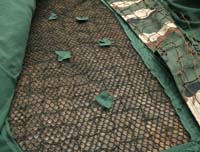
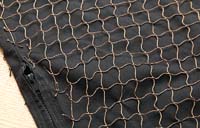
Do not
stretch the netting too tightly across the material when
laying it out or cutting it to size, and especially when finally
tacking it on. Notice in this detail
photo of the pant leg how the netting is just a little "wavy"
without being saggy. If you cut it too small and pull it too
tight, it will make the clothing feel restricted when you try
to move and bend, even if the clothing is oversized.
 |
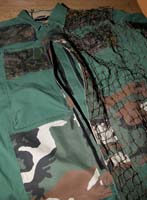 |
Above:
Reinforcement for
tacking over vent panels |
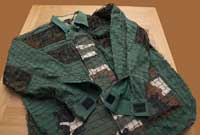 |
Above:
Flaps added to
front keeps netting
out
of zippers.
Left: The shirt with
netting attachment completed. |
Alright,
now to get started on the shirt back - With a piece of netting
cut to size, I began tacking the netting along the top edge
across the shoulders, then worked down. Keep the netting aligned
as close to horizontal/vertical as you can (not diagonally
or diamond shaped). It will retain its shape better this way
without sagging as much from the weight of the burlap or synthetic
threads.
As a basic
rule you should tack
about every 3-6 inches, staggering the tack points. For
the shirt back I put extra tack points across the shoulders
just above the large vent cutout so the shoulders could carry
most of the strain and allow the netting to hang from it. Particularly
along the edges of the netting I stuck with tacking every third
square (3 inches). Because of all the mosquito netting for the
large back vent panel, the other tack points would be mostly
to hold the rest in position. The mosquito and scrim netting
didn't give me much to sew to, so for those tack points I put
a small
patch of scrap material (about 1 inch square or round) behind
the netting (inside of the shirt) to reinforce the tacking stitches.
While attaching
the netting on the shirt front it became obvious that the netting
would need to somehow span across the pocket zippers and the
front zipper to avoid a gap in coverage, all without fouling
the zippers. The netting alone would have just drooped and not
covered the span. It would mostly just end up hung in the zippers.
I solved this by attaching a wide
double-thick fabric flap along the edge of the pocket zippers
on one side. I made it wide enough to cover the gap to the pocket
zippers on the other side. A similar flap, but not as wide,
was then added to the other side to keep netting out of those
pocket zippers. The two flaps overlap each other by about a
1-1/2 inches, which butts the netting together at the front.
A couple of velcro strips hold the two flaps shut together neatly.
 |
 |
Full
view of the
pant leg netting |
 |
Top
- No need to cover the
pocket areas, front or back.
Left - Detail view of tacking
netting to the material with
nylon thread. |
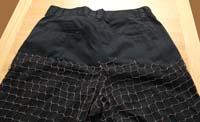
For the
pants, you do not need to cover the pocket areas, either front
or back. The photos at right show how the netting on the pants
only comes up just under the fly zipper, and approximately to
the bottom of the pockets, both front and back. The shirttail
and threads will hang down far enough to cover this
area anyway. Again, keep the netting aligned as horizontal/vertical
as you can, tacking it every 3-6 inches. Be careful you don't
sew to the insides of the pockets. Again, along the edges I stuck with tacking every 3 inches.
When all
the netting is attached, it's time to make a hood, then get busy tying on the threads.
Next - Page Three -Constructing
A Ghillie Suit for Wildlife Photography - Applying the Threads to Suit #1- The Green
Suit
|
|
 |
|
 |
