 |
|
|

Constructing A Ghillie Suit for Wildlife Photography
Applying the Threads to Suit #1- The Green
Suit
Jump to: page
one page
two page three page
four
|
(continued
from Page Two - Constructing A Ghillie
Suit for Wildlife Photography - Buildling the Base Layer)
Making the Hood:
Before getting
down to the business of tying the threads to the shirt or pants,
I still needed to make the hood. I would need the hood first
anyway, since I wanted to start with tying the threads on the
hood to get a feel for how the colors would blend. I am using
a boonie hat as the base for the hood. I knew this should work
well since I'd previously used a boonie hat as the base for
the hood of my Leafy
Camo Suit. It's comfortable, holds the hood in place, and
already has a chin strap for those wicked windy days. The brim
also holds the hood away from your head and neck for better
air circulation, and keeps the hood away from your face too.
 |
 |
 |
 |
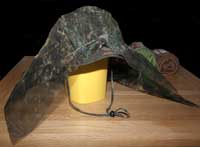
| Base
layer of mosquito netting |
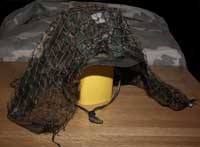
Overlay
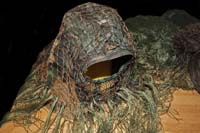
of 1-inch netting | Added
face mask netting
|
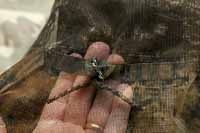
1/8-inch
nylon cord ties netting
to boonie hatband loops |
I cut a
piece of mosquito netting, then tucked, folded and formed it
to fit the hat as a base
layer. It drapes down just long enough to lay on the shoulders.
It doesn't need to hang any lower than that, since the threads
will extend down below that and blend into the shirt. Next I
tied
the mosquito net base to the vegetation loops on the boonie
hatband with 8-inch lengths of 1/8-inch nylon cord. This makes
the hood easily removable and interchangable. There is really
no need to sew it to the hat, but you can if you want to.
With the
mosquito net base firmly attached, it made the job of fitting,
cutting and tacking the 1-inch
netting over it a bit easier. I used a tall kitchen canister
as a stand to hold up the hat while I worked on the hood. After
tying the netting on and checking in the mirror, it was obvious
the hood would need a matching mask across the face area. The
general purpose head mask I had planned to use with it simply
was not going to blend with it at all. It was fairly easy to
add
a mask, using the same technique as when making the ventilation
panels for the shirt, and sewing it across the front of the
hood. I left plenty of room to view over the mask.
Applying the Threads:
Now it's
time to apply the outer layer of camouflage color threads. Later,
in the construction of the second suit, I will go into more
detail about the synthetic threads I ordered for this project.
For now though, let's just get this one covered so we can see
something finished.
The choices
of thread colors will depend on where you will use the Ghillie.
For this first suit I wanted lots of green. The second suit
will use more tans to simulate dead grasses for Fall and Winter.
I started with the hood, since it was the smallest item, and
would give me a chance to figure out how to arrange my selection
of green thread colors to blend into something I could use.
In all instances I tied the threads in groups of 3. While this
might seem rather thin, I found that in the end it covered very
well. The manufacturer advised it would require 5 bundles to
cover one suit. I had two bundles of "forest green", two bundles
of "light olive", one bundle of "dark green", and also had bundles
of tan, "gray" and brown to mix in as I saw the need.
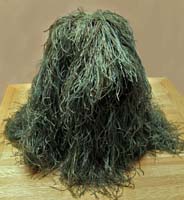 |
Completed
hood
|
One point
here about the colors before I start tying threads. When I was
ordering the thread, I had been disappointed that there was
no dark olive green thread available to buy. The brown thread
they recommended was a very dark brown, almost black, and I
was afraid it would not work so well with the greens. But once
I added some of this very dark brown into the green base colors,
the brown threads somehow "magically" took on a deep
dark olive green tone. They no longer looked brown at all. I
suppose this was a visual illusion, but it was exactly the affect
I was going after. This made me realize that the folks who sell
this stuff have used it and tested it and know how these colors
will work. I would never have thought the brown would be what
I needed if they had not recommended it.
For this
first "green" suit hood, I started tying with a row of threads
on every square all the way around the bottom edge of the hood,
alternating between olive green and forest green. Then I moved
up two netting squares and put another row of the same two colors.
I continued this alternating between the two greens all the
way to the top so that there was an equal amount of each blended
together as my "base color". Then I added threads of the other
colors here and there to put patterns and shading into the color
scheme. Above the hood eye opening I used shorter threads. The
threads come pre-cut about 20-inches long, so I cut some in
half and tied bunches of 3's above the eye opening. This avoided
the long threads dangling down blocking the view and having
to waste them by cutting so much off later. I still needed to
trim a little, but not nearly so much waste as there would have
been. Adding more short threads on the very top of the hood
will thicken up the coverage on top. Using long threads to thicken
up the top will only thicken up the sides where they hang down.
Long threads on top don't help very much where they tend to
reveal the "roots", just like the hair on your head
tends to do when parted.
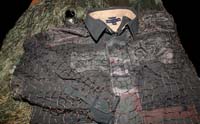 |
Green
shirt dyed black.
(the tan collar area seems
to be a fau
suede which did
not take the
dye color at all)
|
I used the
same color blending scheme much of the time on the pants and
shirt. In some places I would switch to using all one green
shade or the other for several squares in a row to make it look
more patchy and less blended. I also added some patches of brown
and/or dark green threads as I went as well. Later I went back
and inserted various colors here and there for accents. As is
the case with the top of the hood, the same problem with the
long threads spreading and revealing the "roots" along
the upper edges of the shoulders and upper side of the shirt
sleeves needed to be addressed. Adding bunches of the shorter
threads in these two areas gives better coverage. All the vertical
surfaces (shirt front and back, and pant legs) do quite well
with just the long threads hanging over each other like layers
of shingles to give good coverage. The bare looking areas are
less of an issue if your base shirt and pants (and boonie hat)
are a good match for the outer thread colors. The original green
material of my shirt was really a poor match for the green of
the threads, so I dyed the shirt darker before I ever started
adding the threads.
 |
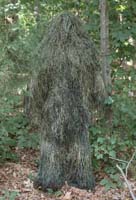 |
Front
of
finished suit |
Back
of
finished suit |
At right
are some shots of the finished suit. These were taken on a June
day with the temperature well into the 90's and the suit did
not feel unbearably hot. In fact, I did not break one bead of sweat at all. I could feel some air movement
inside the suit when I walked. I was in the shade mostly, and
obviously you would not use such a suit in that kind of heat,
but I was pleased with the ventilation I felt even under such
conditions. I felt confident it would serve me very well in
more reasonable weather.
Summary:
This was
definitely a learning process. I have to admit that this turned
out to be a lot of work. I easily have well over 40 hours invested
in this first Ghillie. I started out with plans to make two
suits and a blanket. For that I bought two 5'x9' sections of
netting. It took all but a 2'x3' piece of one 5'x9' net to do
the first suit with hood. The 2'x3' leftover was not quite large
enough to even make a drape for the tripod. That meant it would
take most of the other net just to make the second suit. I'd
need a third net to make a tripod drape and lens cover.
With two different color suits, I'd actually need two tripod
drapes and lens covers - one to match each suit color.
As for the
synthetic thread, it was as easy to work with as I could have
ever hoped. There is no chemical ordor, no lint or dust, and
it isn't "frizzy" like burlap. I'm very sensitive to wool, polyester,
and cannot even wear cotton sweaters, but this synthetic thread
didn't seem to bother me, which was a great relief. It has two
other great qualities - (1) it tends to "cling" to itself while
- (2) virtually never tangling or tying knots on itself. You
can wad up a handful of the threads into a ball, and pull out
individual threads from the bunch without it tying itself into
knots. The threads dangling together on the suit tend to bunch
up and look naturally "tussled" without actually getting tangled.
They brush apart easily. I don't think burlap will do this,
and I'm very glad I opted for the synthetic threads. I don't
know what they'll do in cold weather so far as "static
electricity" is concerned. I suppose I'll find out when
winter arrives. I hope I'm not "sparking in the dark"
while waiting for ducks to fly in.
This suit
is seriouslly lighter in weight than the military camo
netting drape I made several years ago, but it's still heavier
than my Leafy Camo Suit.
Next - Page Four -Constructing
A Ghillie Suit for Wildlife Photography - Applying the Threads to Suit #2- The Winter Grass
Suit
|
|
 |
|
 |
