 |
|
|
|

Good Camouflage and Its Use in Bird Photography
|
To
Camo or Not To Camo:
I
know a few nature and wildlife photographers who seem
to never use camouflage and still get great photos. I've
come to understand though that one's choice of whether
or not to use camouflage, and the extent of its use, is
more about one's particular style of photography than
it is a question of its effectiveness or necessity.
For
bird photography in particular, the use of camouflage
is hardly a necessity for all situations. There are wildlife
refuges where the birds are so acclimated to humans that
you can stand within feet of these wild birds and take
all the photos you want. There are locations where you
can sit in your car within feet of wild birds and take
photos all day, but if you open the door and set foot
outside the car, they're instantly gone. Many times birds
will completely disregard your car as long as you keep
driving on by, but if you slow down they will head the
other way without waiting to see whether or not you actually
stopped. At public parks, boat docks and other such places,
where the birds are quite accustomed to the presence of
humans, the birds often pay you little attention unless
their comfort zone is intruded upon.
So
in essence it is true that for some birds you don't really
have to use camouflage to get close enough for good photos.
However, there are birds that simply don't hang around
humans or human habitation at all. For those it becomes
necessary to enter their private world, and that
is when the use of camouflage really comes into play.
How then do you predict how a
bird will react to your presence? What makes one bird
stay and another flee?
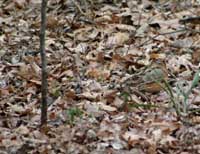 |
 |
Find
the American Woodcock
in this photo |
Find
the Sandpiper
in this photo |
The tolerance of human presence
or close human proximity by any particular bird is greatly
influenced by several factors:
| Species
Individuality
Age/Maturity
Past
experience/conditioning
Location |
|
Proximity/presence
of other birds
Hunger/presence
of food
Reproductive
drive/season
Other
animals
Camouflage
and field craft |
In essence it's a matter of nature, modified (or not)
by nurture and the current conditions of the situation
in question. A little explanation of each point will make things clearer.
Species: Different species will exhibit a greater
or lesser tolerance for humans, a trait apparently inherent
in their genes. You're not going to get close to a Belted
Kingfisher unless you are very well camouflaged, while
a Chickadee may come and snatch a seed from a feeder while
you're standing right under it. It's a fact that some
species are inherently spunkier (or more skiddish) than
others. With most species this is generally not an absolute,
but it is a factor to be reckoned with. With some species
though, it is almost a given that they will simply not
tolerate human presence.
Individuality: Within any species there are variations
between individuals. This is just as true for birds as it is for human personalities.
Age/maturity: Juvenile birds are often more curious and less cautious than older, more mature birds. On the other hand, sometimes mature birds are more confident and experienced than juveniles. It can go either way.
Past experience/conditioning: Similar to age and
maturity, a birds past experiences around humans colors
it's tolerance for human presence. Pelicans, for example,
may hang around fishermen on the beach if they've learned
there is usually a free meal of fish heads or throw-aways.
They can become quite bold at times, even trying to snatch
away a fisherman's keepers.
Location: A bird may react differently to human
presence from one location to another, possibly based
on past experiences at the particular location. It may
also be it feels more comfortable at one location than
another based on other factors we aren't aware of, such
as the presence of rivals or predators. It's possible
these other factors are only amplified by human presence.
Proximity/presence of other birds: Nearby rivals
or potential mates can affect a bird's comfort level.
Being among a flock or group (safety in numbers) can affect
the individual's comfort level, based on the reactions
of others in the group. If one spooks, they may all spook,
though that is not always the case. Even in a flock situation,
some individuals react contrary to the groups reactions. The use of decoys takes advantage of this predictable response.
Hunger/presence of food: Hunger, and the presence
of plentiful food can make a bird stay in a location and
keep its attention on the search for food. For example,
herons and egrets often get very focused on chasing fish,
and appear to ignore things that might otherwise make
them skiddish and flighty.
Reproductive drive/season: The presence of potential
mates, and a concentration on courtship rituals can keep
birds focused to the point of ignoring all but the most
immediate of dangers. In nesting season birds may tend
to stay close to the nest and young, and even stand their
ground or attack to defend their nests, instead of fleeing
intrusions.
Other animals: The presence of various other species
can provide a comfort level, or inversely increase stress
levels in the case of potential predators. Hunters often
use decoys not only of the target species but also what
they call "confidence decoy" species - birds that seem
to flock together despite being of different species.
Camouflage and field craft: A well camouflaged
photographer using good field craft will greatly increase
his/her chances of getting closer to, and remaining close
to birds that might otherwise choose to leave.
With
experience, watchful attention, and an understanding of
how all these factors can affect the flight response,
the photographer can learn what to generally expect from
various species of birds. With time it becomes easier
to judge an individual bird's reactions and to know when
to back off so they don't press the bird too much. It's
all a part of the field craft a photographer needs to
learn and apply.
The Eyes of Birds:
You
need to keep in mind that a bird's dominant sensory input
is it's vision, just as it is for humans. Birds see in
color pretty much the same as humans, but their vision
is much sharper than ours. They also spot movement easily,
much the way we humans do. For example, if I'm trying
to spot a bird in the trees, I don't waste time searching
each limb. I just watch for movement, then I focus
on the movement to see what it is. Birds do the same thing.
Even when you are camouflaged, your movements can easily
give you away. Keeping your hand, head and body movements
to an absolute minimum will make a difference, and any
movements you make should be very slow and smooth.
(To learn more about the Vision of Birds, check
out these web pages from Stanford
University and Wikipedia.)
Practical Considerations:
Ultimately,
the need for camouflage depends on the situation. I certainly
don't use camo all the time. If I can get a great shot
from the window of my truck, why bother with camo? Well,
it seems that even in situations where it's not really
necessary, a little camouflage still can make a difference.
I often use the camo cover over my lens, even when shooting
from the truck window. Anything that makes me or my big
white lens look more like nature can help put the birds
at ease. If it gives them the confidence to come even
ten feet closer than they would otherwise, my photos can
be that much better. Bird photography is difficult enough
without making it harder for myself. Every little advantage
I can get is worthwhile.
Putting
the birds at ease is an important point to keep in mind.
You can get some interesting shots of birds really being
themselves if they feel comfortable with their surroundings.
Preening, scratching, stretching, courting displays and
other behaviors will add to your photos, but birds don't
do these things when they're on the verge of fleeing because
they're nervous about your intrusion. Your being well
camouflaged can allow the birds to do what they do naturally
instead of nervously watching your every move.
What Is Good Camouflage?
Keep
in mind that we're not talking about being camouflaged
from human eyes. Military and survival camouflage means
not being seen at all, not even by the amazing
logic of the human brain. Surviving a sniper is a completely
different thing from hiding from a bird. And with birds
you don't have to be concerned about scent as you would
with predators, or many mammal species as hunters have
to keep in mind. With birds you only have to be very unobtrusive,
not utterly disappear. That which easily fools a bird
can be child's play for a human to detect.
 |
| |
Blur
your shape into the surroundings. This is a camo
netting body drape embellished with rafia &
burlap threads |
So,
what does being well camouflaged for bird photography
entail? My best description is to blur yourself and
equipment into your surroundings. Make yourself seem
part of the landscape, nothing more than a clump of brush,
a leafy extension of the existing foliage. Be completely
unobtrusive, which not only involves camo, but also your
actions and movements. Even with good camouflage, your
location may be perfectly obvious to watchful human eyes,
while at the same time you may simply not exist as far
as the birds are concerned - unless you mistakenly call
attention to yourself. I have given some inattentive folks
quite the surprise when they suddenly realized they were
standing next to someone they didn't see until I moved.
It works for birds as well. I've had birds swim within
three feet of me without their ever knowing I was there,
and I wasn't inside a blind either.
There are five elements to consider for good camouflage:
Texture
Pattern
Color
Shape/dimension
Natural movement
The combination of at least three of these elements is
a great start. With four of them you can have very good
camouflage. With all five you can have excellent camouflage.
Consider
that even though individual leaves are generally symmetrical,
and may well be smooth and slick, or even shiny, the overall
appearance of "foliage" is irregular and asymetrical.
Camouflage is about looking like a whole mass of leaves
or clump of grass. The visual effect of a whole conglomeration
of leaves is completely different from an individual leaf.
Simulating
the texture, pattern and coloration of your surroundings
is the beginnings of camouflage. If these were the only
requirements though, your flowery Hawaiian shirt might
be considered camouflage. You really need more than that.
You also need to simulate the overall shape of something
natural, to merge your shape into the shape of the landscape
and foliage around you. This is the "blurring" effect
I mentioned. You have to take away the edges of your shape
so it is no longer recognizable as the human form. The
same holds true for your camera, lens and tripod, etc.
The one thing I have not found a practical way
to "blur" is that big black round hole leading into the
lens hood.
Finally,
there is the element of natural movement. By this I mean
your camouflage having the ability to catch the breeze
and flutter a bit, just as leaves and grasses would do.
If the foliage around you is moving in the wind, and you
are trying to look like that foliage, then you should
also be moving in the wind, keeping yourself and your
surroundings connected in a natural way.
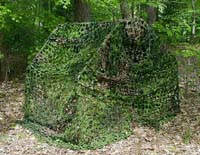 |
Military
surplus camo netting
used as a blind |
|
Take
for example military camo netting, which is relatively
heavy compared to the lightweight polyester die-cut camo
materials you can buy these days. The netting is not only
heavier, it's much more open, offering less wind resistance.
Therefore it doesn't tend to move very much in a light
breeze. Attaching some natural looking embellishments
such as rafia and burlap threads to the netting can provide
elements that will flutter in the wind as does grass or
foliage. Adding clippings of surrounding vegetation will
afford the same effect. Such additional elements as these
also provide additional color, adds three-dimensional
texture, and helps disquise the original outline shape.
The
new lightweight polyester die-cut camo materials will
catch the wind more easily than heavy camo netting. Also,
the small flaps of material created by the die-cuts give
it an enhanced ability to flutter in a light breeze. This
provides the desired natural movement, adding to the illusion
of it being a leafy surface. The three-dimensionality
of the die-cut flaps enhances the texture as well. Yet,
even the die-cut materials can benefit from further imbellishments.
An example of this is the tripod camo skirt I use. The
photo
at right shows it after I added tufts of rafia
and burlap threads to simulate weeds, grasses, Spanish
moss and other naturally occuring foliage.
 |
Old
military field camo pattern and Vietnam era "tiger"
camo pattern.
|
As
for color and pattern, you should use whatever blends
with the landscape wherever you do your photography. There
is an extensive commercial market for camo patterns created
and licensed by competing companies. These patterns go
into the clothing and equipment used by sportsmen and
the military. I have looked at and used all sorts of camo
patterns, from the old standard military field camo and
tiger camo patterns to the commercial sportsmen patterns
I just spoke of, and I have settled on one that works
well for my bird photography.
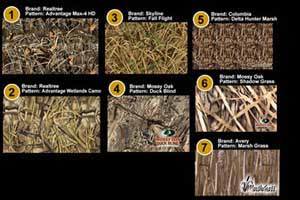 |
| |
Camo
patterns designed for wetlands use. |
I
very much prefer the Advantage Max-4 HD pattern, shown
as pattern #1 in the chart
at right. It is a popular camo pattern found in
sportsmen's clothing designed for duck hunting, which
is obviously conducted in the same sort of wetland terrain
where you find many other birds. I find that such clothing
is not only good camouflage, but also excellent for keeping
warm and dry when out on my late fall and winter photography
expeditions.
The
chart also shows other similar patterns that can work
for marsh type vegetation. However, in my opinion these
others either have too little contrast in the pattern
to be effective, or they use too many golden/yellowish
tones to blend well in the areas where I photograph. Pattern
#5 in the chart is much too small and repeats itself too
often to be believable as a texture.
Making Effective Use of Camouflage:
Using a Blind:
Once
you've decided which pattern might be most effective in
your situation, you need to put your choice into practical
use. Purchasing or making a photography blind is a good
bet for getting closer to the birds. A blind doesn't necessarily
need to be as well camouflaged as you need to be if you're
just sitting out in the open. Generally they're shaped
like a little hut or building, so it's not usually so
well hidden from sight anyway. It's real purpose is to
hide you, not itself. However, the more natural it can
look, and the more it blends into the landscape, the more
easily birds will accept its presence. If you can buy
or make one in the camo pattern you've chosen for your
needs, it will be all the better.
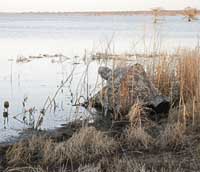 |
Small
blind in use at
Lake Mattamuskeet NWR. |
You
should keep in mind though that using a blind is not always
practical or feasible. Some places (such as many state
and national parks or refuges) won't let you set up a
blind ahead of time and leave it, which pretty much defeats
the whole premise of using a blind in the first place.
If your situation permits however, a blind is a great
way to provide the camouflage you need. In any event,
it requires setting up and taking down, and carting around.
No matter how light and portable it is though, it is still
something else to be carried, packed or dragged along
with your other photography equipment, or else it will
require additional trips to deal with it separately from
your other equipment. Even a blind can keep some birds
away because it's not a completely natural part of their
world, and birds can be wary of changes in their usual
surroundings. Thus, the process of setting up a blind
some distance from where you ultimately want it, and then
over time moving it closer and closer to its final resting
place is a way to acclimate the birds to its presence
before you ever use it to take photos.
Camouflaging Your Equipment:
The
obvious things like lenses, camera bodies and tripods
are not the only items to consider here. The bright sun
reflecting off your sunglasses, jewelry, watch or belt
buckle can catch a birds eye and give you away. Simply
removing these items or covering them with clothing is
all you generally have to do there. For projects and tips
on how to camouflage just about everything else, just
look through the articles linked at the top of this page.
Camo
camera bags, a camouflaged equipment cart and other useful
projects are covered in these how-to articles. Of particular
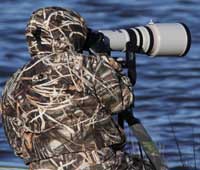
interest should be the super-telephoto lens camo cover
and the tripod camo skirt shown in the left photo. Not
only do they mask my equipment, they serve as a partial
blind for me as well. When I'm sitting behind the camouflaged
tripod and camera, my shape is already partially masked,
and much of my hand and arm movements are concealed. When
I'm also camouflaged to match the camera and tripod, I
visually merge with them into a very irregular, non-human
shaped object that blends well into the surroundings.
This is well demonstrated farther down this page in the
next section, as well as in the article "Homemade
Leafy Camo Suit".
 |
| |
Camo
pattern Advantage
Max-4 HD used in sportsmen's winter clothing.
|
Camouflage For The Photographer:
With
your equipment well camouflaged, it's time to make yourself
blend into nature. A good start is some basic camo pattern
clothing. The weather and the season will dictate what
is reasonable and practical in this regard. The majority
of my bird photography is done in the fall and winter,
so I've gathered a wardrobe of warm, waterproof/water
resistant camo clothing primarily designed for duck hunters.
If you purchase quality clothing it will be lightweight
in terms of bulk, yet provide plenty of warmth and will
block the wind well. It will also be waterproof by default
if it's made for duck hunting, and will come in patterns
suitable for wetland camouflage.
You
can also buy hunting clothes in other camo patterns suitable
for woodlands. With the right choice of camo pattern though,
you can get by with only one pattern that will do a good
job for pretty much all situations. That is one of the
reasons I like the Advantage Max-4 HD pattern. It seems
to be a very versatile camo pattern. For milder weather
I often wear surplus military "fatigue" camouflage shirts
as a light jacket. The material is too heavy to suit me
for a "shirt", but it wears well as a light jacket over
my regular shirts. You can do the same thing with long
sleeved hunting shirts in the commercial camo patterns
as well, using them as a light jacket over your other
clothing to provide some camouflage when it's not so cold
out. Camo pants are also available in lightweight materials
for warmer weather.
Too
often though, the face and hands are overlooked. Hats,
camo gloves and face masks are the final important details
that can make or break attempts at effective camouflage.
These items can be a problem though. In warm weather a
face mask and gloves can quickly become uncomfortable.
Gloves: Gloves hide your hands, or more accurately,
they keep your hands from being flags waving around to
give you away. If your gloves blend with your camo clothing,
hand movements will be less obvious. They don't have to
match your clothing camo pattern, but they should have
a camouflage pattern of some sort. At the least you should
wear black, dark olive green or brown gloves if you don't
have camo gloves. Even cheap green cloth gardening gloves
are better than nothing, but be sure you have a grip with
them. Avoid mittens of any sort. You cannot handle cameras
and lenses with mittens. It's asking for a disaster. You
will drop something.
Admittedly
using gloves is problematic any time when handling a camera.
When it's cold, the warmer gloves can be too thick to
feel what you're doing. When it's not so cold, even lightweight
gloves can be too warm. Finding gloves that let you feel
what you're doing isn't an easy task. Choose a size that
is as small and snug as will barely fit onto your hand.
Any excess size, and therefore baggy looseness, will make
them harder to use. If all else fails, you can try leather
driving gloves, which are made of very thin, soft leather,
and have lots of cutouts in them to let your hands breath.
They're not really made for warmth, they're made for getting
a good grip on the steering wheel. A good grip is a very
important consideration when choosing gloves. I've tried on lightweight camo gloves that gave me
a good tactile feel, but the material they were made from had virtually
no grip at all. Try them on in the store and handle some slick objects to test them before buying them.
The
good news is that you can find both lightweight
and cold weather camo gloves suitable for photography.
I found several pair, some for warm weather and some for
cold weather, by continually keeping an eye open and trying
on anything that looked like it might be suitable.
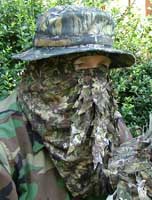 |
| Homemade
face mask made from cotton material. |
|
 |
| |
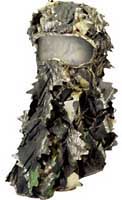
Commercial
leafy face mask of die-cut synthetic. |
Face masks: I don't take very well to polyester,
preferring cotton for just about everything wearable.
It seems though that most of the hunting/sporting face
masks, head nets and balaclavas are made of some form
of polyester - usually fleece. They're meant for winter
hunting and keeping warm while snow skiing, etc. Warm
is great for cold windy days in the winter, but for the
rest of the year my facemask needs to be light and breathable.
Having looked at every sort of face mask I could find
in the stores, I ended up making my own from less than
a yard of inexpensive cotton material I found at Walmart.
It's not your usual camouflage pattern, just an olive
green leafy foliage print that provides suitable camo
blending.
When
selecting a face mask, be sure to get one that has ventilation
around the mouth and nose. It's not for breathing exactly,
but for letting your breath out and away from inside the
mask. If this pathway is blocked, your warm breath will
be forced up and out around the eye opening. On cold days,
this warm, moist air will quickly and continually fog
your viewfinder. It's a mistake I made when designing
my mask, and I had to modify It. I simply cut an opening
around the mouth area and sewed hanging flaps across the
nose that draped down over the mouth opening. The flaps
let my breath out directly so it's no longer forced up
and out around my eyes. No more fogging. Because I cut
out the flaps to look like leafy foliage, they add a 3D
effect to the mask. This can plainly be seen in the enlarged
photo. Unlike the commercial face mask at right,
the top of mine is open, using just two thin straps criss-crossing
the top of the head to hold it up. Thus it needs to be
worn with a separate hat or hood.
Hats: I have half a dozen camo hats of various
kinds - a camo ball cap, wide-brims and roll-up "boonie"
hats. I grab whichever hat suits my needs at that moment.
The wide-brims are mainly for shading my face from the
sun. The ball cap or any hard brim hat tends to get in
the way when trying to see through the camera viewfinder,
so I don't usually wear them when actually taking pictures.
The soft brim "boonie" hats are better for that. They
also work well when I'm wearing the face mask as seen
in the photo above. I use one of the "boonie" hats as
a basis for the camouflage hood that goes with my homemade
leafy camo suit.
 |
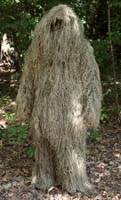 | |
Conventional
Ghillie suits in coloration
for a pine/cedar environment and a winter grasses environment.
| |
| Are
you curious where the term "Ghillie"
suit came from? This link to Ghillie
Suit on Wikipedia explains it. |
|
"Ghillie" type suits and camo drapes: My first
attempt at a camouflage "suit" was this Camo
Net Body Drape that I made from military netting
in a "poncho" style. "Ghillie" type suits are generally
classified as (1) a true Ghillie (for crawling), (2) a
"bush rag" (a sparce poncho style) for ease of mobility
on foot, or (3) a "Yeti" that looks like a big wooly booger.
Some Ghillie suits are a pants and jacket two-piece affair,
and some are a one-piece jump suit affair. Because of
the way a true Ghillie suit is constructed (a base layer
of material with netting attached which is then embellished
with jute, burlap or synthetic threads) it is often inherently
hot to wear (read the information from Wikipedia
on Ghillie suits). The net drape in my article
provides far more ventilation than a true Ghillie suit,
though the net itself is made from rubberized material,
which isn't necessarily comfortable in the warmest weather.
My first foray into making my own Ghillie suits is covered
in this 4-page article - Ghillie
Suit Camouflage.
Another
consideration is ease of use. I find the military camo
netting is easily caught on my equipment's buckles, knobs
and latches, my wristwatch, clothing buttons and adjacent
vegetation. It's not well suited for movement in the bush,
but works well once I'm settled and quietly waiting for
birds to come along. A "string" type Ghillie suit will
also tend to behave the same way, catching on anything
it can. The one truly outstanding attribute of the Ghillie
suit is its ability to blend into the landscape when made
of the correct color combinations for the terrain where
it is used. The popularity of Ghillie suits is evident
by their more frequent appearance of late in hunting/sporting
supply stores and big chain stores. The "leafy" camo material
is likewise becoming more popular, with shirts, jackets
and pants appearing more often in those same outlets.
Even "blanket" style products are becoming available that
you can throw over yourself as well as over your camera
and tripod. I find the blanket type coverings to be more
of a hassle than anything else. It certainly is not the
sort of thing the more "mobile" photographer would want
to deal with, but once you're settled in a spot for awhile,
it can be a useful option to consider. I made a small
two-sided
reversible Ghillie "blanket" as a sort of accessory
throw cover that matches my Ghillie suits, which I can
use as a quick cover, or to hide equipment.
 |
 |
| |
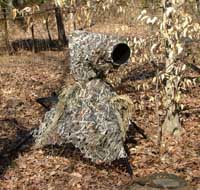
Tripod
with camera and
empty stool |
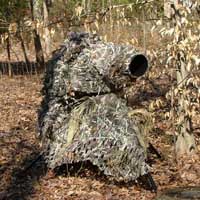
Tripod
with camera and
photographer |
My
net body drape is predominently green, even after being
embellished with other materials, and works well in greener
seasons, or around evergreen foliages in colder weather. It's unreasonable to expect anything that covers
your arms and head in warm weather to be all that comfortable.
However, my homemade leafy camo suit (shirt, pants and
hat/hood) works better in more seasons because of its
light weight, its breathability, and its color and pattern.
As I mentioned earlier, when I can't use a blind, I use
this suit along with the camo cover for my lens and the
tripod camo skirt as my portable blind.
While
my camo patterned clothing does very well with the camouflaged
lens and tripod, the more aggressive (and effective) camouflage
afforded by my homemade leafy camo suit works even better.
This is quite evident in the two photos at right - one
without the photographer, and one with the photographer.
Essentially, I become part of the camera and tripod camouflage.
Even when I'm looking around, the head covering with the
face flap velcro'ed shut is pretty effective at hiding
me. Another good point about this sort of material is
that contrary to what I expected, it very seldom becomes
entangled in anything, making use with photography equipment
a hassle-free affair.
The
suit is so effective by itself, I can even use it alone
when shooting hand-held, so long as I use a similar camo
covering for the smaller lens. It is comfortable, easy
to put on and take off, even over shoes. The "jacket"
(actually a shirt) and pants are both large enough I can
wear them over a heavy winter hooded coat and insulated
hunting overalls, yet light enough to wear in much warmer
weather.
You
can purchase similar commercially made lightweight leafy
camo clothing, but a suit like mine would cost over $200.
I made my three piece leafy camo suit for less than $50,
and that's including the lens cover and the tripod skirt
too. If you would like to learn a little more about it,
see my article on the "Homemade
Leafy Camo Suit".
I
use this leafy camo suit jacket and hood in conjunction
with the camo coverings on both my duckboat and kayak.
The combination works well, as evidenced by the adjacent
photo of my kayak
camouflage project.
The Snicker Factor:
I
will admit that I get stares often enough when I show
up in my camo. On the other hand, I also get curious folks
asking "Are you a professional wildlife photographer?"
One birder I met along a trail said I was the first walking
tree she'd ever seen, and then wanted to take some snapshots
of me. Despite that curious meeting, birders in general
"pooh pooh" camo as being utterly unnecessary, which is
understandable. They only need to get close enough to
see the bird with binoculars or a scope well enough to
tell what it is. We photographers have to do considerably
better than that for good photos, and anything we can
do to get closer has to be worthwhile. To those who think
camo is funny, or silly, or overkill, I let my photographs
do the talking. I'm not out there to look good, I'm out
there to get photos that look good. Besides, I get a great
deal of satisfaction seeing birds up close, and good camo
allows me to do that. |
| |
|
|
 |
|
 |
