 |
|
|

Tips On Getting
Closer To Your Subjects (Field Craft)
|
This
article applies particularly to photographing birds, since that
is the main focus of my photography, though it can generally
apply to other wildlife as well. Another of my articles, "Good
Camouflage and Its Use in Bird Photography", provides
a detailed discussion of the application of camouflage, and
some insight on how and why birds react differently to the human
presence. Reading that article will provide a good basis of
understanding on which to effectively apply the tips discussed
in this article on the field craft of getting closer to birds.
Photography From A Vehicle: General Tips -
Wildlife
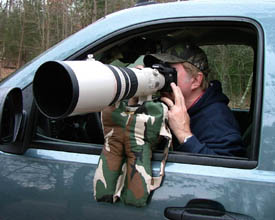
refuges, sanctuaries and parks most often provide this sort
of opportunity. Keep these tips in mind -
- Parking on the highway shoulder in situations where the
subjects are situated along a busy highway with traffic
zipping by can be a dangerous affair. The air pressure of
cars and trucks flying by on the highway can and will rock
your vehicle. Avoid shooting while your vehicle rocks to
avoid image blur.
- More likely there will be trails and drives provided away
from traffic where quiet photography is much easier. Thoughtfully
sharing space at busy times with other visitors is a two-way
street. Other visitors who hop out of their cars to get
closer with their pocket cameras will scare off your subjects,
which can make your day frustrating. A polite reminder to
them is not out of order.
- On dry dusty roads, remember to keep other windows shut
to minimize the dust inside the vehicle.
- Camera/lens support -
- Bean Bag: By far the most cost effective, easy-to-use
and practical support for your camera and lens when
shooting from your vehicle window is the ubiquitous
bean bag. It's easily placed on and removed from the
window opening, won't scratch or bang up your vehicle
interior, your equipment or yourself, and can be stored
out of the way in the floorboard, dash or seat. Use
a bean bag large enough and tall enough to put your
eyepiece at eye level without you having to "slouch"
down to use the viewfinder. "Slouching" can quickly
cause neck and back pain, and fatigue. Using a power
window to raise the bean bag is not recommended. It
was designed to hold up the window glass, not 20 pounds
of bean bag, camera and lens. Stacking a small bean
bag on top of a large one can help, but increases the
chances something will slip.
- To make panning and tilting easier, particularly with
a large telephoto, a flat plate with panning head and/or
ballhead can be used atop a large bean bag. This is
a costly addition, but it will raise the eye level of
the camera on a bean bag that is not tall enough.
- A very low cost solution is the "Flying
Saucer Ball Head" project. This simple device
will raise the camera eye level while providing a smooth
and easy pan and tilt function. Add a quick release
clamp compatible with your equipment to the Flying Saucer
Ball Head for added ease of use and the option to better
balance the lens on the mount.
- Mechanical supports: In lieu of a bean bag, there
are mechanical supports available you can attach to
your door or window to mount lens and camera, but these
are more expensive, cumbersome and complicated to handle
and use.
 |
The Field Craft Of Photography From A Vehicle:
- Remember to try positioning your vehicle so the light
is coming from the optimum direction. If you are familiar
with the area, plan ahead for the time of day that will
give the right lighting for shooting from the driver's door
(if you're the driver as well as the photographer).
- Drive as slowly as you can to avoid tire/gravel noise
so you can listen as well as watch for your subjects. Stop
often to better hear.
- Turn off the engine while shooting to avoid unnecessary
vibrations, and so you can hear better to assist in locating
subjects.
- As a rule, stay inside the vehicle. Getting out usually
spooks the birds. On occasion you may be able to
get out on the side away from your subjects and shoot from
the hood or rear of your vehicle with a bean bag support
while using the vehicle as a visual shield. If the birds
see only your head/shoulders, it may appear to them the
same as if you're in the vehicle window.
- Some birds are more skiddish than others. If you pull
over and stop they sometimes move away or leave altogether.
In this case, try stopping well short of the birds location
(50 yards or more) where they're still in view. Give them
the time to realize you are not all that close before you
begin SLOWLY creeping closer, 5 feet or less at a time,
waiting 15-30 seconds between movements. Occasionally stop
completely for a minute or two before continuing. Patience
is the key the same as when you're on foot. Eventually you
may get within good shooting distance for your lens without
them being completely spooked.
The Field Craft Of Approaching On Foot:
- The number one rule is always use PATIENCE. If you cannot
muster patience, you will never become successful at bird
photography.
- If at all possible, pick a spot, settle down and wait
for the birds to come to you instead of trying to creep
up on them. Wisely choosing a location that you've scouted
before, where you know the birds like to congregate, will
net you better photos with less effort than chasing them
down will ever provide.
- Birds are creatures of habit. They will return to favorite
perches, favorite feeding spots and favorite bathing locations.
Use that knowledge to your advantage.
- Be quiet (no talking), walk silently, move slowly and
stop often to listen and scan. Even if you're headed to
a particular location, take time along the way if possible
to watch and listen for the unexpected opportunity.
- If you're on the move, the birds will most likely know
you're coming before you ever spot them, with or without
the best camouflage in the world.
- Use good camouflage anyway. Even simple natural colors
(greens and browns) will be better than flashy colors. Bird
photography is difficult enough without making it harder
for yourself.
- If you spot a subject(s), pause to assess the situation.
Does it look nervous with your presence? Is it busy feeding
and hasn't noticed you? Are there others to alert the group
to danger? Do you have any cover to use for an approach?
Formulate a plan of approach before you go charging in.
Make a judgement as to camera settings and lens and be prepared
to shoot.
- If you are sure you've been spotted, pause to see what
the subject will do. Allow time for the subject to calm
and hopefully accept your presence. If it settles down,
approach slowly, pausing as you go, continually assessing
its reactions.
- If you are sure you've been spotted, take shots if you
wish even before getting to the optimum distance or location.
Sometimes something is better than nothing. This pause may
also help to calm the subject, as well as acclimate it to
the shutter noise.
- By ocassionally moving parallel to the subject (approaching
more indirectly), instead of continually heading directly
toward it, you may seem less threatening to the subject.
- Many photographers advise not to continually stare at
your target, assuming that this may be construed as a predatory
approach. Look away often and try to appear more casual.
- If you judge it to be overly agitated, sit down and wait.
Allow time for it to realize you are no threat. If it goes
about normal activity, you might try once more to get a
little closer.
- If you reach your desired shooting spot and the subject
has not fled, then settle in, keeping your movements slow
and make no more movements than necessary. Sit, lie down,
or position yourself for your desired method of shooting.
Making yourself appear smaller is always a good idea. Give
the subject time to be more comfortable with your presence.
Take the time to choose your poses and shots. Learn to anticipate
what it will do next based on your observations of its activities.
This is when you often get the best photos.
- Often making an approach by crawling works well. This
is a slow and tediuos process, but works amazing well for
many ground-based birds such as shorebirds or other ground
feeders that spend much of their time walking around instead
of flitting about. Again, patience is the key, and camouflage
colors help to make you look less threatening. This smaller
profile and lack of the upright human shape should also
make you appear less threatening. Move and pause, move and
pause, just like approaching on foot.
- For water birds (both swimmers and waders) a crawling
approach not only helps get you closer, but will provide
that low angle view that works so well with water, where
there are no grasses or weeds to obstruct the shot. Low
angle shots and subject's eye level shots are more interesting
and intimate than looking down on them.
 |
 |
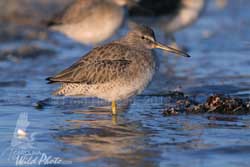
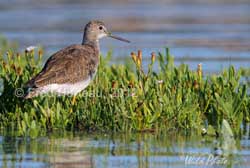
| Photos
taken from a drifting kayak |
The Field Craft Of Approaching On Water (by canoe or kayak):
Many photographers
claim that birds are less threatened by humans when they are
approached from the water. I cannot say from my own experience
whether or not that notion is valid. I've had mixed results
paddling in my kayak. The same is true from my small duckboat
(with a quiet trolling motor). Even being fully camouflaged
(boat and all) seems to make little difference. I've been five
feet from a singing Red-winged Blackbird, within 30 feet of
a feeding Osprey, and within 100 feet of an adult Bald Eagle
while paddling in my kayak. On other occasions I couldn't get
within 500 feet of either with the same boat. I'm sure the variables
listed in my article on using
camouflage in bird photography are at play here. A factor
based solely on approaching from water (whether wading or in
a boat) is not included in that list, since I have no convincing
data that the whole notion of "approaching from water" in and
of itself is a factor.
It does
appear however that if you are using a kayak, canoe or
other small boat to reach your subjects, there is a wrong way
and a right way to approach. My experience shows that a slow drifting approach will often work amazingly well.
To do this, paddle your kayak into a position some distance
from your subject to take advantage of the prevailing breeze
and/or current, allowing it alone to slowly carry you toward
the subject. From that point try to avoid paddling at all, although
an occasional slow, low angled touch up stroke to keep your
boat facing in the right direction doesn't seem to harm anything.
I keep the paddle lying crosswise in front of me and use one
hand on the paddle for the touch-up "strokes" while
keeping the camera up with the other hand. Obviously you can't
do much of a stroke with one hand on a kayak paddle, but it
can be enough to help keep the boat oriented toward the subject.
Just don't flail your paddles about in the air, which is the
whole point of this exercise. In this fashion, allow the boat
to slowly drift toward your subject - as slowly as possible.
Keep your camera up in front of your face and begin shooting
once you are at an acceptable, though not necessarily optimal
distance. Do not move around, just keep your face behind the
camera and snap away. As you drift closer the shots will get
better and tighter until you're either too close for the lens,
or the bird decides to leave.
Using this
method (with neither the boat nor myself camouflaged at all)
I've actually drifted until the bow beached itself on the sandbar
only 5 to 10 feet from where the birds were gathered. Though
some left as I approached, many of them stayed, and I sat there
picking and choosing shots until I tired of it. I'm sure it
all depends on the particular species, the conditions and location,
and other factors. In any event, common sense would tell you
it should work better than flailing an 8-foot stick about in
the air while approaching. Who wouldn't want to get out of the
way of anything such as that?
One last
note here on the kayak camouflage. The purpose of (and best
use for) the camouflage is when you've picked a good location
and "parked" the boat in order to sit and wait for your subjects
to come by, essentially using it as a sort of blind. Just as
when on foot, stalking your subject in a kayak isn't necessarily
the best use of camouflage, though it hopefully helps you appear
more "natural", and therefore less of a threat. I think the
movements of arms and paddle does more to attract the birds
attention than anything else. My point is that you should never
underestimate the issue of unnecessary movement when approaching
and photographing birds, whether in your vehicle, on foot, or
in a boat. Movement is the "big giveaway".
|
|
 |
|
 |
